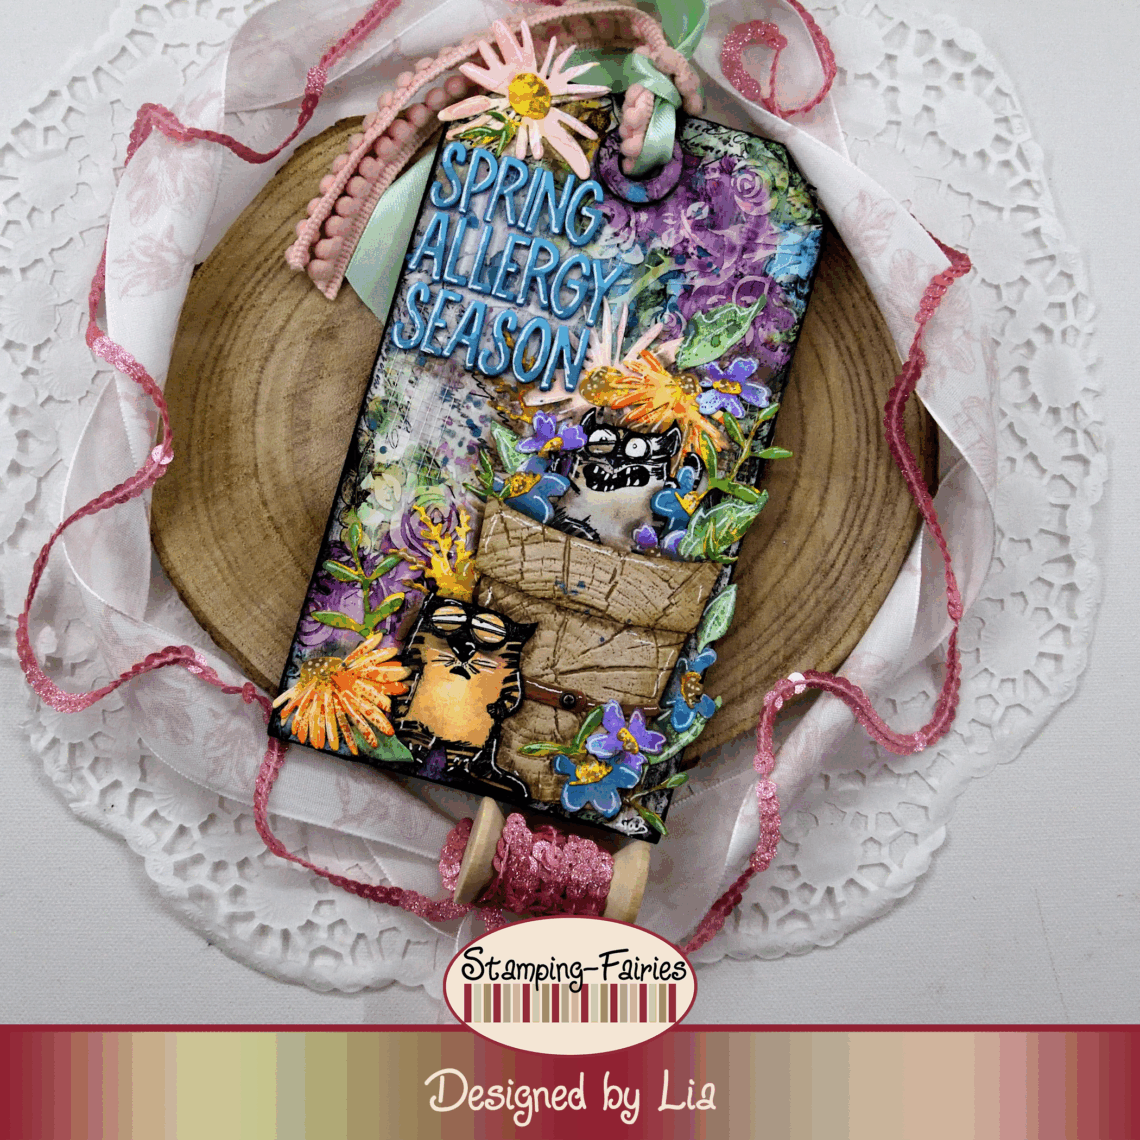
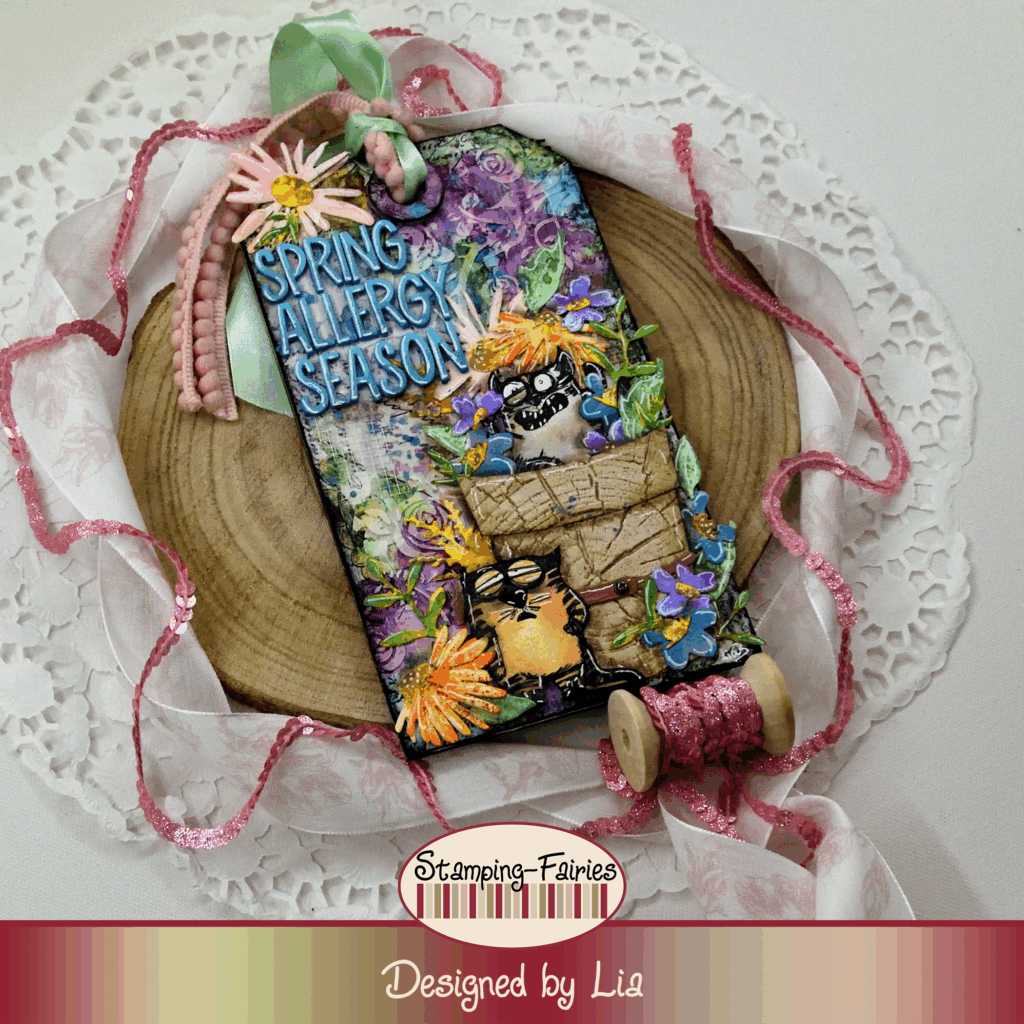
Spring Allergy Season
*German version below | Deutsche Version unten*
Hello everyone! Welcome back to another Mixed Media project. I have a very colourful project to show you today! As a person who loves flowers but has allergies, I thought I needed to commemorate this beautiful, colourful, full of allergies season! Let’s start with the materials I used:
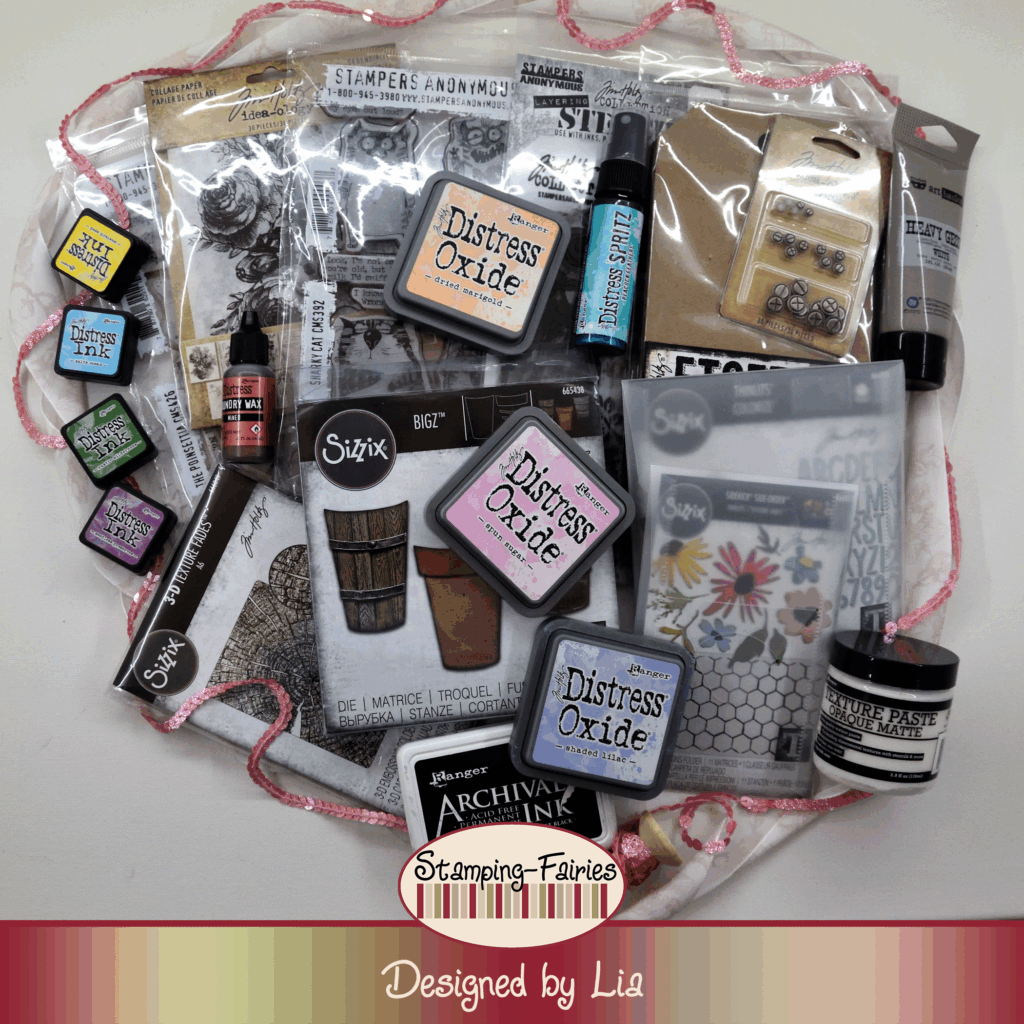
Materials
(If something is not in stock,
please simply click on “Product reminder”/ “Produkterinnerung”)
- Tim Holtz – Mini Thickboard Tag 11,5 x 20 cm
- Finnabair Art Basics – Heavy Gesso White (Tube)
- Tim Holtz Collage Paper – Serendipity
- Ranger Multi Medium – Matte
- Prima Marketing – Art Basics – Gesso Clear
- Mini Distress Ink Pad
- Tim Holtz Layering Stencil – Thorned
- Ranger Texture Paste – Opaque Matte
- Tim Holtz Stamp Set – The Poinsettia
- Archival Ink – Jet Black
- Distress Spritz – Peacock Feathers
- Sizzix Sidekick Side-Order Thinlits/ Texture Fades – Vault Floristry
- Ranger – Tim Holtz Distress Oxide Pads
- Tim Holtz Stamp Set – Snarky Cat
- Sizzix Tim Holtz Bigz – Potted#2
- Sizzix Tim Holtz – 3-D Texture Fades – Woodgrain
- Distress – Foundry Wax – Mined
- Tim Holtz- Screw Heads
- Sizzix Tim Holtz Thinlits – Santa Greetings, Colorize
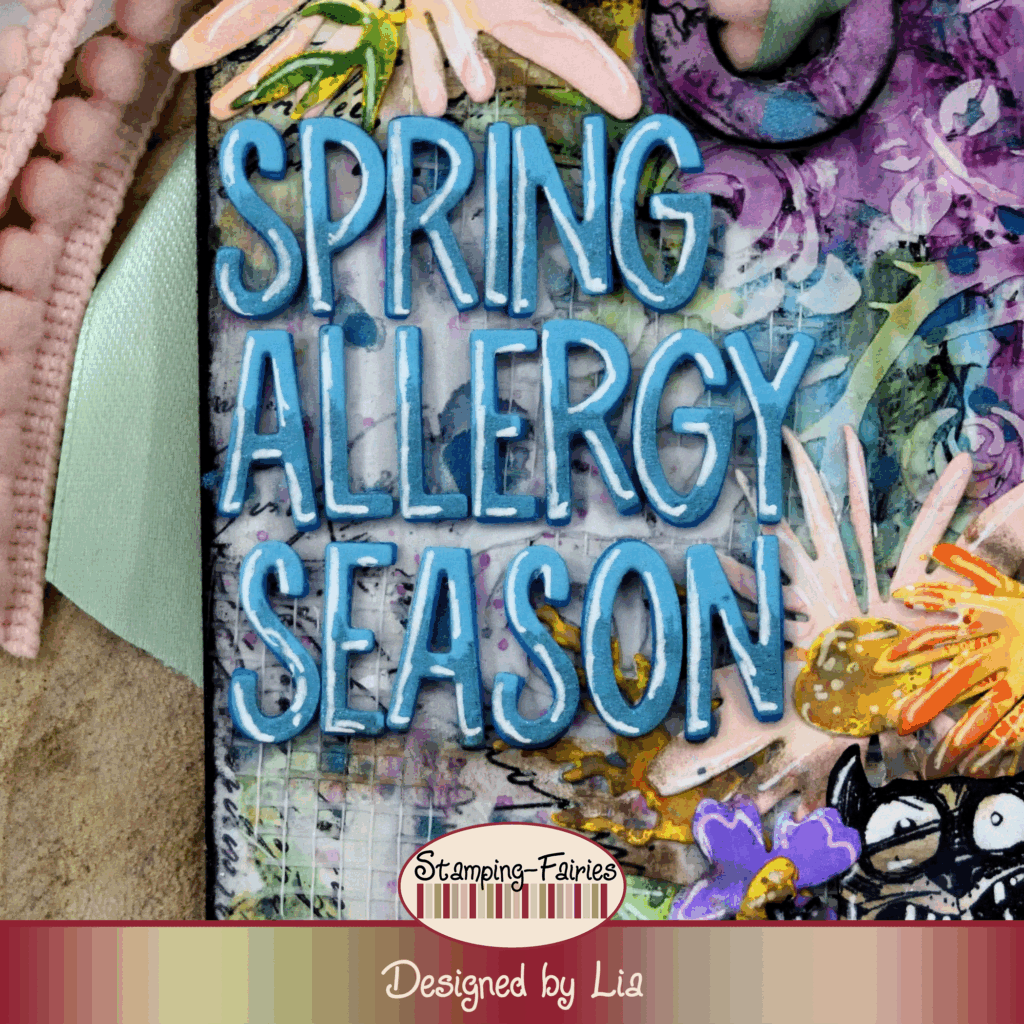
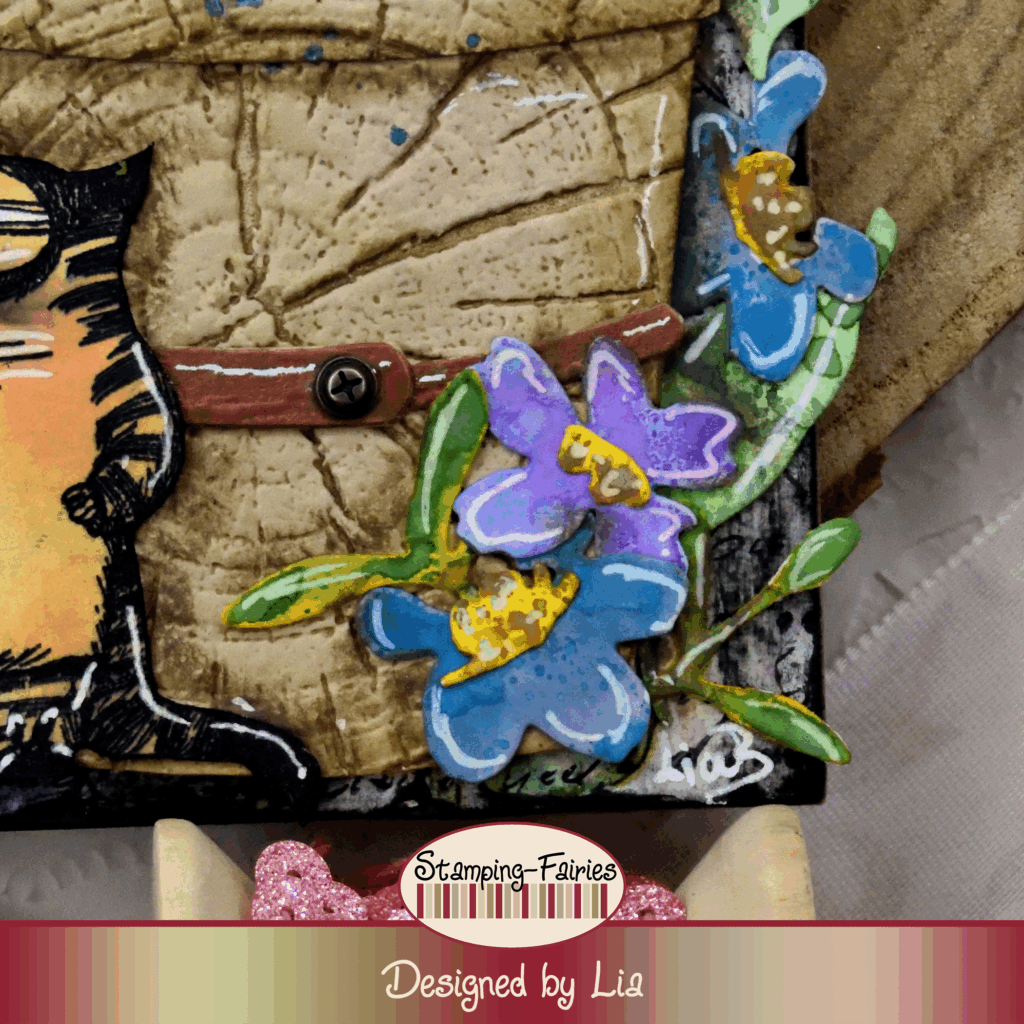
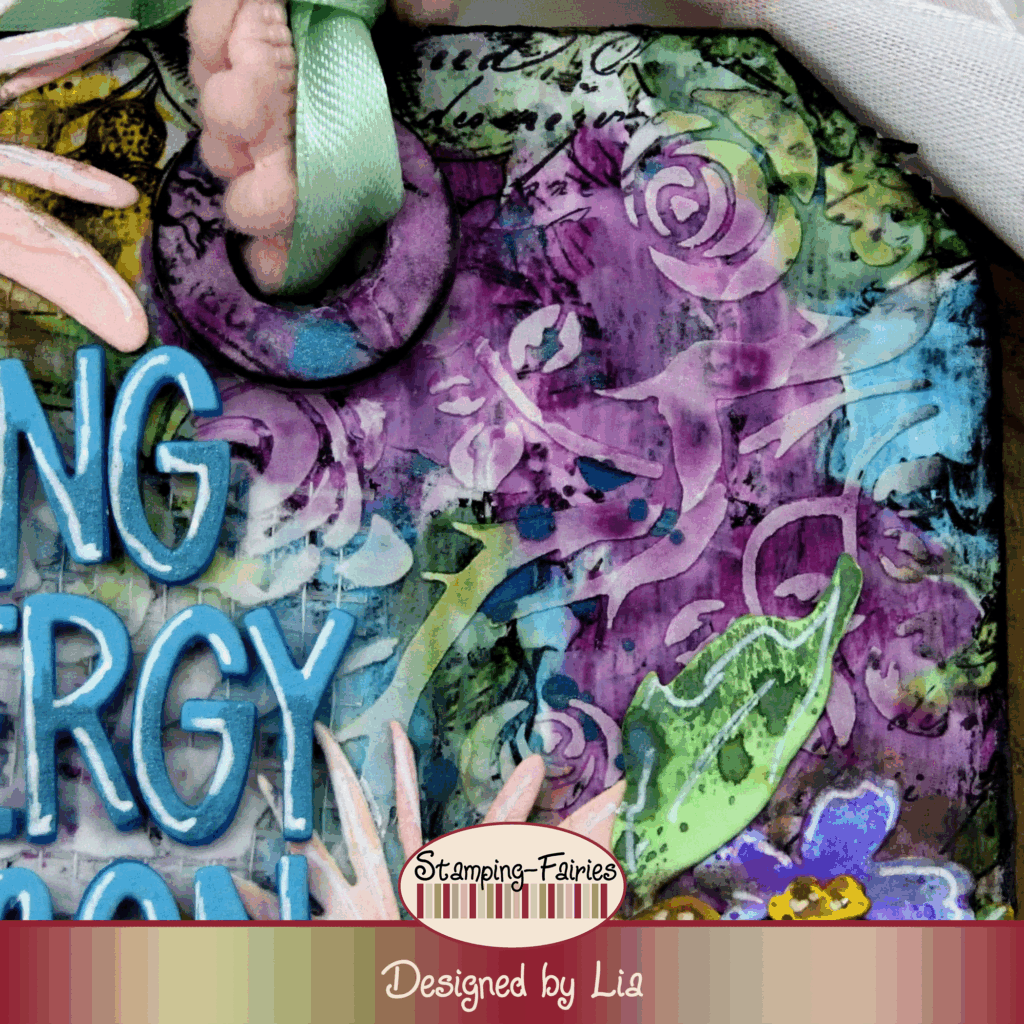
Today’s project is made on an Etcetera Thickboard Tag. I started by applying a good layer of white Gesso. Once the Gesso was dry, I covered the Tag with collage paper. I used two designs from the Idea-Ology Serendipity Collage Paper pack, one with flowers and one with text, and I glued them on the Tag using Multi Medium Matte. I dried the glue and then I covered everything with clear Gesso. I wanted to colour the flowers with inks, but the Distress Oxide inks (I normally use) are very opaque and chalky, and they would obscure the lines too much, which didn’t really matter in the end, but I did not know that at the point. So, I used Distress inks in various colours and I coloured all the flowers. At this point, I just wanted to leave the Tag as it was. It was beautiful, flowery and colourful. But this is not what I do, is it? So, I used some white gesso and a spatula, to knock the colours back a little bit and obscure the flower design (the thing I didn’t want to do in the beginning… please, do not laugh too much!). Time to add some texture. First, I added small pieces of dry wall tape all over the Tag, just to give a different kind of texture. Then, I used the Thorned Layering stencil with Ranger Opaque Matte Texture Paste on the upper right and the lower left corner of my Tag. I left the Paste to dry and then I added some text details around the edges of the Tag, using a stamp from the Tim Holtz The Poinsettia stamp set with Jet Black archival ink. I used the same ink to darken the edges of the Tag and then I splattered my project with Peacock Feathers Distress Spritz. And with that, my background was ready!

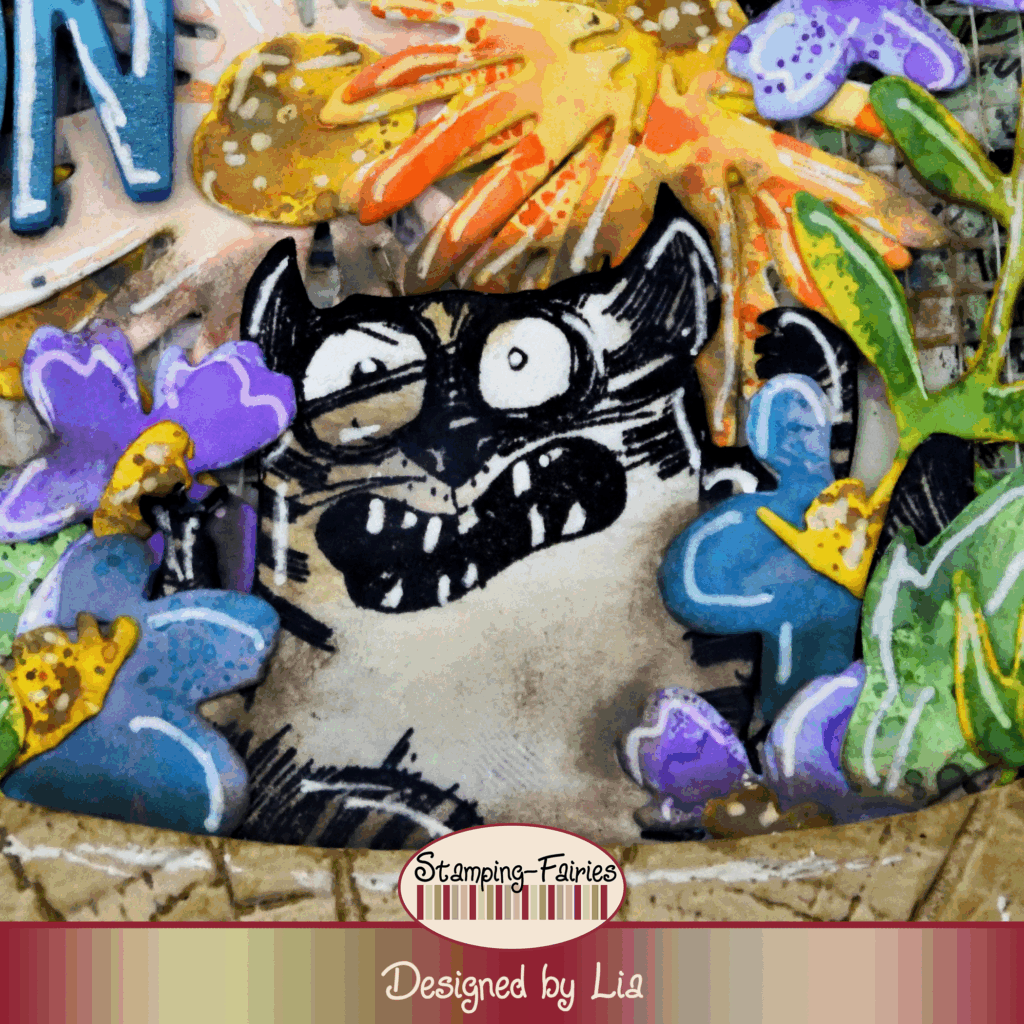
Time to prepare my images. I knew I wanted colourful flowers. So, I used the Sizzix Vault Floristry Sidekick Side-Order set and I cut a lot of flowers out of watercolour paper. Then I used Distress Oxide inks in various colours to colour my flowers with the ink smooshing technique. To bind the project with the idea of allergies, I needed someone to have an allergic reaction. Have you seen the cats from the Tim Holtz Snarky Cat stamp set? They are amazing. They look so irritated and… well…snarky! So, I chose two of the cats, stamped them with my Jet Black Archival ink and coloured them with Distress Oxide inks. One cat is grey and the other is a typical orange cat. I still needed a pot for my flowers. I used the Sizzix Potted #2 Bigz set to cut the pieces of the pot and then I dry embossed them with the Sizzix Tree Rings 3D Texture Fade Folder. This Embossing Folder does not exist in the shop. I have linked the Woodgrain 3D Texture Fade Folder, which could actually look a little better on this project. But the Tree Rings is what I had in hand, so I used that. I applied Ground Espresso Distress Oxide ink in the Embossing Folder before I put my pieces in, so the design would also have colour. This pot was a little too tall, so I cut it to make it a little shorter. I put the pieces together and then I covered the bindings of the pot with Mined Foundry Wax. I love this colour of Foundry Wax because it looks so much like rust! Just remember! Foundry Wax needs to be heat sets, otherwise it turns into something like powder and falls off. So, I heat set the Foundry Wax and once it was set, I added an Idea-Ology Screw Head on the binding. I placed one cat in the pot, along with my flowers and the other one in front of the pot. They both look just perfect, don’t you think?
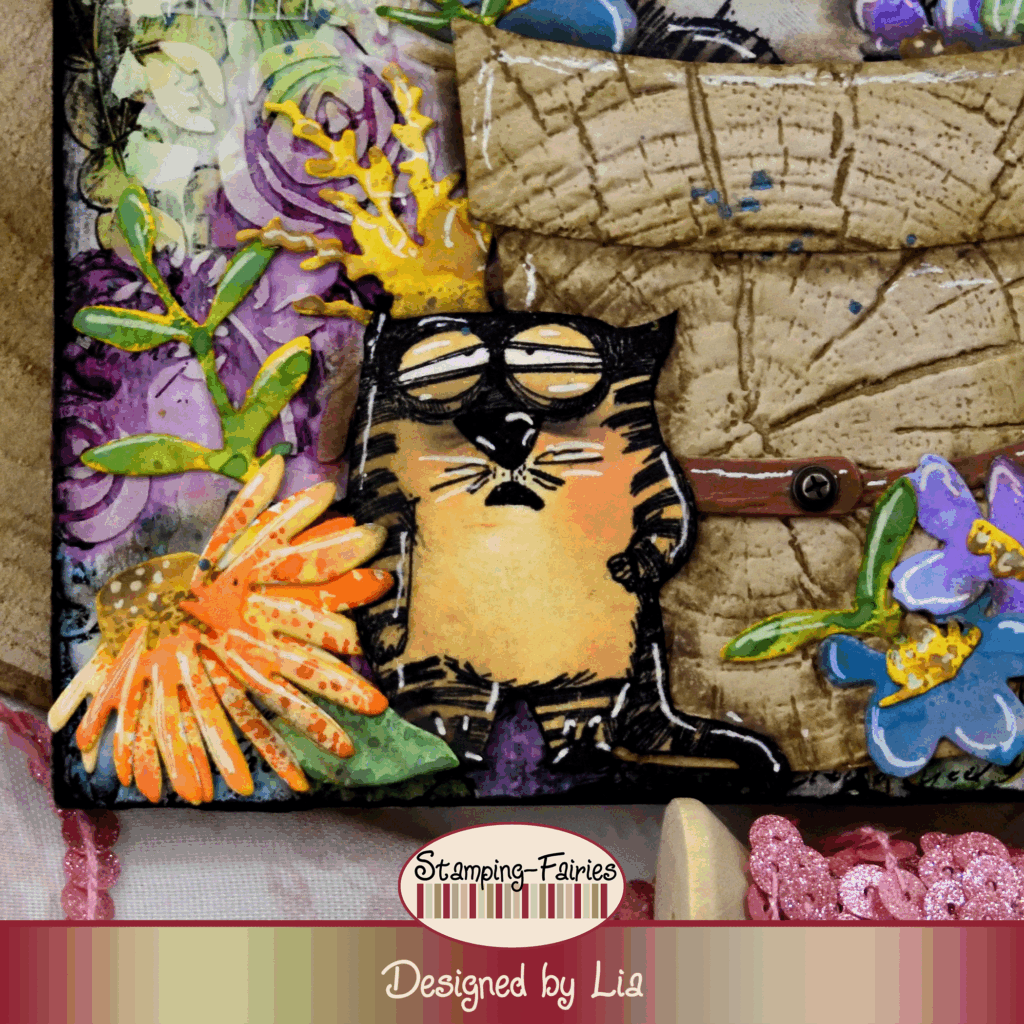
My sentiment is cut with the alphabet dies from the Sizzix Santa Greetings, Colorize Thinlits set. I cut it out of blue cardstock and blue fun foam and I stacked the letters to create more depth. I also added a little bit of Peacock Feathers Distress Spritz on the bottom parts of the letters. As a last little detail, I added some white highlights on all my elements, using a white pen.
And that was the project for today! Getting inky while sneezing all the time, is not so much fun, but it can create some really funny moments… I had a lot of fun making this project. I especially like the cats. They look sufficiently irritated, don’t you think? I really hope you like today’s project! I hope you got inspired! We will see each other again next Monday! Until then, stay creative and have fun!
*Deutsche Version*
Hallo zusammen! Willkommen zurück zu einem weiteren Mixed-Media Projekt. Ich habe heute ein farbenfrohes Projekt für euch! Als Blumenliebhaberin mit Allergien dachte ich, ich müsste diese schöne, farbenfrohe und allergiereiche Jahreszeit unbedingt würdigen! Beginnen wir mit den Materialien, die ich verwendet habe:
Materialien
(wenn etwas nicht auf Lager ist,
bitte einfach auf „Produkterinnerung“ klicken)
- Tim Holtz – Mini Thickboard Tag 11,5 x 20 cm
- Finnabair Art Basics – Heavy Gesso White (Tube)
- Tim Holtz Collage Paper – Serendipity
- Ranger Multi Medium – Matte
- Prima Marketing – Art Basics – Gesso Clear
- Mini Distress Ink Pad
- Tim Holtz Layering Stencil – Thorned
- Ranger Texture Paste – Opaque Matte
- Tim Holtz Stamp Set – The Poinsettia
- Archival Ink – Jet Black
- Distress Spritz – Peacock Feathers
- Sizzix Sidekick Side-Order Thinlits/ Texture Fades – Vault Floristry
- Ranger – Tim Holtz Distress Oxide Pads
- Tim Holtz Stamp Set – Snarky Cat
- Sizzix Tim Holtz Bigz – Potted#2
- Sizzix Tim Holtz – 3-D Texture Fades – Woodgrain
- Distress – Foundry Wax – Mined
- Tim Holtz- Screw Heads
- Sizzix Tim Holtz Thinlits – Santa Greetings, Colorize
Das heutige Projekt ist auf einem Etcetera Thickboard Tag entstanden. Ich habe zunächst eine dicke Schicht weißes Gesso aufgetragen. Nachdem das Gesso getrocknet war, habe ich das Tag mit Collagepapier überzogen. Ich habe zwei Designs aus dem Idea-Ology Serendipity Collage Paper Set verwendet, eines mit Blumen und eines mit Text, und sie mit Multi Medium Matte auf das Tag geklebt. Als der Kleber getrocknet war, habe ich alles mit klarem Gesso überzogen. Ich wollte die Blumen mit Tinte kolorieren, aber die Distress Oxide Tinten (die ich normalerweise verwende) sind sehr deckend und kreidig und würden die Linien sehr verwischen. Das wäre letztendlich nicht so wichtig gewesen, aber das wusste ich da noch nicht. Jedenfalls habe ich Distress Tinten in verschiedenen Farben verwendet und alle Blumen koloriert. An diesem Punkt wollte ich das Tag einfach so lassen, wie es war. Es war wunderschön, blumig und farbenfroh. Aber das ist nicht mein Ding, oder? Also habe ich etwas weiße Gesso und einen Spachtel verwendet, um die Farben etwas abzuschwächen und das Blumenmuster zu verdecken (was ich anfangs nicht wollte … bitte nicht zu viel lachen!). Zeit, etwas Struktur hinzuzufügen. Zuerst habe ich überall auf dem Etikett kleine Stücke Trockenbauklebeband angebracht, um eine andere Art von Struktur zu erzeugen. Dann habe ich die Thorned Layering Schablone mit Ranger Opaque Matte Texture Paste auf der oberen rechten und der unteren linken Ecke meines Etiketts verwendet. Ich habe die Paste trocknen lassen und dann mit einem Stempel aus dem Tim Holtz „The Poinsettia“ Stempelset und Jet Black Archival Tinte einige Textdetails an den Rändern des Etiketts hinzugefügt. Ich habe die gleiche Tinte verwendet, um die Ränder des Etiketts abzudunkeln, und dann habe ich mein Projekt mit Peacock Feathers Distress Spritz bespritzt. Und damit war mein Hintergrund fertig!

Zeit, meine Bilder vorzubereiten. Ich wusste, ich wollte bunte Blumen. Also habe ich das Sizzix Vault Floristry Sidekick Side-Order Set verwendet und viele Blumen aus Aquarellpapier ausgeschnitten. Anschließend habe ich Distress Oxide Tinten in verschiedenen Farben verwendet, um meine Blumen mit der Ink-Smooshing Technik zu kolorieren. Um das Projekt mit dem Thema Allergien zu verbinden, brauchte ich jemanden, der eine allergische Reaktion hat. Kennt ihr die Katzen aus dem Tim Holtz Snarky Cat Stempelset? Sie sind unglaublich. Sie sehen so gereizt und … na ja … bissig aus! Also habe ich zwei der Katzen ausgewählt, sie mit meiner Jet Black Archival Tinte gestempelt und mit Distress Oxide Tinten koloriert. Eine Katze ist grau, die andere ist eine typische orange Katze. Mir fehlte noch ein Topf für meine Blumen. Ich habe die Stücke aus dem Sizzix Potted #2 Bigz Set ausgeschnitten und sie anschließend mit dem Sizzix Tree Rings 3D Texture Fade Folder trockengeprägt. Dieser Prägefolder ist nicht im Shop erhältlich also habe ich den Woodgrain 3D Texture Fade Folder verlinkt, der bei diesem Projekt tatsächlich noch etwas besser aussehen könnte. Aber ich hatte den Tree Rings zur Hand, also habe ich den verwendet. Ich habe Ground Espresso Distress Oxide Tinte in den Prägefolder aufgetragen, bevor ich meine Teile hineingelegt habe, damit das Design auch Farbe bekommt. Dieser Topf war etwas zu hoch, also habe ich ihn gekürzt. Ich habe die Teile zusammengesetzt und dann den Binder des Topfes mit Mined Foundry Wax überzogen. Ich liebe diese Farbe von Foundry Wax, weil sie so sehr nach Rost aussieht! Aber Achtung: Foundry Wax muss heiß ausgehärtet werden, sonst wird es zu etwas wie Pulver und fällt ab. Also habe ich das Foundry Wax heiß ausgehärtet und nachdem es ausgehärtet war, einen Idea-Ology Schraubenkopf auf den Binder gesetzt. Ich habe eine Katze zusammen mit meinen Blumen in den Topf gesetzt und die andere davor. Sie sehen beide einfach perfekt aus, findet ihr nicht?
Mein Spruch ist mit den Alphabet Stanzen aus dem Sizzix Santa Greetings, Colorize Thinlits Set ausgestanzt. Ich habe ihn aus blauem Karton und blauem Fun Foam ausgeschnitten und die Buchstaben übereinandergelegt, um mehr Tiefe zu erzeugen. Außerdem habe ich die unteren Teile der Buchstaben mit etwas Peacock Feathers Distress Spritz versehen. Als letztes Detail habe ich alle meine Elemente mit einem weißen Stift mit weißen Highlights versehen.

Und das war das Projekt für heute! Ständiges Niesen macht zwar nicht so viel Spaß, kann aber für echt lustige Momente sorgen… Ich hatte viel Spaß bei diesem Projekt. Besonders die Katzen gefallen mir. Sie sehen ziemlich genervt aus, findet ihr nicht? Ich hoffe sehr, dass euch das heutige Projekt gefällt! Ich hoffe, ihr habt euch inspirieren lassen! Wir sehen uns nächsten Montag wieder! Bis dahin bleibt kreativ und habt Spaß!

Es wird Sommer!