Happy Holidays 2025
*German version below | Deutsche Version unten*
Hello everyone! Welcome back to another Mixed Media project. For today’s project, I was inspired by Tim Holtz, but I also did my own crazy things. I made a Christmas – Winter window. Let’s start with the materials I used:
Materials
(If something is not in stock,
please simply click on “Product reminder”/ “Produkterinnerung”)
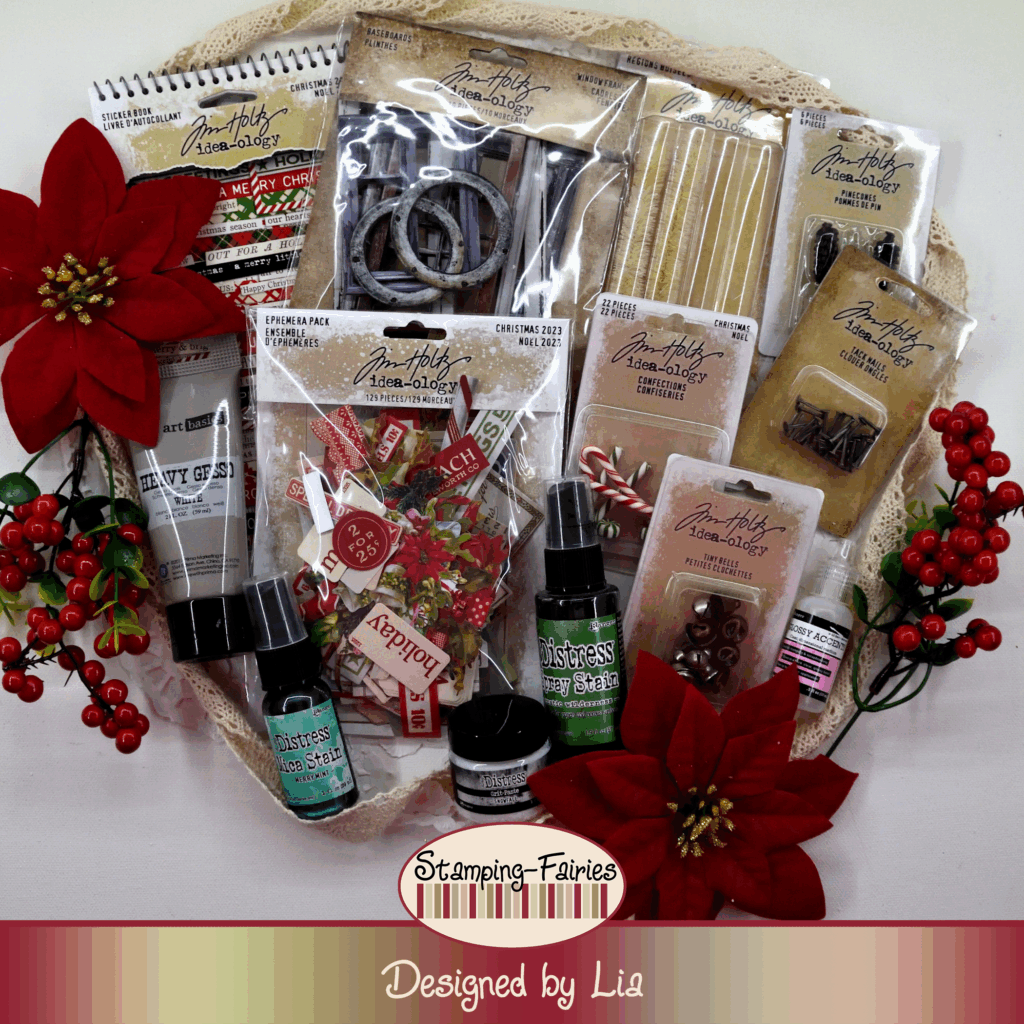
- A picture frame
- Finnabair Art Basic – Heavy Gesso White (Tube)
- Ranger Texture Paste Opaque Crackle
- Ranger Multi Medium – Matte
- Tim Holtz Ephemera Pack – Christmas 2023
- Distress Stickles Dry Glitter – Clear Rock Candy
- Distress – Mica Flakes
- Tim Holtz – Baseboards Window Frames
- Hot Glue
- Tim Holtz Distress Grit Paste – Snowfall
- Tim Holtz – Woodlands – Garland
- Distress Spray Stain – Rustic Wilderness
- Distress Mica Stain – Merry Mint
- Tim Holtz idea-ology – Tack Nails
- Tim Holtz idea-ology – Pinecones
- Ranger Glossy Accents
- Tim Holtz idea-ology – Tiny Bells
- Tim Holtz idea-ology – Confections – Christmas
- Tim Holtz Sticker Book – Christmas 2024
- Tim Holtz – idea-ology – Droplets – Christmas
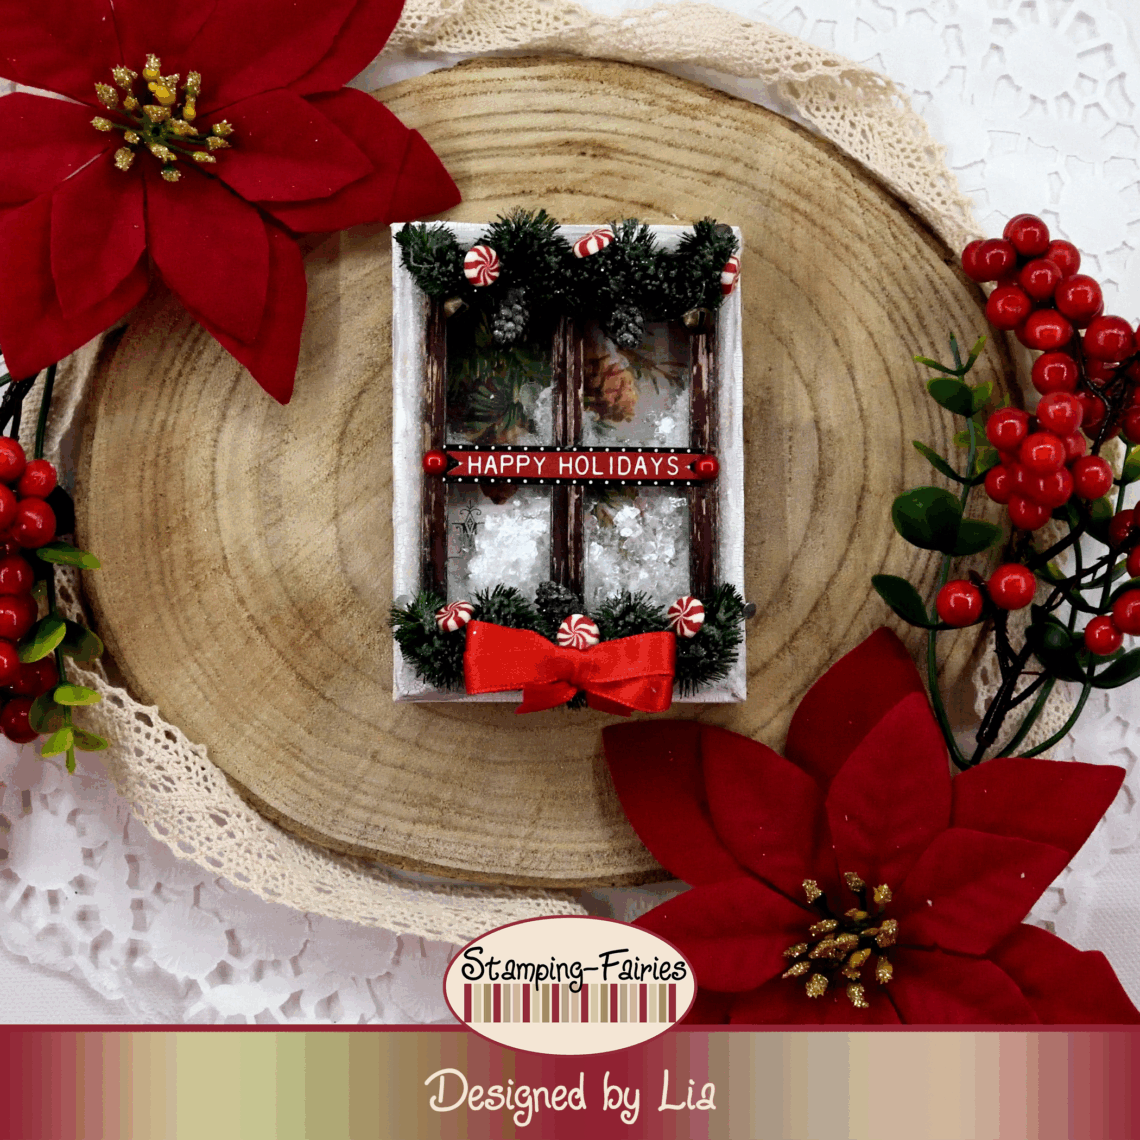
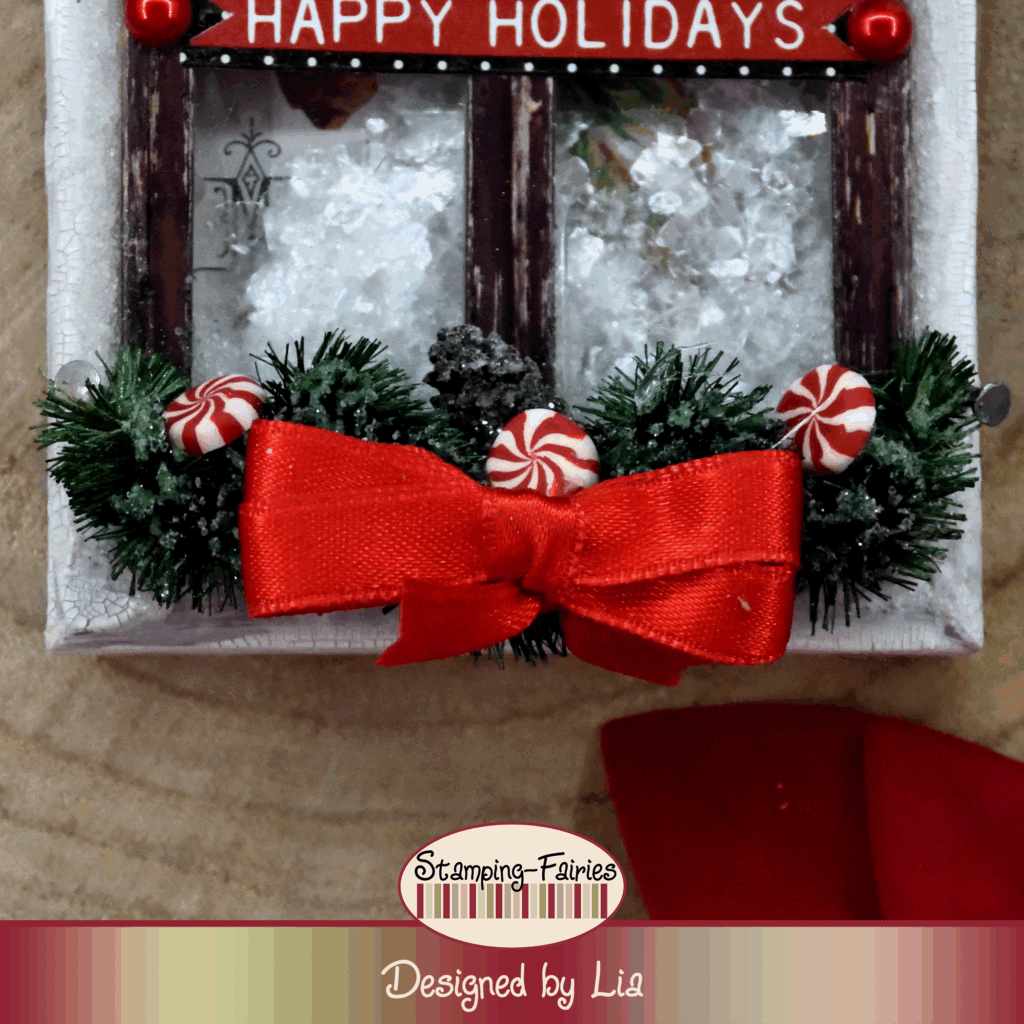
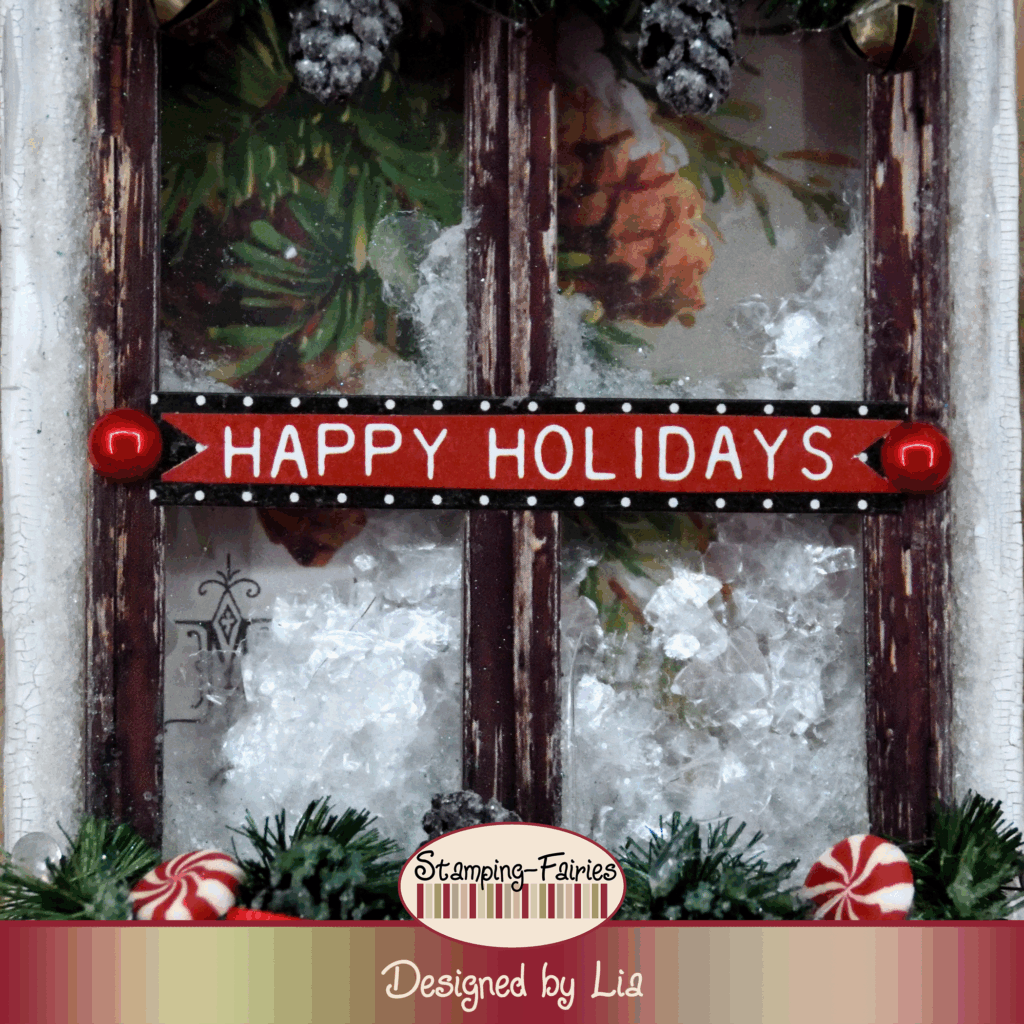
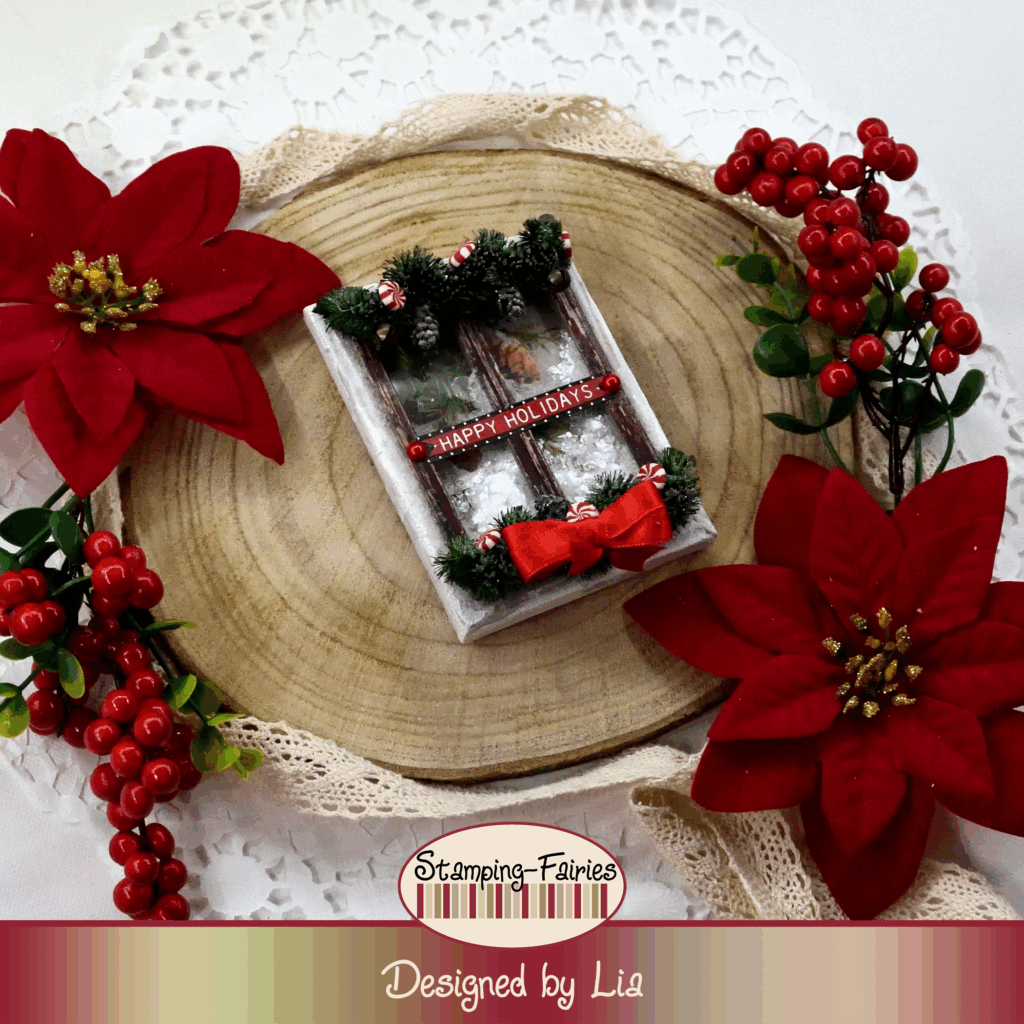
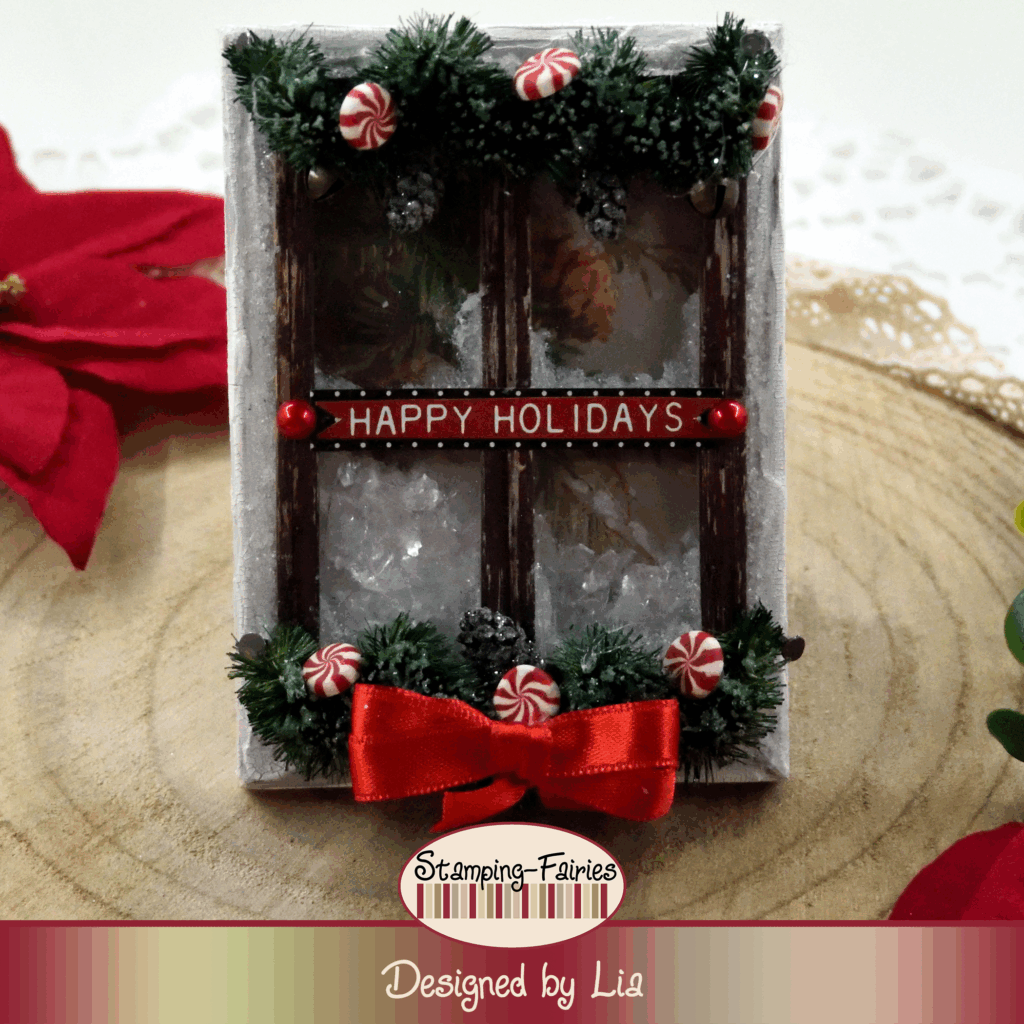
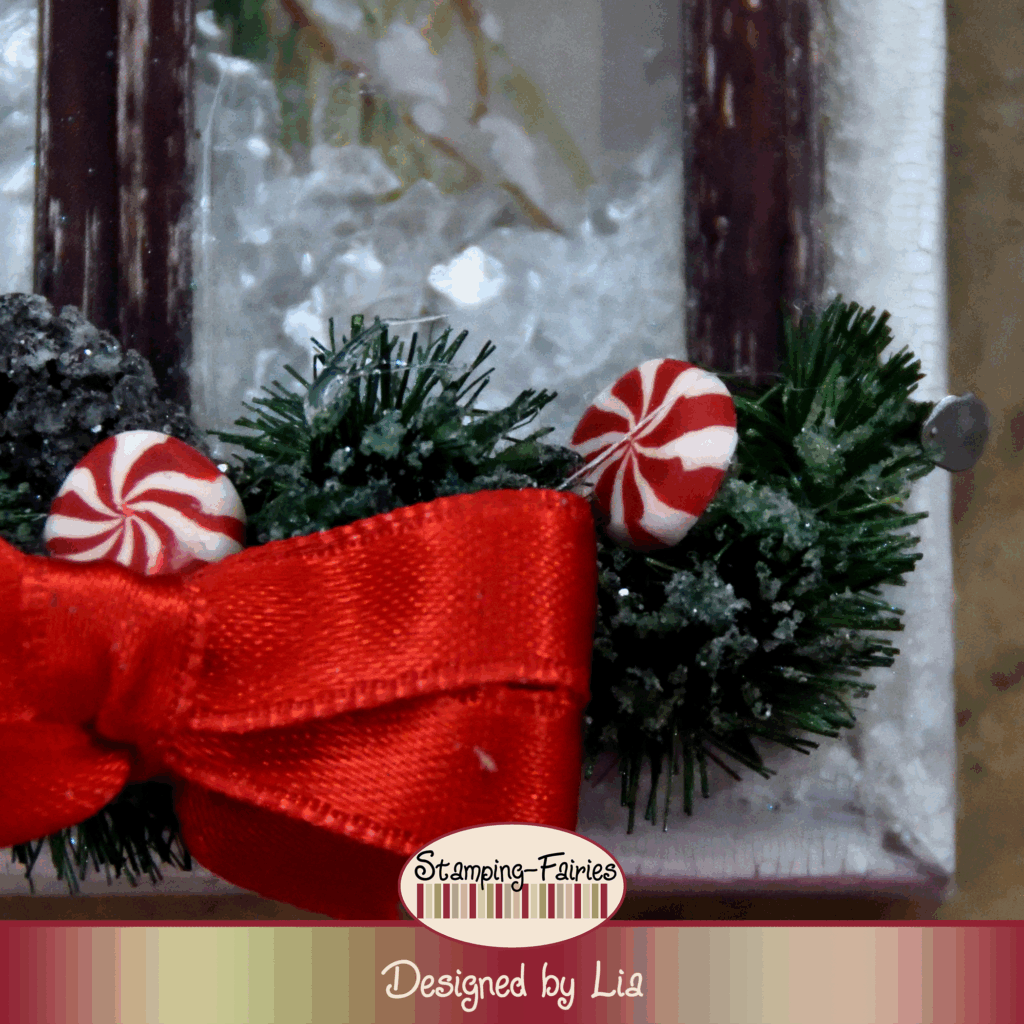
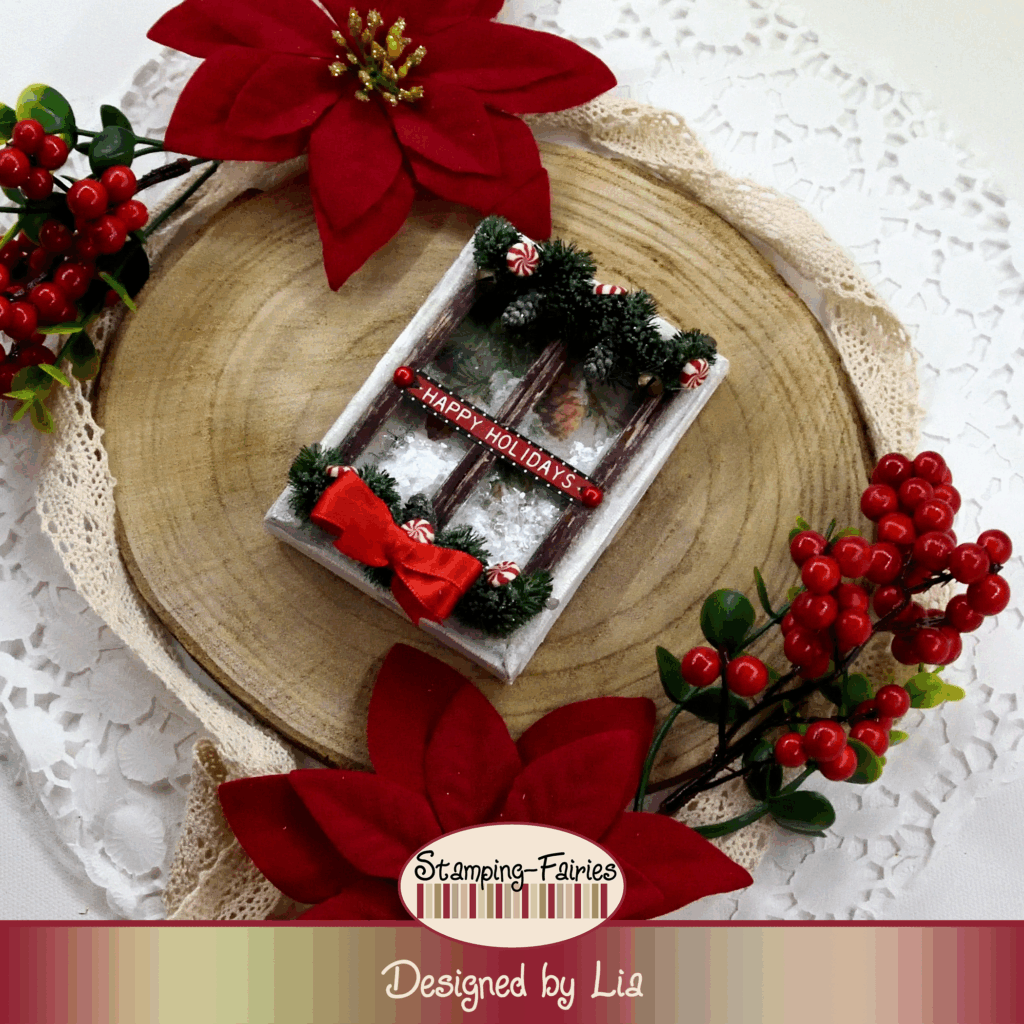
My base for this project is a picture frame. It is about 11 x 8 cm. It is made of wood but the colour didn’t match with the window I wanted to use, so I covered it with white Gesso. Then I applied a good layer of Ranger Texture Crackle Paste on it. For my background image (the image in the picture frame), I used a piece from the Idea-Ology Christmas 2023 Ephemera pack and I glued it in the picture frame using Multi Medium Matte. Once the glue was dry, I added some Distress Rock Candy Glitter and some Distress Mica Flakes right on top of my image. I chose a window from the Idea-Ology Window Frames Baseboards and I added a piece of acetate to it. Then I added it to the picture frame, above everything else. In this way, I created a shaker. I used hot glue to glue the window, because it had to be done fast. I also used the hot glue on the back side of the picture frame, just to seal everything in and make sure that all the glitter will stay inside the shaker. Once all the glue had dried, I added some Ranger Snowfall Grit Paste around the window and on the edges of the „glass“ parts. And with that, my base piece was done.
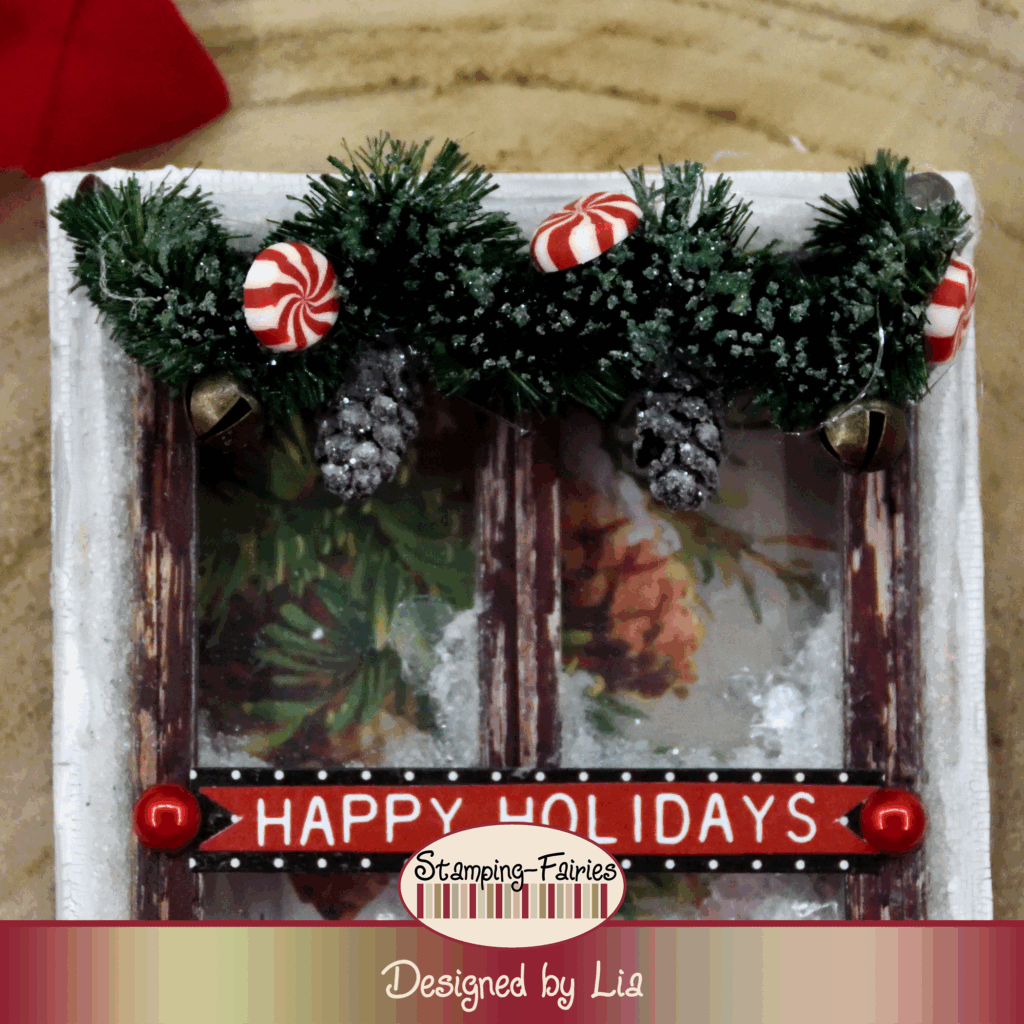
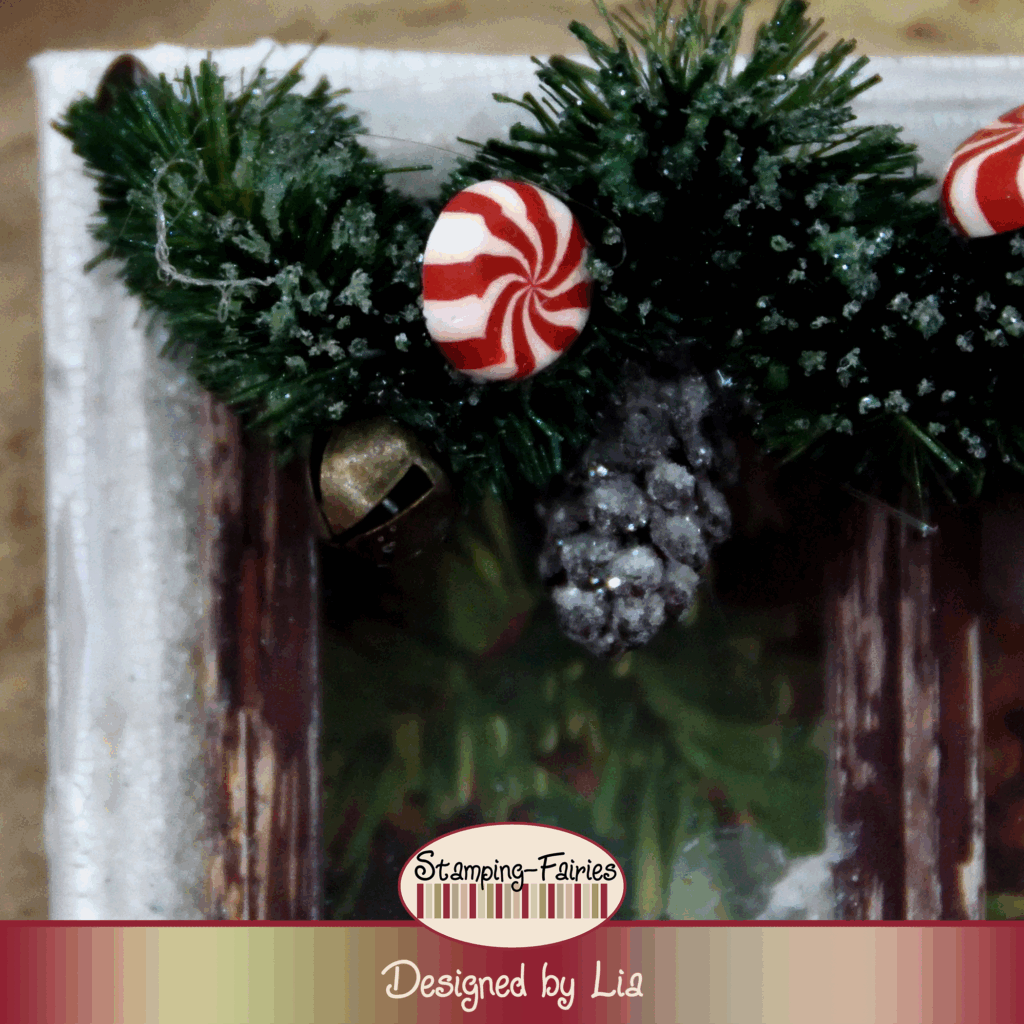
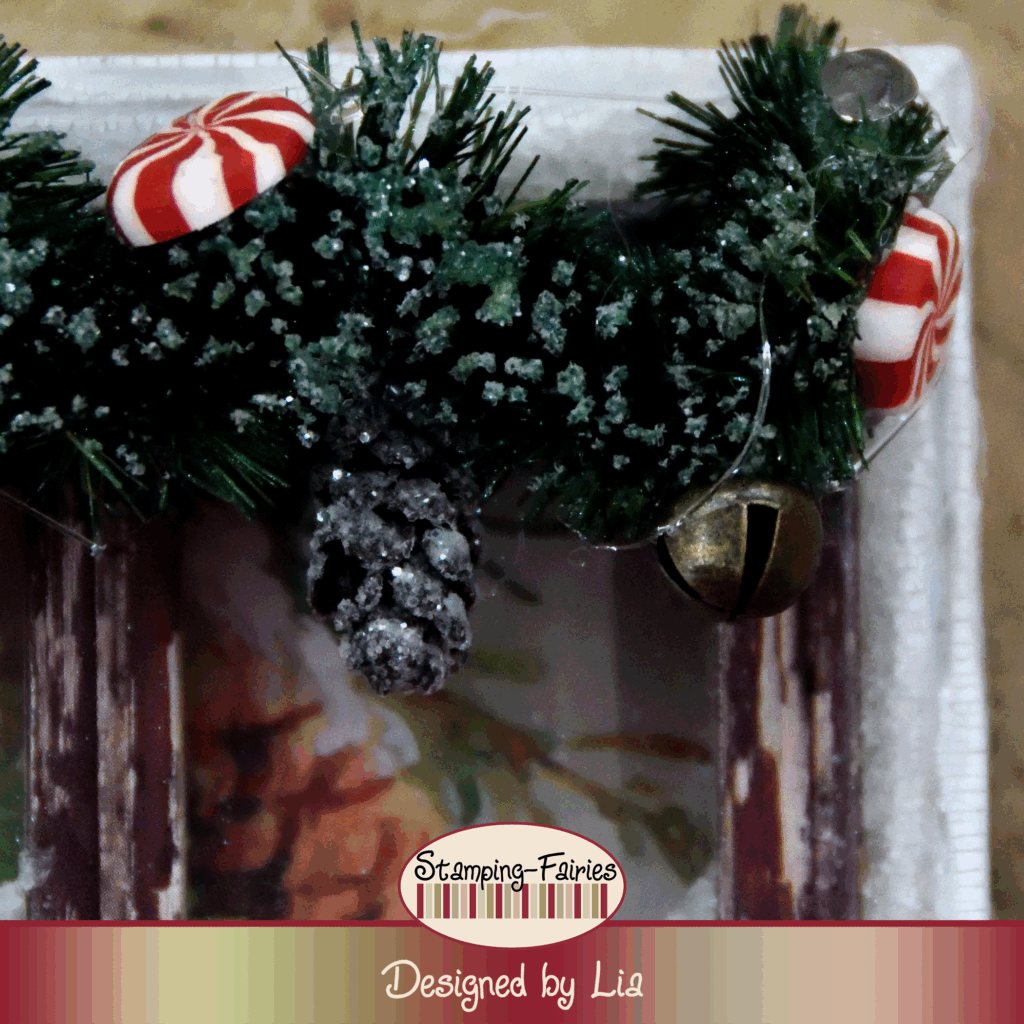
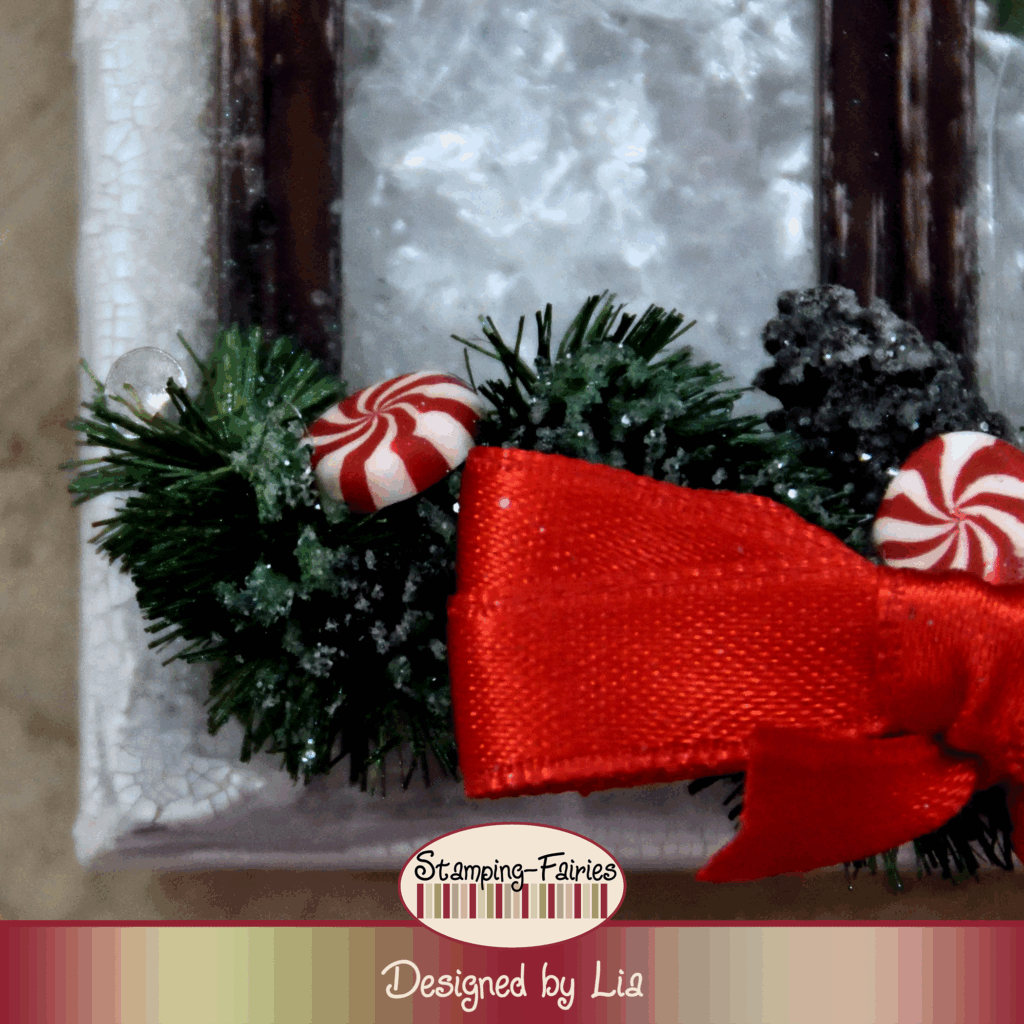
Time to prepare all of my window decorations! I used two garland pieces from the Idea-Ology Garland Woodlands pack. I used Rustic Wilderness Distress Stain spray and Merry Mint Distress Mica Stain spray to colour the garlands, I dried them and then I shaped them. I used a small brush to add some Glossy Accents on the garlands and then I sprinkled them with Distress Rock Candy glitter. I used the hot glue to attach them to my window. Next was the pinecones. I used three pinecones from the Idea-Ology Pinecones pack and I covered them with Rock Candy Glitter, just like I did with the garlands. Next, I chose some candy minds and some tiny bells, from the Idea-Ology Christmas Confections and the Idea-Ology Tiny Bells packs. I added them to my garlands using hot glue. Then I thought that my garlands needed something to be tied to. So, I got four nails from the Idea-Ology Tack Nails pack and I added one on every corner, just to make it look like they were there to hold the garlands.
My sentiment comes from the Idea-Ology Christmas 2024 Sticker Book. I chose a red sentiment stripe and I glued it on a black stripe with white dots. I placed it on the middle of my window. The sentiment says: „Happy Holidays“, just perfect for my Christmas window! I thought that I needed something more, something with a bright colour. So, I added two red pearls from the Idea-Ology Christmas Droplets pack.
And that was the project for today! I had so much fun building this window! Tim Holtz created a window with a wreath on it. I used the garlands as garlands. We can take inspiration from others and use it to make something of our own. I am really happy with my window! I really hope you like today’s project! I hope you got inspired! We will see each other again next Monday! Until then, stay creative and have fun!
*Deutsche Version*
Hallo zusammen! Willkommen zurück zu einem weiteren Mixed-Media Projekt. Für das heutige Projekt habe ich mich von Tim Holtz inspirieren lassen, aber auch meine eigenen verrückten Ideen umgesetzt. Ich habe ein Weihnachts-Winter Fenster gestaltet. Beginnen wir mit den Materialien, die ich verwendet habe:
Materialien
(wenn etwas nicht auf Lager ist,
bitte einfach auf „Produkterinnerung“ klicken)
- Ein Bilderrahmen
- Finnabair Art Basic – Heavy Gesso White (Tube)
- Ranger Texture Paste Opaque Crackle
- Ranger Multi Medium – Matte
- Tim Holtz Ephemera Pack – Christmas 2023
- Distress Stickles Dry Glitter – Clear Rock Candy
- Distress – Mica Flakes
- Tim Holtz – Baseboards Window Frames
- Heißkleber
- Tim Holtz Distress Grit Paste – Snowfall
- Tim Holtz – Woodlands – Garland
- Distress Spray Stain – Rustic Wilderness
- Distress Mica Stain – Merry Mint
- Tim Holtz idea-ology – Tack Nails
- Tim Holtz idea-ology – Pinecones
- Ranger Glossy Accents
- Tim Holtz idea-ology – Tiny Bells
- Tim Holtz idea-ology – Confections – Christmas
- Tim Holtz Sticker Book – Christmas 2024
- Tim Holtz – idea-ology – Droplets – Christmas
Meine Basis für dieses Projekt ist ein Bilderrahmen. Er misst etwa 11 x 8 cm. Er ist aus Holz, passte aber farblich nicht zu dem Fenster, das ich verwenden wollte. Deshalb habe ich ihn mit weißem Gesso überzogen. Anschließend habe ich eine dicke Schicht Ranger Texture Crackle Paste aufgetragen. Für mein Hintergrundbild (das Bild im Bilderrahmen) habe ich ein Stück aus dem Idea-Ology Christmas 2023 Ephemera Set verwendet und es mit Multi Medium Matte in den Bilderrahmen geklebt. Nachdem der Kleber getrocknet war, habe ich etwas Distress Rock Candy Glitter und Distress Mica Flakes direkt auf mein Bild aufgetragen. Ich habe ein Fenster aus den Idea-Ology Window Frames Baseboards ausgewählt und ein Stück Acetat daraufgeklebt. Anschließend habe ich es über allem anderen auf den Bilderrahmen geklebt. So entstand ein Shaker. Das Fenster habe ich mit Heißkleber geklebt, da es schnell gehen musste. Auch die Rückseite des Bilderrahmens habe ich mit Heißkleber versiegelt, damit der gesamte Glitzer im Shaker bleibt. Nachdem der Kleber getrocknet war, habe ich etwas Ranger Snowfall Grit Paste um das Fenster und an den Rändern der Glasteile aufgetragen. Damit war mein Basisteil fertig.
Zeit, meine Fensterdekoration vorzubereiten! Ich habe zwei Girlandenstücke aus dem Idea-Ology Garland Woodlands Paket verwendet. Ich habe die Girlanden mit Rustic Wilderness Distress Stain Spray und Merry Mint Distress Mica Stain Spray gefärbt, getrocknet und dann geformt. Mit einem kleinen Pinsel habe ich den Girlanden Glossy Accents verpasst und sie dann mit Distress Rock Candy Glitzer bestreut. Mit Heißkleber habe ich sie an meinem Fenster befestigt. Als Nächstes waren die Tannenzapfen dran. Ich habe drei Tannenzapfen aus dem Idea-Ology Pinecones Paket verwendet und sie, genau wie die Girlanden, mit Rock Candy Glitzer bestreut. Als Nächstes habe ich ein paar Zuckerköpfe und Glöckchen aus den Idea-Ology Christmas Confections und Idea-Ology Tiny Bells Paketen ausgewählt. Ich habe sie mit Heißkleber an meinen Girlanden befestigt. Dann dachte ich, dass meine Girlanden noch etwas zum Festbinden brauchen. Also habe ich vier Nägel aus der Idea-Ology Tack Nails Packung genommen und an jeder Ecke einen hinzugefügt, damit es so aussah, als wären sie da, um die Girlanden zu halten.
Mein Spruch stammt aus dem Idea-Ology Christmas 2024 Stickerbuch. Ich habe einen roten Spruchstreifen gewählt und ihn auf einen schwarzen Streifen mit weißen Punkten geklebt. Ich habe ihn mittig an meinem Fenster angebracht. Der Spruch lautet: „Frohe Feiertage“, perfekt für mein Weihnachtsfenster! Ich dachte, ich brauche noch etwas mehr, etwas mit einer leuchtenden Farbe. Also habe ich zwei rote Perlen aus dem Idea-Ology Christmas Droplets Set hinzugefügt.
Und das war das Projekt für heute! Es hat mir so viel Spaß gemacht, dieses Fenster zu bauen! Tim Holtz hat ein Fenster mit einem Kranz gestaltet. Ich habe die Girlanden als Girlanden verwendet. Wir können uns von anderen inspirieren lassen und daraus etwas Eigenes machen. Ich bin echt zufrieden mit meinem Fenster! Ich hoffe sehr, dass euch das heutige Projekt gefällt! Ich hoffe, ihr habt euch inspirieren lassen! Wir sehen uns nächsten Montag wieder! Bis dahin bleibt kreativ und habt Spaß!

Under the sea