
Let it Snow
*German version below | Deutsche Version unten*
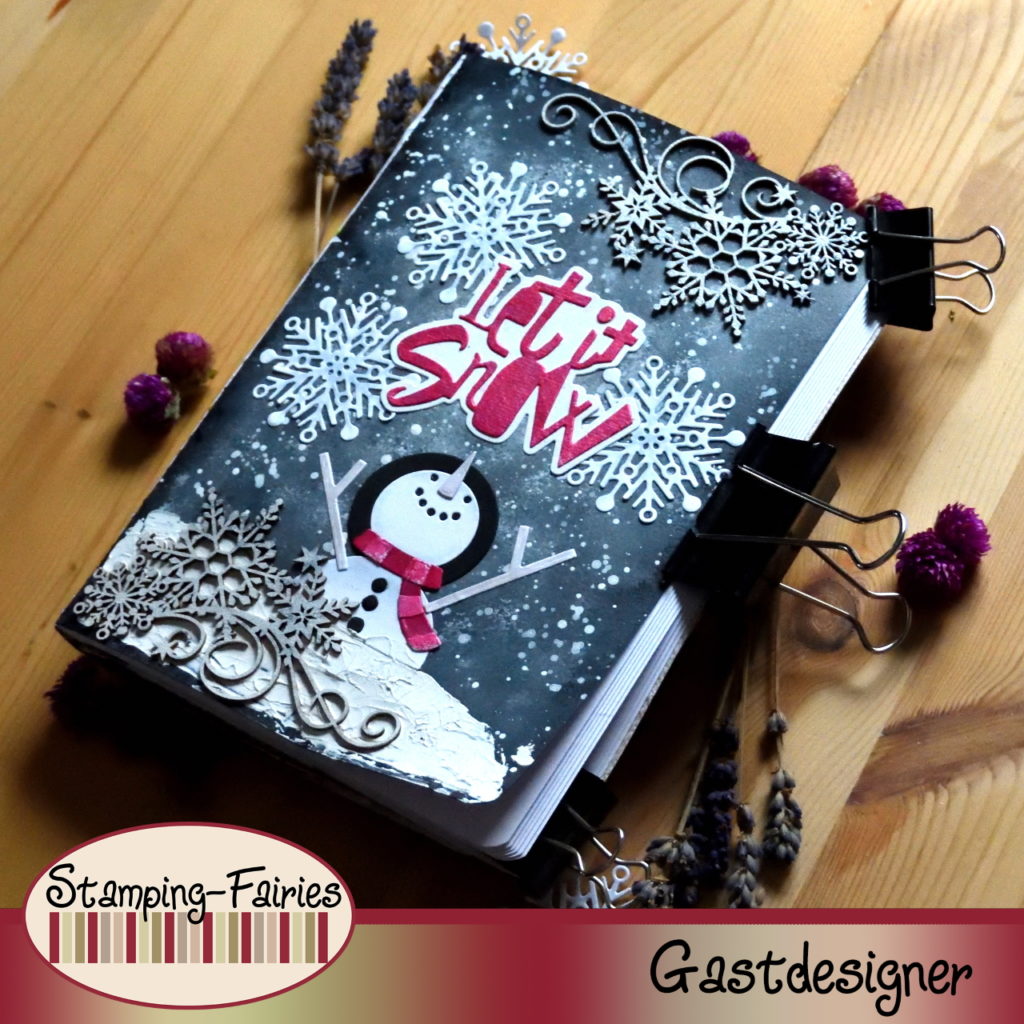
Hello everyone! I am Lia and I am here again with a new art journal page! My theme is “Let it Snow“, which is perfect, considering the weather! It has been snowing and I am loving it!!! This project is also an example for the current Stamping Fairies challenge. The theme is “Grey on grey with a splash of colour“. Let’s start with the materials I used.
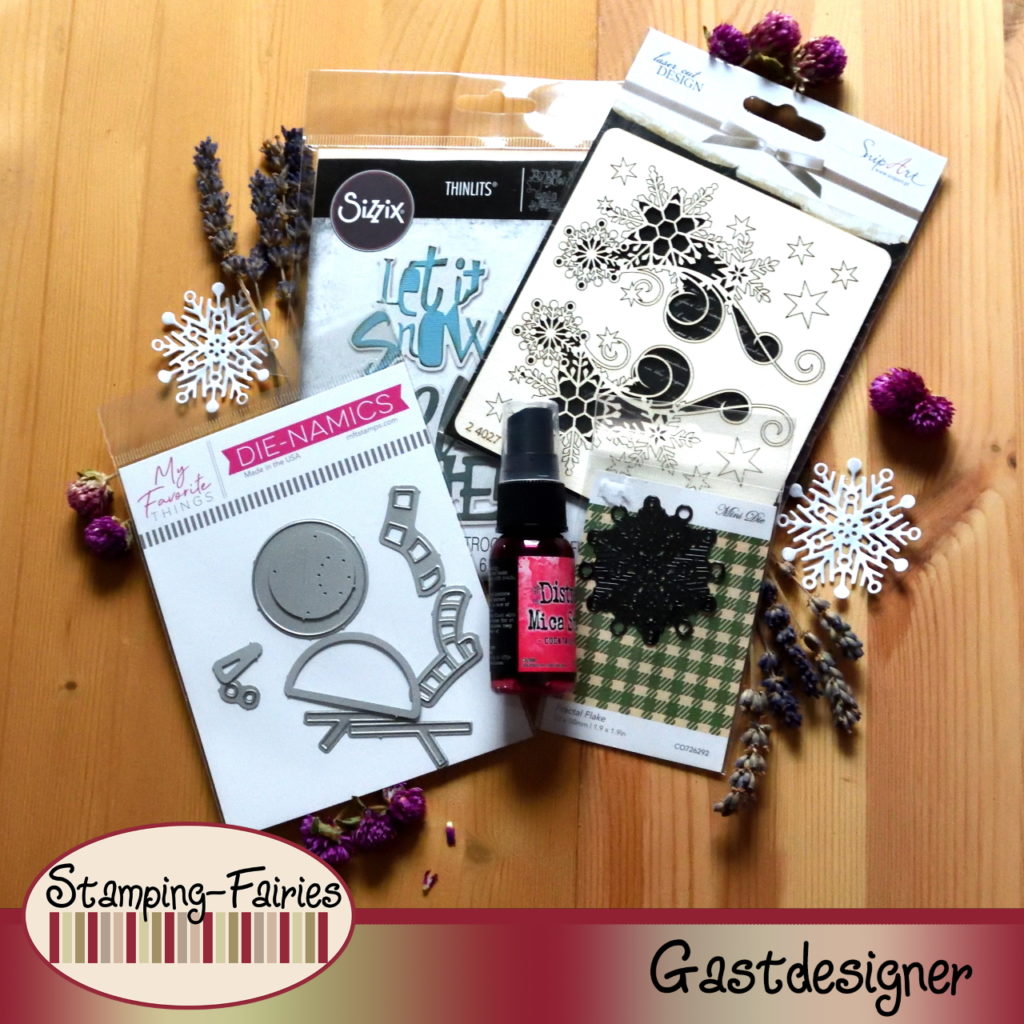
Materials
- Ranger Dylusions Paint Flip Cap Bottle
- Ranger Texture Paste Opaque Crackle
- Couture Creations – Highland Christmas Mini Die – Fractal Flake
- Die-namics – Snow Buddy
- Sizzix Tim Holtz Thinlits – Festive Words
- SnipArt Chipboards Frosty Moments – Decors with snowflakes
- Cocktail Party Distress Mica Stain
- Spectrum Noir Sparkle Marker
- Grey Alcohol Markers
So, for this page, I started with the background. I use Dylusions paint in colours White Linen and Black Marble. I squeezed the paint on a pallet and then I applied it on the page, using a sponge. I worked from the center towards the edges of my page, starting with the white and gradually making it darker by adding black. As soon as I was done spreading the paint, I diluted a little bit of white paint with water and splattered the background. Dylusion paints are basically acrylic paints. They dry pretty fast. So, the splatter didn’t get mixed with the rest of the colours.
Now it was time for the die cutting. I cut the hat and the buttons of the snowman out of black cardstock, and everything else out of white Bristol paper. I used a cool grey alcohol marker to give a little bit of shadow to the body of the snowman and to my snowflakes. Snow might be white, but if we don’t add the shadows, the final shape would look flat, and we do not want that 😉 I also used a brown grey alcohol marker for the hands and the nose of the snowman.
The fun part was adding the little splash of colour! I chose to colour the sentiment and the snowman’s scarf. I placed the pieces on a paper towel and I heavily sprayed them with the Cocktail Party Mica Stain spray. Then I added the detail pieces of the scarf, and I sprayed them very lightly. Now all of the scarf pieces have the same colour, just different values of it.

Assembly time! I assembled my snowman and the sentiment. I also pulled out some SnipArt chipboards with snowflakes on them. I painted them pale grey, using my Dylusions paints. Once they were dry, I added some shine, using a Spectrum Noir Sparkle Marker. Of course, it is difficult to see that in the photos, but it is there!
I attached the snowman on the page and then I added the Crackle paste under him, in order to work as a base. I was trying to create the idea of a snow pile with the snowman sitting on top of it. Before the paste would dry, I attached one of the chipboards on top of it. I put all of the rest of my pieces together, and this page was done!

Making this page was messy! First, I dipped my fingers in the paint while using the sponge. Then I sprayed Mica all over my hands! But you know what? I like it messy!!! For me, getting messy while crafting is so much fun!!! I had so much fun while creating this art journal page! I hope you like my project! I hope you got inspired! See you all again in two weeks! Until then, stay creative and have fun!
*Deutsche Version*
Hallo zusammen! Ich bin Lia und ich bin wieder hier mit einer neuen Kunstjournalseite! Mein Thema ist “Let it Snow“, was perfekt ist, wenn man das Wetter bedenkt! Es hat geschneit und ich liebe es!!! Dieses Projekt ist auch ein Beispiel für die aktuelle Stamping Fairies Challenge. Das Thema ist „Grau in Grau mit einem Farbtupfer“. Beginnen wir mit den Materialien, die ich verwendet habe
Materialien
- Ranger Dylusions Paint Flip Cap Bottle
- Ranger Texture Paste Opaque Crackle
- Couture Creations – Highland Christmas Mini Die – Fractal Flake
- Die-namics – Snow Buddy
- Sizzix Tim Holtz Thinlits – Festive Words
- SnipArt Chipboards Frosty Moments – Decors with snowflakes
- Cocktail Party Distress Mica Stain
- Spectrum Noir Sparkle Marker
- Grey Alcohol Markers
Für diese Seite habe ich also mit dem Hintergrund begonnen. Ich habe Dylusions Farbe in den Farben White Linen und Black Marble verwendet. Ich habe die Farbe auf eine Palette gedrückt und sie dann mit einem Schwamm auf die Seite aufgetragen. Ich habe von der Mitte zu den Rändern meiner Seite gearbeitet, beginnend mit dem Weiß und es allmählich dunkler gemacht, indem ich Schwarz hinzugefügt habe. Sobald ich mit dem Auftragen der Farbe fertig war, habe ich ein wenig weiße Farbe mit Wasser verdünnt und den Hintergrund bespritzt. Dylusion-Farben sind im Grunde Acrylfarben. Sie trocknen ziemlich schnell. Die Spritzer haben sich also nicht mit den restlichen Farben vermischt.
Nun ging es ans Stanzen. Die Mütze und die Knöpfe des Schneemanns habe ich aus schwarzem Karton geschnitten, alles andere aus weißem Bristolpapier. Ich habe einen kühlen grauen Alkoholmarker benutzt, um dem Körper des Schneemanns und meinen Schneeflocken ein wenig Schatten zu verleihen. Schnee mag weiß sein, aber wenn wir die Schatten nicht hinzufügen, würde die endgültige Form flach aussehen, und das wollen wir nicht 😉 Ich habe auch einen braungrauen Alkoholmarker für die Hände und die Nase des Schneemanns verwendet.
Der lustige Teil war das Hinzufügen des kleinen Farbtupfers! Ich habe beschlossen, die Worte und den Schal des Schneemanns zu färben. Ich habe die Teile auf ein Papiertuch gelegt und sie kräftig mit dem Cocktail Party Mica Stain Spray besprüht. Dann habe ich die Detailstücke des Schals hinzugefügt und sie sehr leicht besprüht. Jetzt haben alle Schalstücke die gleiche Farbe, nur mit unterschiedlichen Farbwerten.
Montagezeit! Ich habe meinen Schneemann und das Sentiment zusammengebaut. Ich habe auch einige SnipArt-Spanplatten mit Schneeflocken für diese Seite benutzt. Die habe ich mit meinen Dylusions-Farben hellgrau bemalt. Sobald sie trocken waren, habe ich mit einem Spectrum Noir Sparkle Marker etwas Glanz hinzugefügt. Das ist auf den Fotos natürlich schwer zu erkennen, aber es ist da!
Ich habe den Schneemann auf der Seite befestigt und dann habe ich die Crackle-Paste darunter als Basis aufgetragen. Ich habe versucht, das Bild eines Schneehaufens zu schaffen, auf dem der Schneemann sitzt. Bevor die Paste trocknete, habe ich eine der Spanplatten darauf befestigt. Ich habe alle anderen Teile zusammengefügt und diese Seite war fertig!
Das Erstellen dieser Seite war chaotisch! Zuerst habe ich meine Finger in die Farbe getaucht, während ich den Schwamm benutzt habe. Dann habe ich Mica über meine Hände gesprüht! Aber weißt du was? Ich mag es chaotisch!!! Mir macht es so viel Spaß, beim Basteln unordentlich zu werden!!! Ich hatte so viel Spaß beim Erstellen dieser Kunstjournalseite! Ich hoffe euch gefällt mein Projekt! Ich hoffe, ihr habt euch inspirieren lassen! Wir sehen uns alle in zwei Wochen wieder! Bis dahin bleibt kreativ und habt Spaß!

Monochrome Weihnacht

Süße Leckerei
Das könnte dich auch interessieren
Gestatten? Da Vinci mein Name!

Oh the Fun We Have When We’re Together
