Baby it’s cold outside
*German version below | Deutsche Version unten*
Hello everyone! It is Monday again and I am back with another art journal page! I played a lot with Tim Holtz Colorize dies to create a fun and relatively easy projects. Let’s start with the products I used.
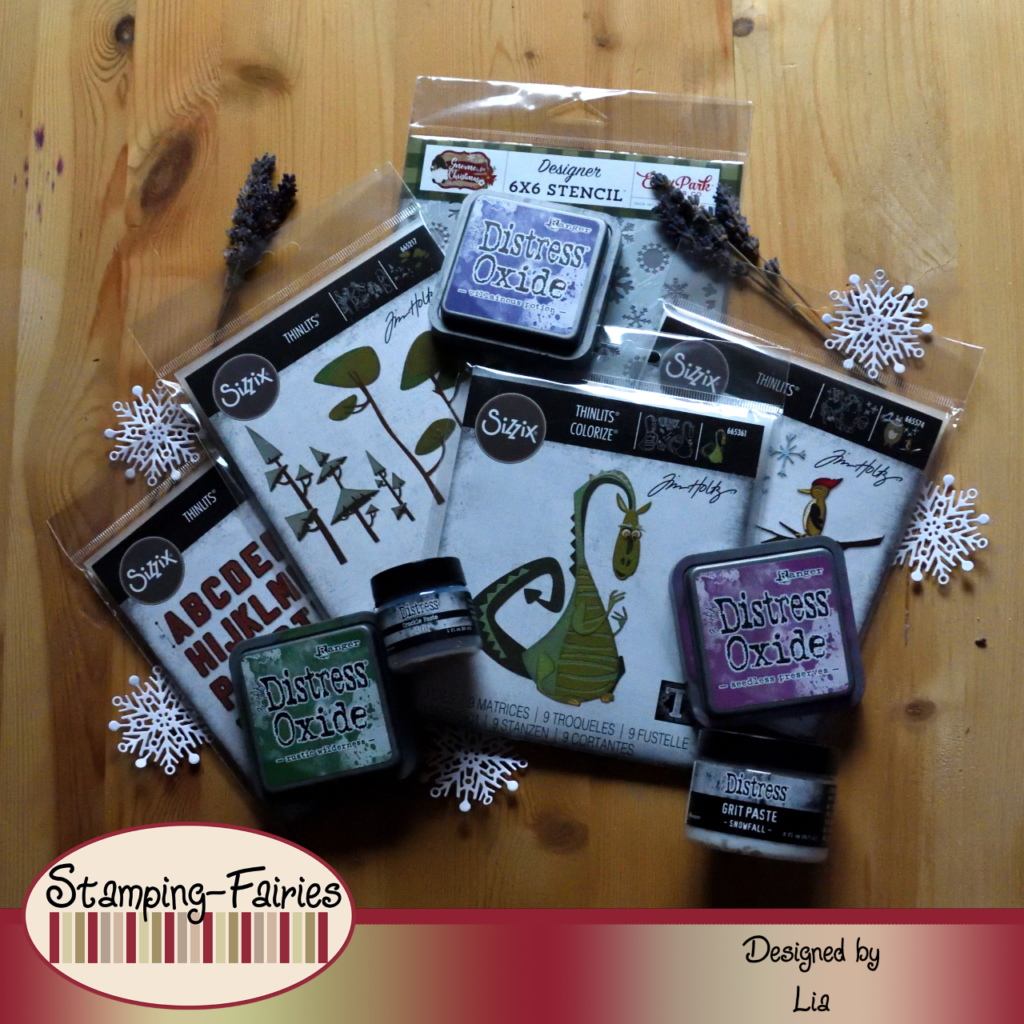
Materials
- Ranger – Tim Holtz Distress Oxide Pads
- Distress Ink Pad – Picket Fence
- Echo Park 6″ x 6″ Stencil – Snow Globe
- Ranger Dylusions Paint Flip Cap Bottle – White Linen
- Sizzix Tim Holtz Thinlits Colorize – Rupert
- Sizzix Tim Holtz Thinlits – Funky Trees
- Sizzix Tim Holtz Thinlits – Alphanumeric Varsity
- Sizzix Tim Holtz Thinlits – Cozy Winter
- Tim Holtz Distress Grit Paste – Snowfall
- Tim Holtz Distress Crackle Paste – Icicle
- Ranger Texture Paste Opaque Crackle
- Tonic Craft Tacky Glue
- Nuvo Mousse – Indian Gold
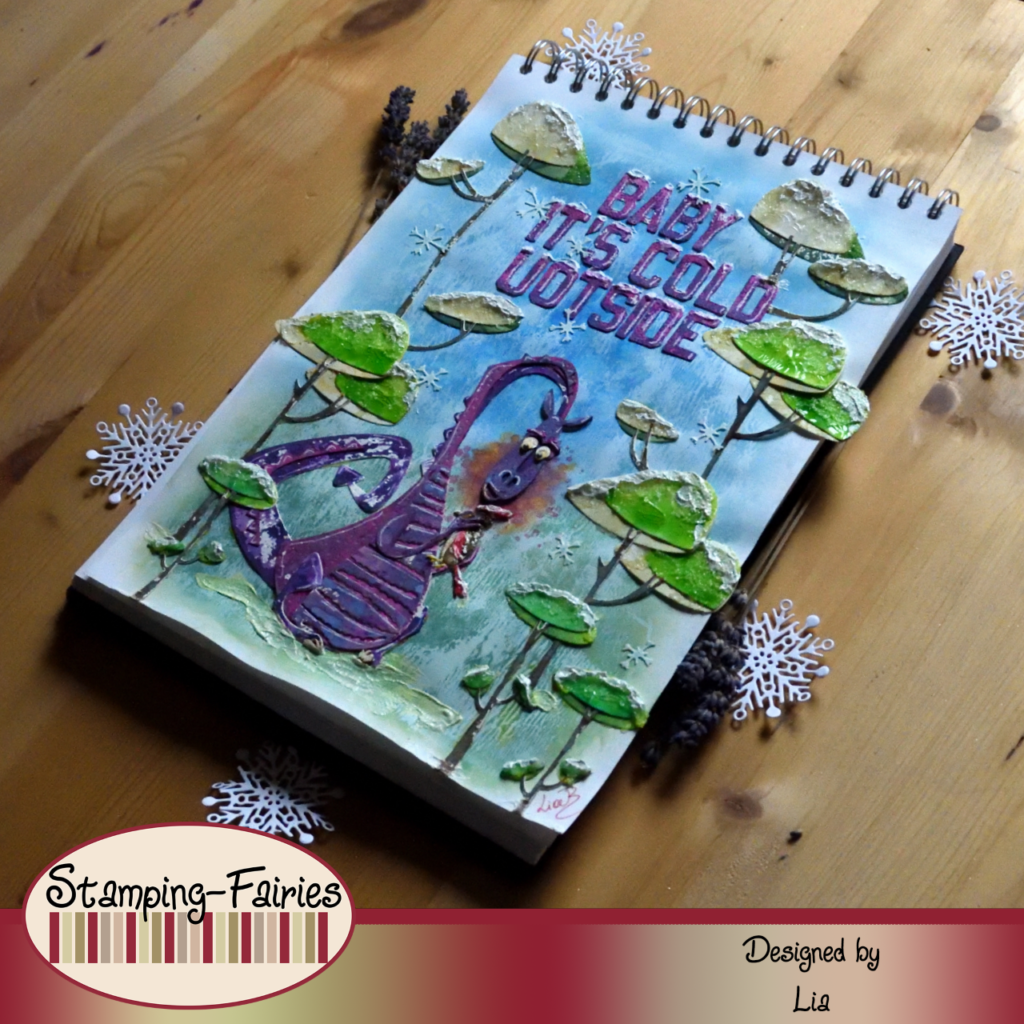
As always, I started with my background. I wanted a wintery cold but not very defined background. So, I started by ink blending some Distress Oxide inks to create the sky and the ground. I used the colours Salty Ocean, Speckled Egg, Rustic Wilderness and Old Paper. Then I placed the Echo Park Snow Globe stencil on the sky part and sprayed it with water. I removed the stencil and bloted my page with a paper towel. Then I used the same stencil with Distress Picket Fence ink. Now I have both faded snowflakes and white snowflakes. After I was done, I realized that my page was a bit too dark for my liking. So, I pulled out my Dylusions White Linen paint and my brayer and very lightly added white paint all over my background. I mostly lost the snowflakes, but I like the background much better like this.
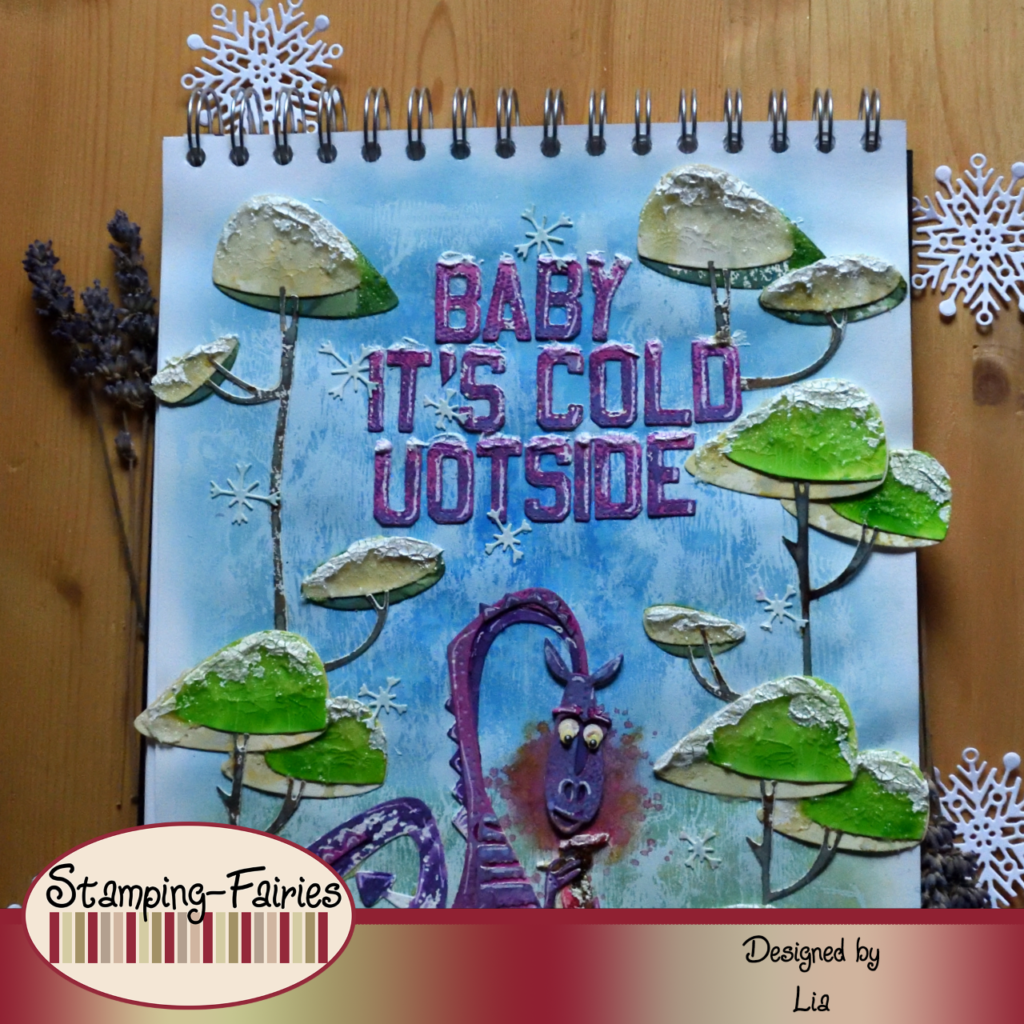
Now it was time to prepare my images. This time I did my images and the sentiment all at the same time. I used the „Rupert“ Thinlits Colorize set for the dragon, the „Cozy Winter“ Thinlits set for the bird my dragon is holding and the snowflakes, the „Funky Trees“ Thinlits set for my trees and the „Alphanumeric Varsity“ Thinlits set for my sentiment. All of these pieces are cut out of mixed media paper that can take water nicely, as I was going to use a lot of water to colour them. Watercolour paper would be better, but I tent to keep my watercolour paper for painting, so I used some good mixed media paper this time. For colouring I did some ink smooshing with Distress Oxide inks. I simply smooshed the ink pads on my work surface, sprayed the ink with a lot of water and then smooshed my cut pieces in the colour. I used the colours Seedless Preserves, Dusty Concord and Villainous Potion for the Dragon and my letters, Rustic Wilderness, Mowed Lawn, Cracked Pistachio, Old Paper and Ground Espresso for the trees and also Lumberjack Plaid, Squeezed Lemonade and Wild Honey for the bird.
I wanted my trees to look snowy, so I had to do some extra work with them. After the pieces were coloured and dry, I used the Distress Icicle Crackle Paste to cover the green parts of my trees. One thing I did not think of, is that this paste is a very wet medium. The Distress Oxide inks are water reactive and a medium as wet as the Icicle paste can activate them. So, my colours moved and became smoother. This is not bad, it is just something to keep in mind when using this product. Another thing to keep in mind is that when this paste dries, it nearly looks like shattered glass. I find that very interesting. Of course, I wanted my trees to look snowy, not broken. So, I used the Distress Snowfall Grit Paste on the top portion of them. When this paste dries, it looks like translucent sand, providing a lot of texture, but no colour. At this point I was happy with the trees. So, I just put the pieces together to form my images.
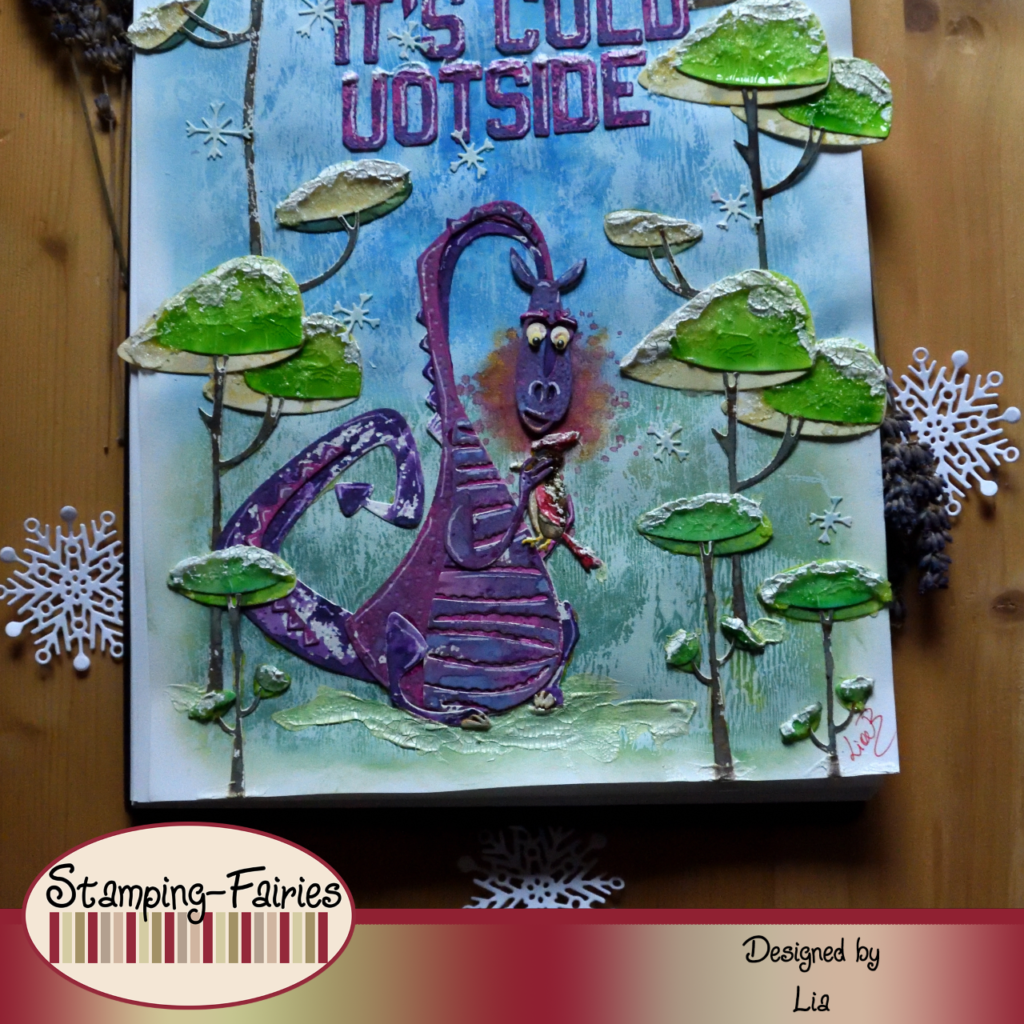
I used the Tonic Craft Tacky glue to glue my pieces on my background. My pieces were all warped from the water I used during colouring, so a good glue was needed. I really like how fast and reliable this glue is! I glued the letters on top of my page, to form the sentiment and then I glued the trees and the dragon. I used a little bit of Lumberjack Plaid Distress Oxide ink behind the head of the Dragon, mostly around the area of his mouth. I also used some Indian Gold Nuvo Mousse mixed in the red ink. Then I placed the bird in the dragon’s hands. I was imagining the bird being frozen and the dragon trying to thaw it and save it. After all my images were placed down, I used some Ranger Texture Crackle Paste to add some more snowy areas in my project. I added the paste on the tops of the trees as well as the tops of the letters. I also added the paste under the dragon, to ground him and of course I added paste on the bird, because it is frozen!

And that was my project for today! I really hope you like it! I hope you got inspired! Do not forget that our Winter/Snowflakes challenge still runs. You can find more information about it at Stamping Fairies Facebook and Instagram pages. We will see each other again next Monday! Until then, stay creative and have fun!
*Deutsche Version*
Hallo zusammen! Es ist wieder Montag und ich melde mich mit einer weiteren Kunstjournalseite zurück! Ich habe viel mit Tim Holtz Colorize Stanzformen gespielt, um ein lustiges und relativ einfaches Projekt zu erstellen. Beginnen wir mit den Produkten, die ich verwendet habe.
Materialien
- Ranger – Tim Holtz Distress Oxide Pads
- Distress Ink Pad – Picket Fence
- Echo Park 6″ x 6″ Stencil – Snow Globe
- Ranger Dylusions Paint Flip Cap Bottle – White Linen
- Sizzix Tim Holtz Thinlits Colorize – Rupert
- Sizzix Tim Holtz Thinlits – Funky Trees
- Sizzix Tim Holtz Thinlits – Alphanumeric Varsity
- Sizzix Tim Holtz Thinlits – Cozy Winter
- Tim Holtz Distress Grit Paste – Snowfall
- Tim Holtz Distress Crackle Paste – Icicle
- Ranger Texture Paste Opaque Crackle
- Tonic Craft Tacky Glue
- Nuvo Mousse – Indian Gold
Wie immer habe ich mit meinem Hintergrund begonnen. Ich wollte einen winterlich kalten, aber nicht sehr definierten Hintergrund. Also habe ich damit begonnen, einige Distress Oxide-Tinten zu mischen, um den Himmel und den Boden zu gestalten. Ich habe die Farben Salty Ocean, Speckled Egg, Rustic Wilderness und Old Paper verwendet. Dann habe ich die Echo Park Snow Globe Schablone auf den Himmelsteil gelegt und mit Wasser besprüht. Ich habe die Schablone entfernt und meine Seite mit einem Papiertuch abgetupft. Dann habe ich die gleiche Schablone mit Distress Picket Fence-Tinte verwendet. Jetzt hatte ich sowohl verblasste Schneeflocken als auch weiße Schneeflocken. Nachdem ich fertig war, habe ich festgestellt, dass meine Seite für meinen Geschmack etwas zu dunkel war. Also habe ich meine Dylusions White Linen-Farbe und meinen Brayer herausgekramt und sehr leicht weiße Farbe über meinen gesamten Hintergrund hinzugefügt. Ich habe meistens die Schneeflocken verloren, aber der Hintergrund gefällt mir so viel besser.
Jetzt war es an der Zeit, meine Bilder vorzubereiten. Dieses Mal habe ich meine Bilder und den Spruch gleichzeitig gemacht. Ich habe das Thinlits Colorize-Set „Rupert“ für den Drachen verwendet, das Thinlits-Set „Cosy Winter“ für die Schneeflocken und den Vogel, den mein Drache hält, das Thinlits-Set „Funky Trees“ für meine Bäume und das Thinlits-Set „Alphanumeric Varsity“ für meinen Spruch. Alle diese Teile sind aus Mixed-Media Papier geschnitten, das Wasser gut aufnehmen kann, da ich viel Wasser verwenden wollte, um sie zu färben. Noch besser wäre Aquarellpapier gewesen, aber Ich hebe mein Aquarellpapier zum Malen auf, also habe ich dieses Mal gutes Mixed-Media Papier verwendet. Zum Färben habe ich die Tintenschmiertechnik mit Distress Oxide-Tinten verwendet. Ich habe die Stempelkissen einfach über meine Arbeitsfläche geschmiert, die Tinte mit viel Wasser besprüht und dann meine Schnittstücke auf die verschmierte Farbe gedrückt. Ich habe die Farben Seedless Preserves, Dusty Concord und Villainous Potion für den Drachen und meine Briefe verwendet, Rustic Wilderness, Mowed Lawn, Cracked Pistachio, Old Paper und Ground Espresso für die Bäume sowie Lumberjack Plaid Squeezed Lemonade und Wild Honey für den Vogel.
Ich wollte, dass meine Bäume schneebedeckt aussehen, also musste ich etwas zusätzliche Arbeit mit ihnen machen. Nachdem die Stücke gefärbt und getrocknet waren, habe ich die Distress Icicle Crackle Paste verwendet, um die grünen Teile meiner Bäume zu bedecken. Eine Sache, an die ich nicht gedacht habe, ist, dass diese Paste ein sehr nasses Medium ist. Die Distress Oxide-Tinten sind wasserreaktiv und ein Medium, das so nass wie die Icicle-Paste ist, kann sie aktivieren. Also haben meine Farben sich bewegt und sind glatter geworden. Das ist nicht schlim, aber es ist nur zu beachten, wenn ihr dieses Produkt verwendet. Eine andere Sache, die ihr beachten solltet, ist, dass diese Paste, wenn sie trocknet, fast wie zerbrochenes Glas aussieht. Das finde ich sehr interessant. Natürlich wollte ich, dass meine Bäume schneebedeckt aussehen, nicht kaputt. Also habe ich die Distress Snowfall Grit Paste auf den oberen Teil von ihnen aufgetragen. Wenn diese Paste trocknet, sieht sie aus wie durchsichtiger Sand und bietet viel Textur, aber keine Farbe. An diesem Punkt war ich mit den Bäumen zufrieden. Also habe ich einfach die Teile zusammengefügt, um meine Bilder zu formen.
Ich habe den Tonic Craft Tacky-Kleber verwendet, um meine Stücke auf meinen Hintergrund zu kleben. Meine Teile waren alle vom Wasser, das ich beim Färben verwendet habe, verzogen, also war ein guter Kleber erforderlich. Ich mag wirklich, wie schnell und zuverlässig dieser Kleber ist! Ich habe die Buchstaben oben auf meine Seite geklebt, um den Spruch zu bilden und dann habe ich die Bäume und den Drachen geklebt. Ich habe ein wenig Lumberjack Plaid Distress Oxide-Tinte hinter dem Kopf des Drachen verwendet, hauptsächlich im Bereich seines Mundes. Ich habe auch etwas Indian Gold Nuvo Mousse verwendet, das in die rote Tinte gemischt wurde. Dann habe ich den Vogel in die Hände des Drachen gelegt. Ich habe mir vorgestellt, dass der Vogel eingefroren war und der Drache versuchte, ihn aufzutauen und zu retten. Nachdem alle meine Bilder platziert waren, habe ich etwas Ranger Texture Crackle Paste verwendet, um meinem Projekt weitere schneebedeckte Bereiche hinzuzufügen. Ich habe die Paste auf die Wipfel der Bäume sowie auf die Wipfel der Buchstaben hinzugefügt. Ich habe auch die Paste unter dem Drachen aufgetragen, um ihn zu erden, und natürlich habe ich Paste auf den Vogel aufgetragen, weil er gefroren ist!
Und das war mein Projekt für heute! Ich hoffe sehr, dass es euch gefällt! Ich hoffe, ihr habt euch inspirieren lassen! Vergesst nicht, dass unsere Winter/Schneeflocken-Challenge noch läuft. Weitere Informationen dazu findet euch auf den Facebook- und Instagram-Seiten von Stamping Fairies. Wir sehen uns nächsten Montag wieder! Bis dahin bleibt kreativ und habt Spaß!