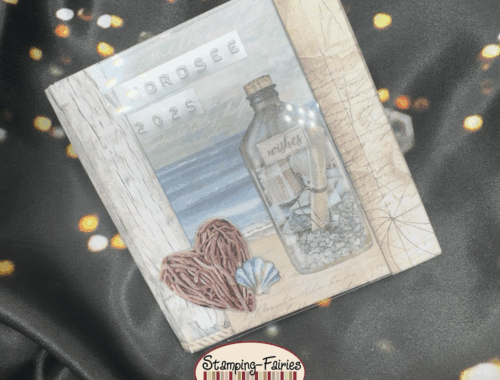
Beyond the Sea
*German version below | Deutsche Version unten*
Hello everyone! Welcome back to another mixed media project. For today, I am trying out the Lindy’s Magical Pigment Powders on a Summer-Sea art journal project. Let’s start with the materials I used:
Materials
- Stamperia Stencil – Compass
- Tim Holtz Layering Stencil – Linked Circles
- Ranger Texture Paste Opaque Crackle
- Thread
- Ranger Multi Medium – Matte
- Prima Marketing – Art Basic – Gesso Clear
- Lindy’s Magical Pigment Powders
- Stamperia High Definition Stamps – Writings & Branch
- Archival Ink
- P13 Paper Pad – Beyond the Sea Paper Pad
- Tonic Craft Tacky Glue
- P13 – Beyond the Sea – Set 01 Sentiment Stickers
- Tim Holtz – idea-ology – Droplets – Christmas
- Prima Metallique Wax – White Pearl

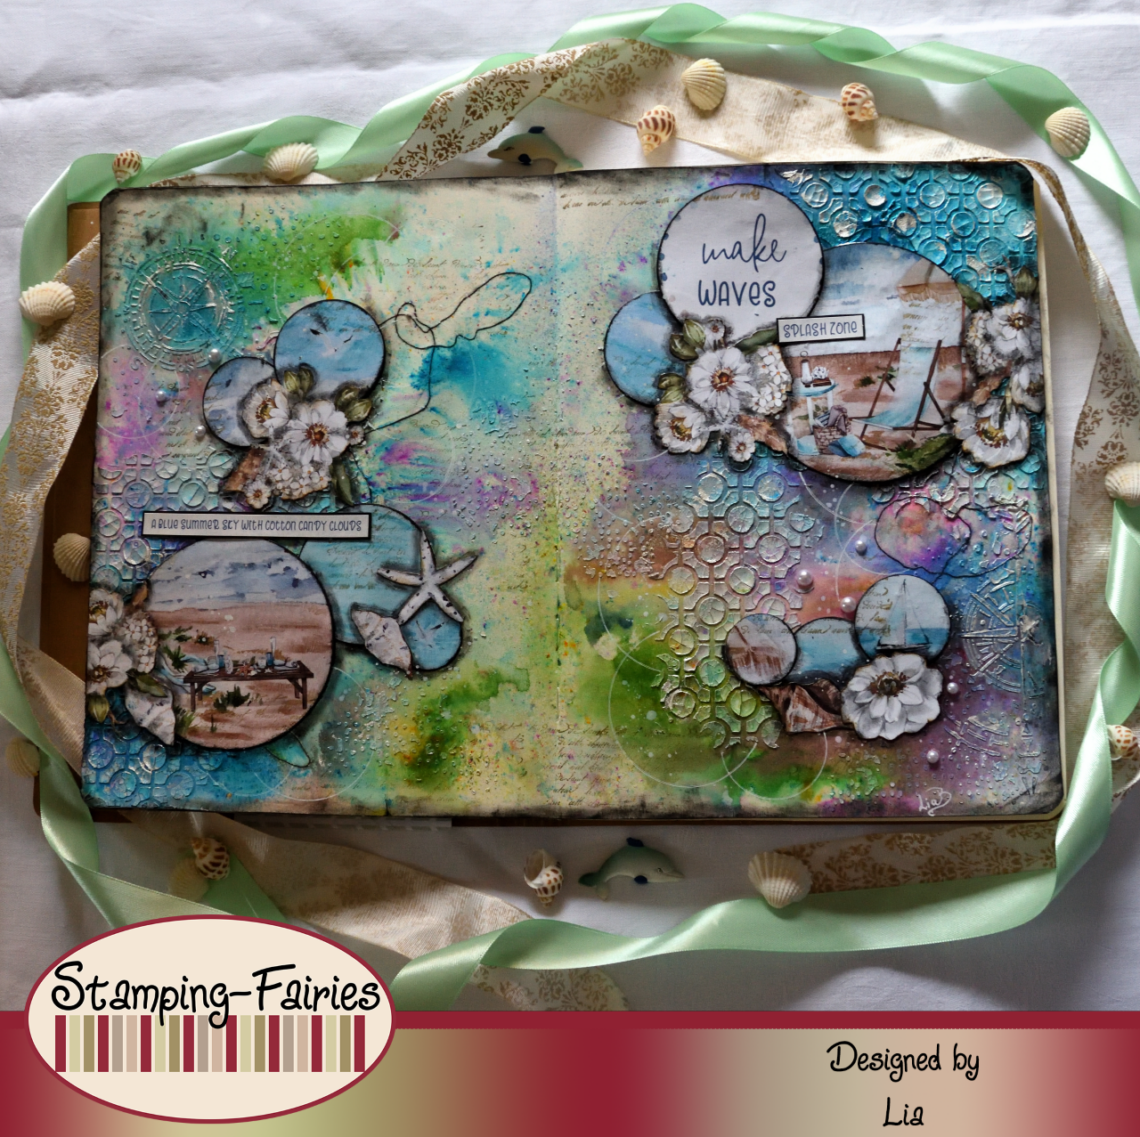
This time I chose to work in a big art journal. I wanted the extra space so my background would be mostly visible. I started by using the Tim Holtz Linked Circles stencil and the Stamperia Compass stencil with Ranger Texture Crackle Paste and I mostly concentrated the stencil design on the outer parts of the pages. Once the Crackle Paste was dry, I used Multi Medium Matte to glue some black thread on my project, just to add a little bit more texture. I left the Multi Medium to dry and then I covered everything with clear Gesso. The colouring of these pages was so much fun for me. I used the Lindy’s Magicals, which are basically pigment powders. They contain different pigments in each colour and sometimes they separate as the water hits them. I really love this effect! So, I used the colours Delphinium Turquoise, French Lilac Violet, Emerald Eh and Canadian Bacon Blush. The process is simple. I slightly sprayed my pages with water, added some of the powders one colour at a time, sprayed with more water in order to make the colour dissolve and move and then I dried the project. I repeated this process as many times as needed to get the result I wanted. I usually use a fan brush to dust the powders on my work. It is always wise to start with a light hand and carefully build up the colour as you go, because these colours can be quite intense! After my pages were dry, I used the Stamperia Writings & Branch stamp with Ground Espresso Archival ink to add some writing details on my project. And with that, the background was done!
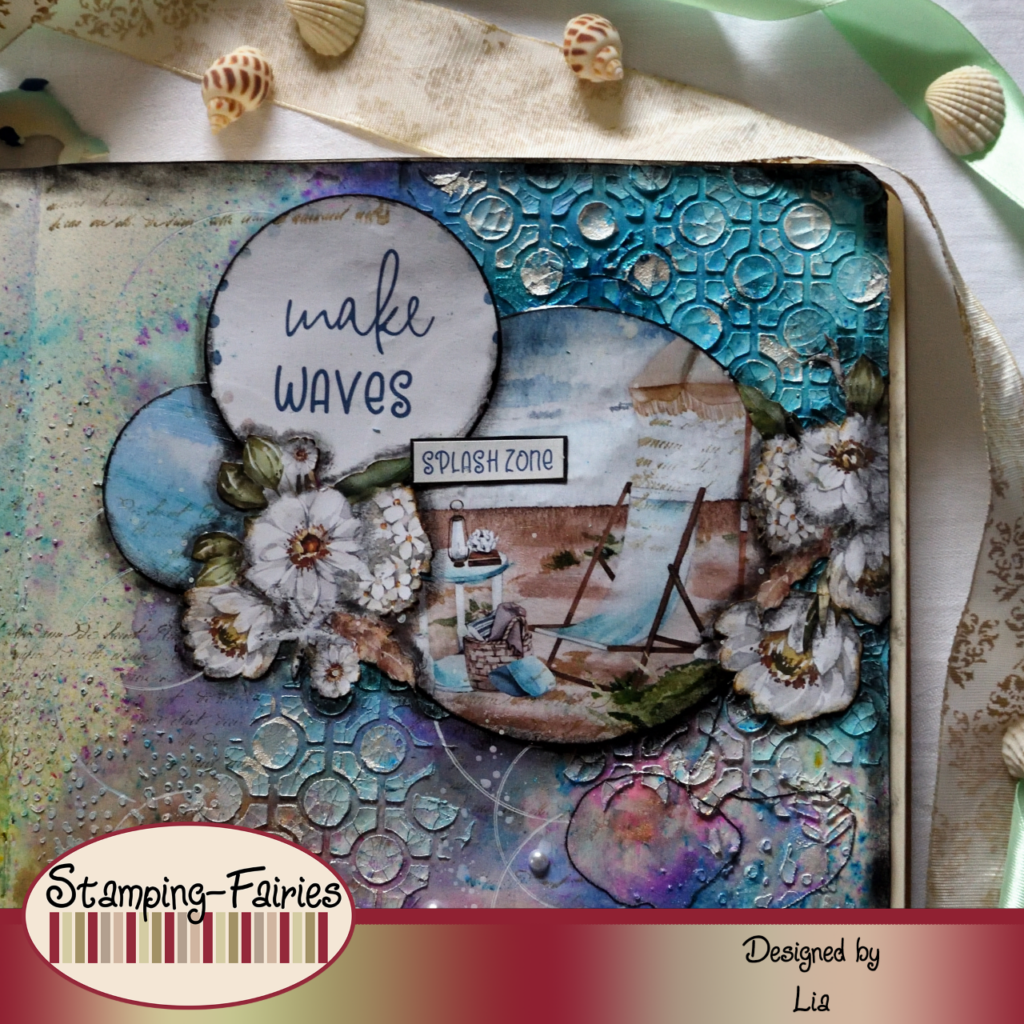
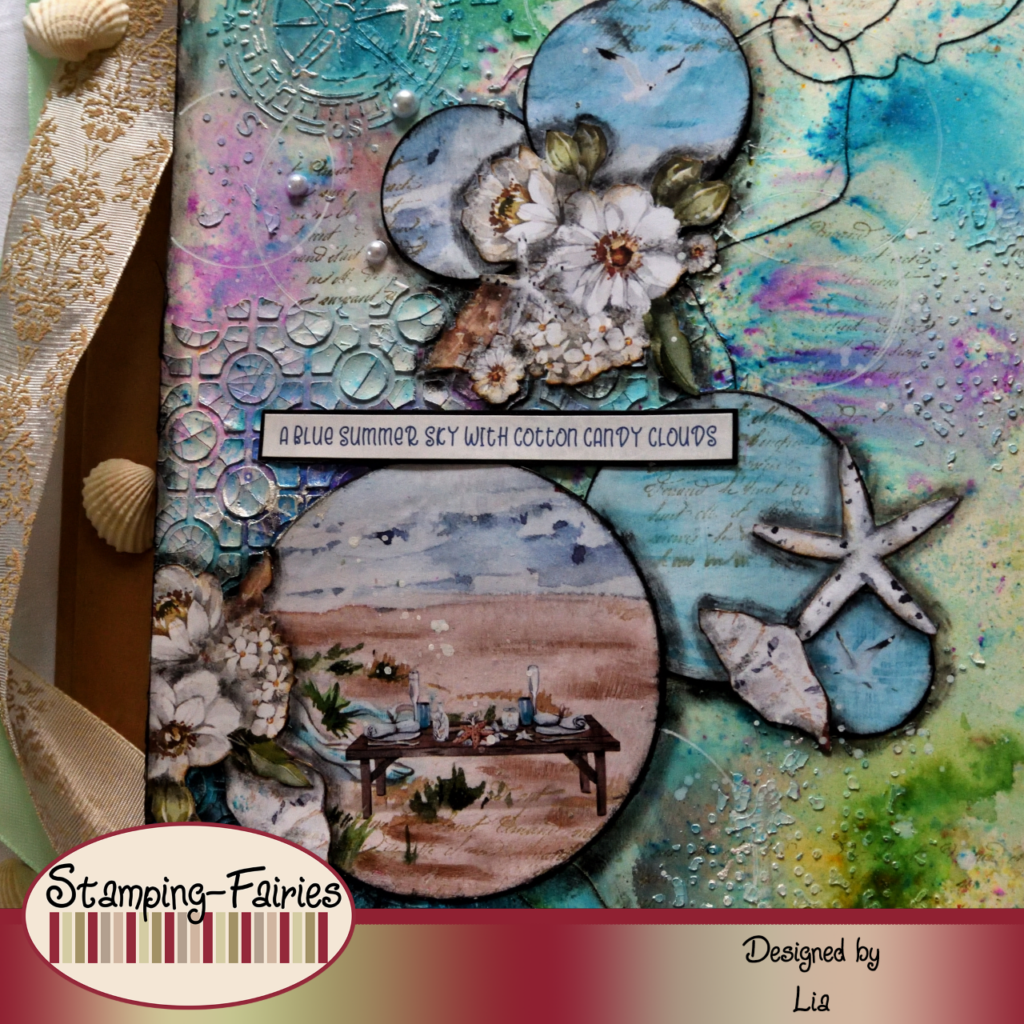
It was time to prepare my focal points. I really love the Beyond the Sea collection by P13. I chose some pages from the paper pad and cut circles out of them. I used objects from my craftroom to trace the circles around a certain design and then I cut them by hand. An easier way would be to use dies to cut the circles but sometimes I just like doing things the difficult way. Anyway, I cut my circles and I also cut some flower and seashell images to embellish my project. I arranged everything on my pages and then glued them down with my trusty Tonic Craft Tacky glue. Then I used Black Archival ink and a stiff brush to add shadows around all of my images and around the edges of my pages. I wanted to add some faint circles, so I used the same round objects as before and I traced some circles on the pages, using a white Gelly Roll pen. At this point I also used the White Pearl Metallique Wax on some of the stencil design, to make it stand out a little better.

My sentiment consists of several parts this time. One of the circles I cut already had a sentiment in it. It says „Make waves“. The other two little sentences I used come from the P13 Beyond the Sea Set 01 Sentiment Stickers. The one says „A blue Summer sky with cotton candy clouds“ and the other says „Splash Zone“. I really like how playful they sound! I placed my sentiments on the project and then I thought that I needed more embellishments. So, I picked some white droplets from the Idea-Ology Christmas Droplets set and I placed them on my pages. I also used some Picket Fence Distress Paint to platter everything.
And that was the project for today! I hope we could all have some fun by the sea! Just a reminder: the Stamping Fairies challenge will be running until the end of July! You can find more information about it at the Stamping Fairies Facebook and Instagram profiles. Come play with us! Also, some of the products I used today are on sale in the Stamping Fairies shop. If you want to replenish your craft supplies, now is your chance! I really hope you like today’s project! I hope you got inspired! We will see each other again next Monday! Until then, stay creative and have fun!
*Deutsche Version*
Hallo zusammen! Willkommen zurück zu einem weiteren Mixed-Media-Projekt. Heute probiere ich die Lindy’s Magical Pigment Powders im Rahmen eines Summer-Sea-Kunstjournalprojekts aus. Beginnen wir mit den Materialien, die ich verwendet habe:
Materialien
- Stamperia Stencil – Compass
- Tim Holtz Layering Stencil – Linked Circles
- Ranger Texture Paste Opaque Crackle
- Gewinde
- Ranger Multi Medium – Matte
- Prima Marketing – Art Basic – Gesso Clear
- Lindy’s Magical Pigment Powders
- Stamperia High Definition Stamps – Writings & Branch
- Archival Ink
- P13 Paper Pad – Beyond the Sea Paper Pad
- Tonic Craft Tacky Glue
- P13 – Beyond the Sea – Set 01 Sentiment Stickers
- Tim Holtz – idea-ology – Droplets – Christmas
- Prima Metallique Wax – White Pearl
Dieses Mal habe ich mich entschieden, in einem großen Kunstjournalformat zu arbeiten. Ich wollte den zusätzlichen Platz, damit mein Hintergrund größtenteils sichtbar ist. Ich habe mit der Tim Holtz Linked Circles Schablone und der Stamperia Compass Schablone mit Ranger Texture Crackle Paste begonnen und ich habe das Schablonendesign hauptsächlich auf die äußeren Teile der Seiten konzentriert. Sobald die Crackle Paste trocken war, habe ich mit Multi Medium Matte etwas schwarzen Faden auf mein Projekt geklebt, um etwas mehr Textur hinzuzufügen. Ich habe das Multi Medium trocknen lassen und dann alles mit klarem Gesso bedeckt. Das Ausmalen dieser Seiten hat mir so viel Spaß gemacht. Ich habe die Lindy’s Magicals verwendet, bei denen es sich im Grunde genommen um Pigmentpulver handelt. Sie enthalten unterschiedliche Pigmente in jeder Farbe und manchmal lösen sie sich, wenn das Wasser auf sie trifft. Ich liebe diesen Effekt wirklich! Also habe ich die Farben Delphinium Turquoise, French Lilac Violet, Emerald Eh und Canadian Bacon Blush verwendet. Der Vorgang ist einfach. Ich habe meine Seiten leicht mit Wasser besprüht, Farbe für Farbe Pulver hinzugefügt, mit mehr Wasser besprüht, damit sich die Farbe auflöst und bewegt, und dann habe ich das Projekt getrocknet. Ich habe diesen Vorgang so oft wie nötig wiederholt, um das gewünschte Ergebnis zu erzielen. Normalerweise benutze ich einen Fächerpinsel, um die Pulver auf meiner Arbeit aufzustäuben. Es ist immer ratsam, mit einer leichten Hand zu beginnen und die Farbe im Laufe der Zeit sorgfältig aufzubauen, denn diese Farben können sehr intensiv sein! Nachdem meine Seiten trocken waren, habe ich den Stamperia Writings & Branch Stempel mit Ground Espresso Archival Tinte verwendet, um einige Schriftdetails zu meinem Projekt hinzuzufügen. Und damit war der Hintergrund fertig!
Zeit, meine Schwerpunkte vorzubereiten. Ich liebe die Beyond the Sea Kollektion von P13 sehr. Ich habe einige Seiten aus dem Papierblock ausgewählt und Kreise daraus ausgeschnitten. Ich habe Gegenstände aus meinem Bastelraum verwendet, um die Kreise um ein bestimmtes Design zu zeichnen, und habe sie dann von Hand ausgeschnitten. Eine einfachere Möglichkeit wäre, die Kreise mit Stanzformen auszuschneiden, aber manchmal mache ich Dinge lieber auf die schwierige Art. Wie auch immer, ich habe meine Kreise ausgeschnitten und auch einige Blumen- und Muschelbilder, um mein Projekt zu verschönern. Ich habe alles auf meinen Seiten arrangiert und sie dann mit meinem bewährten Tonic Craft Tacky Kleber festgeklebt. Dann habe ich schwarze Archivtinte und einen steifen Pinsel verwendet, um Schatten um alle meine Bilder und um die Ränder meiner Seiten herum hinzuzufügen. Ich wollte einige schwache Kreise hinzufügen, also habe ich dieselben runden Objekte wie zuvor verwendet und mit einem weißen Gelly Roll Stift einige Kreise auf die Seiten gezeichnet. An dieser Stelle habe ich auch das White Pearl Metallique Wax für einige Schablonendesigns verwendet, um es etwas besser zur Geltung zu bringen.
Mein Spruch besteht dieses Mal aus mehreren Teilen. Einer der Kreise, die ich ausgeschnitten habe, enthielt bereits ein Spruch. Es heißt „Wellen schlagen“. Die anderen beiden kleinen Sätze, die ich verwendet habe, stammen aus den Sentiment Aufklebern P13 Beyond the Sea Set 01. Auf dem einen steht „Ein blauer Sommerhimmel mit Zuckerwattewolken“ und auf dem anderen „Splash Zone“. Mir gefällt wirklich, wie verspielt sie klingen! Ich habe meine Sprüche zu dem Projekt zum Ausdruck gebracht und dann habe ich gedacht, dass ich noch mehr Ausschmückungen brauchte. Also habe ich ein paar weiße Droplets aus dem Christmas Droplets Set von Idea-Ology ausgewählt und sie auf meinen Seiten platziert. Ich habe auch etwas Picket Fence Distress Paint verwendet, um alles zu bespritzen.

Und das war das Projekt für heute! Ich hoffe, wir konnten alle etwas Spaß am Meer haben! Nur zur Erinnerung: die Stamping Fairies-Challenge läuft bis Ende Juli. Weitere Informationen dazu findet ihr auf den Facebook und Instagram Profilen von Stamping Fairies. Komm, spiel mit uns! Außerdem einige der Produkte, die ich heute verwendet habe, im Stamping Fairies Shop im Angebot erhältlich. Wenn ihr euren Bastelbedarf auffüllen möchtet, ist jetzt eure Chance! Ich hoffe sehr, dass euch das Projekt gefällt! Ich hoffe, ihr habt euch inspirieren lassen! Wir sehen uns nächsten Montag wieder! Bis dahin bleibt kreativ und habt Spaß!

Happy Summer