Creepy Nest
*German version below | Deutsche Version unten*
Hello everyone! Welcome back to another mixed media project. Halloween is getting closer and I prepared a spooky project for you today! I love how it looks! I hope you will like it too! Let’s start with the materials I used:
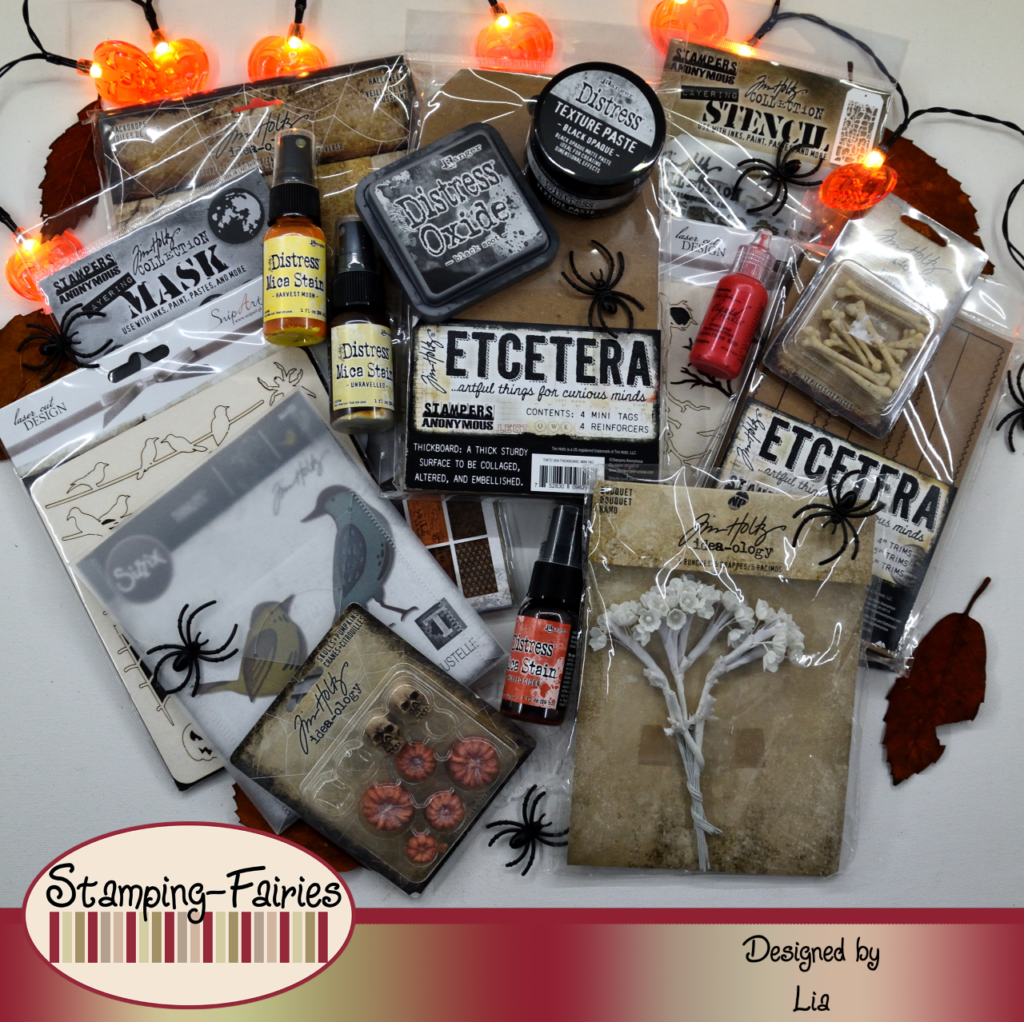
Materials (If something is not in stock, please simply click on “Product reminder”/ “Produkterinnerung”)
- Ranger Multi Medium – Matte
- Tim Holtz – Mini Thickboard Tag 11,5 x 20 cm
- Tim Holtz Etcetera – Pinked Trims
- Tim Holtz Backdrops – Halloween
- Distress Paints – Walnut Stain & Black Soot
- Tim Holtz Layering Stencil – Decayed
- Tim Holtz Texture Paste – Black Opaque
- Tim Holtz Layering Mask – Moon Mask
- Ranger – Tim Holtz Distress Oxide Pad – Fossilized Amber & Black Soot
- Distress Mica Stain Set – Halloween #3 & #5
- Sizzix Tim Holtz DIE Set – Feathered Friends
- SnipArt Chipboards Witch Please – Halloween & Branches
- Dried Moss
- Tim Holtz idea-ology – „Bouquet“ & „Boneyard“ & „Skulls+Pumpkins“
- Wendy Vecchi Liquid Pearls – Carnation Red
- Ribbons
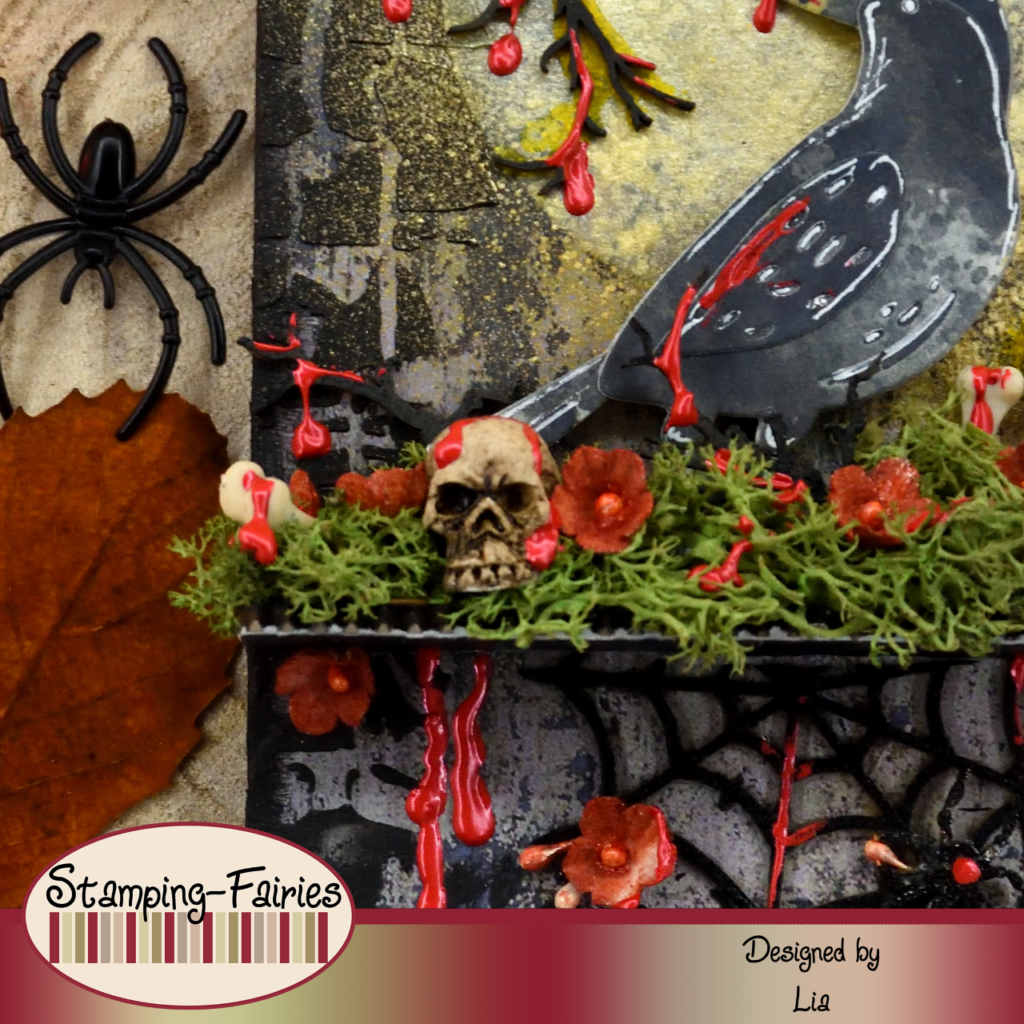
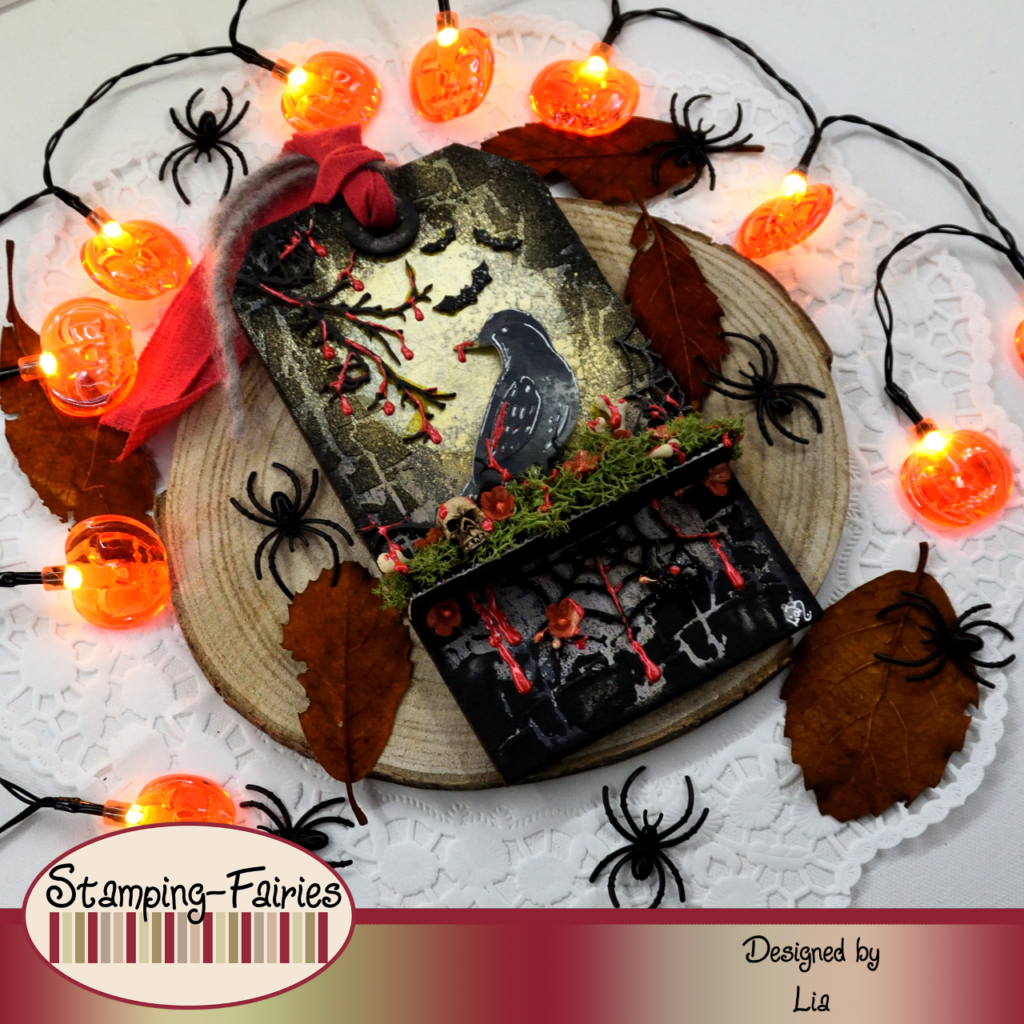
For today’s project, I worked on an Etcetera Tag and I also used one of the Etcetera Trims. These products are made out of thickboard and they are a nice and sturdy surface to work on. For my background, I chose a beautiful paper out of the Halloween Backdrops by Tim Holtz. I must admit, it was hard to pick just one paper. They are all amazing! I covered my Tag as well as the under side of my Trim with the paper and then I used Black Soot Distress Paint to paint the upper side of the Trim and to darken the edges of the Tag. I wanted some texture, so I used the Decayed Layering stencil with Ranger Black Opaque Texture Paste, just around the edges of the Tag. I wanted a moon in the center of this project, so I used the Moon Mask by Tim Holtz…well I actually used a Mask of the set to traced a circle in the size of the moon and I carefully cut it out, making sure the left over piece is not damaged, because that was the piece I wanted. I used that left over piece as a stencil in order to create the moon on the Tag, using Fossilized Amber Distress Oxide ink. Then I removed the „stencil“ piece and I sprayed on my moon with Harvest Moon Distress Mica Stain Spray. I prepared one of the Tag reinforcers the same way I prepared the Tag. I attached the Tag reinforcer and the Trim on the Tag and the background was done!

It was time to prepare my images. For the main image, I used the Sizzix Feathered Friends Thinlits set and I cut the tall bird out of mixed media paper. Then I used the ink smooshing technique with Black Soot Distress Oxide ink to colour the pieces of the bird. I put the bird together and then I added some Fossilized Amber Distress Oxide ink on the legs and the beak. I used a few things to embellish the area around the bird. I used the spider webs, a spider and some bats from the SnipaArt Halloween Chipboard set, as well as some branches from the the SnipArt Branches Chipboard set. I coloured the Chipboard pieces dark, using Black Soot and Walnut Stain Distress Paints. I also chose a skull and some bones from some Idea-Ology Halloween sets. As a last little bit of embellishment, I picked a few little flowers from the Idea-Ology Bouquet and I coloured them using the Mulled Cider and the Unravelled Distress Mica Stains. I attached some dried moss on the Trim and then I arranged all of my pieces on the Tag.
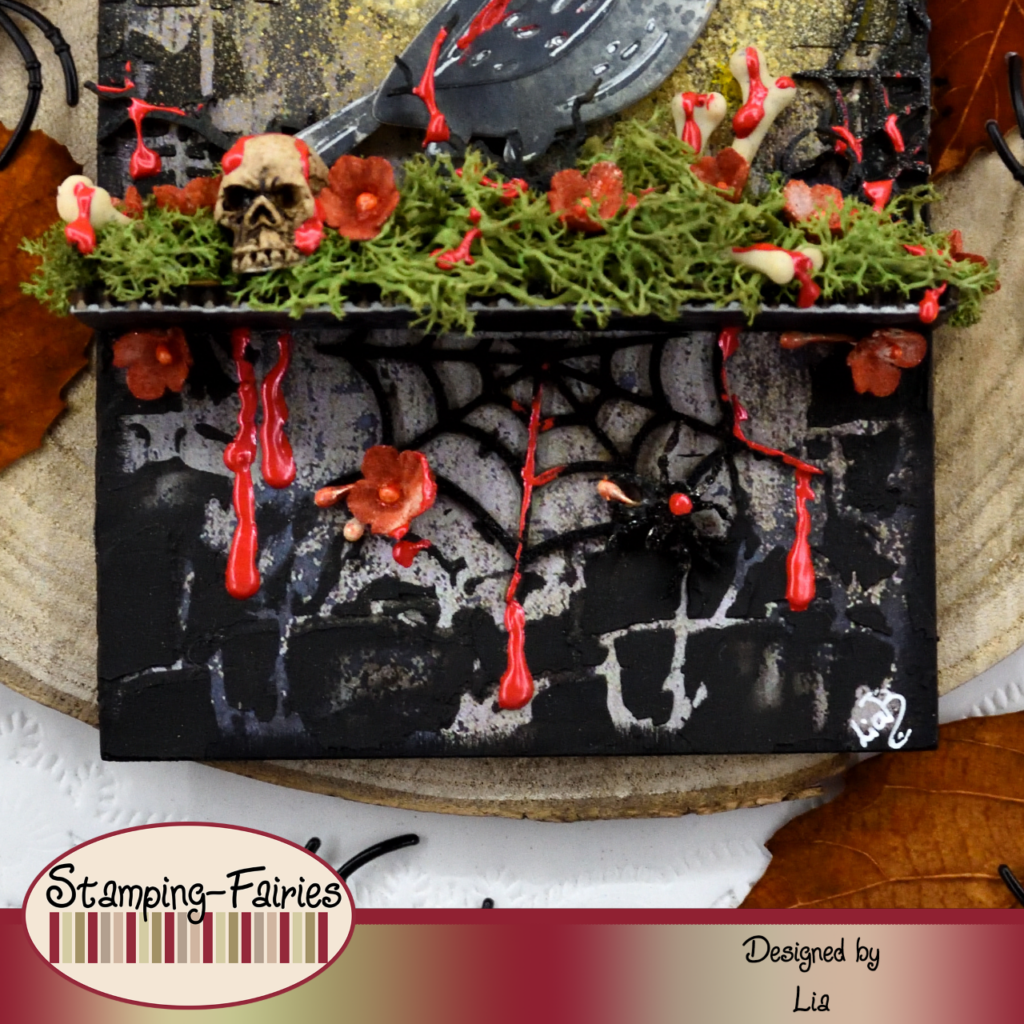
As you can see, I have no sentiment on this Tag. As sentiment, I was going to use a piece from the Idea-Ology Halloween 2023 Baseboards+Transparencies set, but in the end, I decided I didn’t need it. I thought that the Tag looked pretty good without it. What I actually added was blood…. well something like blood. It can not be Halloween without blood, can it? So, I used the Carnation Rad Liquid Pearls to add some red drops on the Tag. I really think that the blood drops brought everything together.
And that was the project for today! Honestly, I love Halloween. I do not celebrate, but I love making for Halloween. Creepy projects are not what I normally do, but they come really naturally at this time of the year. Do you like making for Halloween? You can let me know in the comments. I really like exchanging ideas! I really hope you like today’s project! I hope you got inspired! We will see each other again next Monday! Until then, stay creative and have fun!
*Deutsche Version*
Hallo zusammen! Willkommen zurück zu einem weiteren Mixed-Media-Projekt. Halloween rückt näher und ich habe heute ein gruseliges Projekt für euch vorbereitet! Ich liebe, wie es aussieht! Ich hoffe, es wird euch auch gefallen! Beginnen wir mit den Materialien, die ich verwendet habe:
Materialien (wenn etwas nicht auf Lager ist, bitte einfach auf „Produkterinnerung“ klicken)
- Ranger Multi Medium – Matte
- Tim Holtz – Mini Thickboard Tag 11,5 x 20 cm
- Tim Holtz Etcetera – Pinked Trims
- Tim Holtz Backdrops – Halloween
- Distress Paints – Walnut Stain & Black Soot
- Tim Holtz Layering Stencil – Decayed
- Tim Holtz Texture Paste – Black Opaque
- Tim Holtz Layering Mask – Moon Mask
- Ranger – Tim Holtz Distress Oxide Pad – Fossilized Amber & Black Soot
- Distress Mica Stain Set – Halloween #3 & #5
- Sizzix Tim Holtz DIE Set – Feathered Friends
- SnipArt Chipboards Witch Please – Halloween & Branches
- Getrocknetes Moos
- Tim Holtz idea-ology – „Bouquet“ & „Boneyard“ & „Skulls+Pumpkins“
- Wendy Vecchi Liquid Pearls – Carnation Red
- Bänder
Für das heutige Projekt habe ich an einem Etcetera Tag gearbeitet und außerdem einen der Etcetera Trims verwendet. Diese Produkte bestehen aus dicker Pappe und bieten eine schöne und stabile Oberfläche zum Arbeiten. Für meinen Hintergrund habe ich ein wunderschönes Musterpapier aus den Halloween Backdrops von Tim Holtz ausgewählt. Ich muss zugeben, dass es schwierig war, nur ein Musterpapier auszuwählen. Sie sind alle erstaunlich! Ich habe meinen Tag sowie die Unterseite meines Trims mit dem Musterpapier bedeckt und dann habe ich Black Soot Distress Paint verwendet, um die Oberseite des Trims zu bemalen und die Kanten des Tags abzudunkeln. Ich wollte etwas Textur, also habe ich die Decayed Layering Schablone mit Ranger Black Opaque Texture Paste direkt an den Rändern des Tags verwendet. Dann habe ich den Lochverstärker des Tags auf die gleiche Weise vorbereitet. Ich wollte einen Mond in der Mitte dieses Projekts, also habe ich die Moon Mask von Tim Holtz verwendet … nun, ich habe tatsächlich eine Maske aus dem Set verwendet, um einen Kreis in der Größe des Mondes zu zeichnen. Ich habe ihn sorgfältig ausgeschnitten und darauf geachtet, dass das Reststück nicht beschädigt wurde, denn das war das Stück, das ich eigentlich wollte. Dieses Reststück habe ich dann als Schablone verwendet, um mit Fossilized Amber Distress Oxide Tinte den Mond auf dem Tag zu malen. Dann habe ich das Schablonenstück entfernt und meinen Mond mit Harvest Moon Distress Mica Stain Spray besprüht. Ich habe den Trim und den Lochverstärker und an dem Tag angebracht und schon war der Hintergrund fertig!

Zeit, meine Bilder vorzubereiten. Für das Hauptbild habe ich das Sizzix Feathered Friends Thinlits Set verwendet und den großen Vogel aus Mixed Media Papier ausgeschnitten. Dann habe ich die Ink Smooshing Technik mit Black Soot Distress Oxide Tinte verwendet, um die Teile des Vogels einzufärben. Ich habe den Vogel zusammengesetzt und dann etwas Fossilized Amber Distress Oxide Tinte auf die Beine und den Schnabel aufgetragen. Dann habe ich den Bereich um den Vogel verschönert. Ich habe die Spinnennetze, eine Spinne und einige Fledermäuse aus dem SnipaArt Halloween Chipboard Set, sowie einige Zweige aus dem SnipArt Branches Chipboard Set, verwendet. Ich habe die Spanplattenstücke dunkel eingefärbt und dabei Black Soot und Walnut Stain Distress Paints verwendet. Ich habe auch einen Schädel und einige Knochen aus einigen Halloween Sets von Idea-Ology ausgewählt. Als letzte kleine Verzierung habe ich ein paar kleine Blumen aus dem Idea-Ology Bouquet gepflückt und sie mit dem Mulled Cider und den Unravelled Distress Mica Stains gefärbt. Ich befestigte etwas getrocknetes Moos an dem Trim und ordnete dann alle meine Teile auf dem Tag an.
Wie ihr sehen könnt, habe ich keinen Spruch zu diesem Tag. Als Spruch wollte ich ein Stück aus dem Idea-Ology Halloween 2023 Baseboards+Transparencies Set verwenden, aber am Ende habe ich entschieden, dass es das nicht brauchte. Ich fand, dass der Tag auch ohne ziemlich gut aussah. Was ich statt dessen hinzugefügt habe, war Blut … also so etwas wie Blut. Es kann kein Halloween ohne Blut sein, oder? Also habe ich die Carnation Rad Liquid Pearls verwendet, um ein paar rote Tropfen auf das Tag zu geben. Ich glaube, dass die Blutstropfen alles zusammengeführt haben.
Und das war das Projekt für heute! Ehrlich gesagt liebe ich Halloween. Ich feiere nicht, aber ich liebe es, etwas für Halloween zu machen. Gruselige Projekte sind nicht das, was ich normalerweise mache, aber zu dieser Jahreszeit sind sie ganz natürlich. Bastelt ihr gerne für Halloween? Ihr könnt es mir gerne in den Kommentaren mitteilen. Der Austausch macht mir sehr viel Spaß! Ich hoffe sehr, dass euch das Projekt gefällt! Ich hoffe, ihr habt euch inspirieren lassen! Wir sehen uns nächsten Montag wieder! Bis dahin bleibt kreativ und habt Spaß!