Happy Birthday Stamping Fairies
*German version below | Deutsche Version unten*
Hello everyone! Welcome back to another mixed media project. September is the birthday month of Stamping Fairies and of course our challenge for this month is about birthdays! My first September project is made to wish Happy Birthday to Stamping Fairies! Let’s start with the materials I used:
Materials
- P13 Paper Pad – Hello Autumn 12″ x 12″
- Prima Marketing – Art Basic – Gesso Clear
- Stamperia Stencil – Leaf
- Ranger Texture Paste Opaque Crackle
- Perfect Pearls Mists – Sunflower Sparkle
- Ranger – Tim Holtz Distress Oxide Pad – Black Soot
- Prima Marketing Mulberry Paper Flowers
- SnipArt Chipboards
- Tim Holtz – idea-ology – Droplets – Halloween
- Tonic Craft Tacky Glue

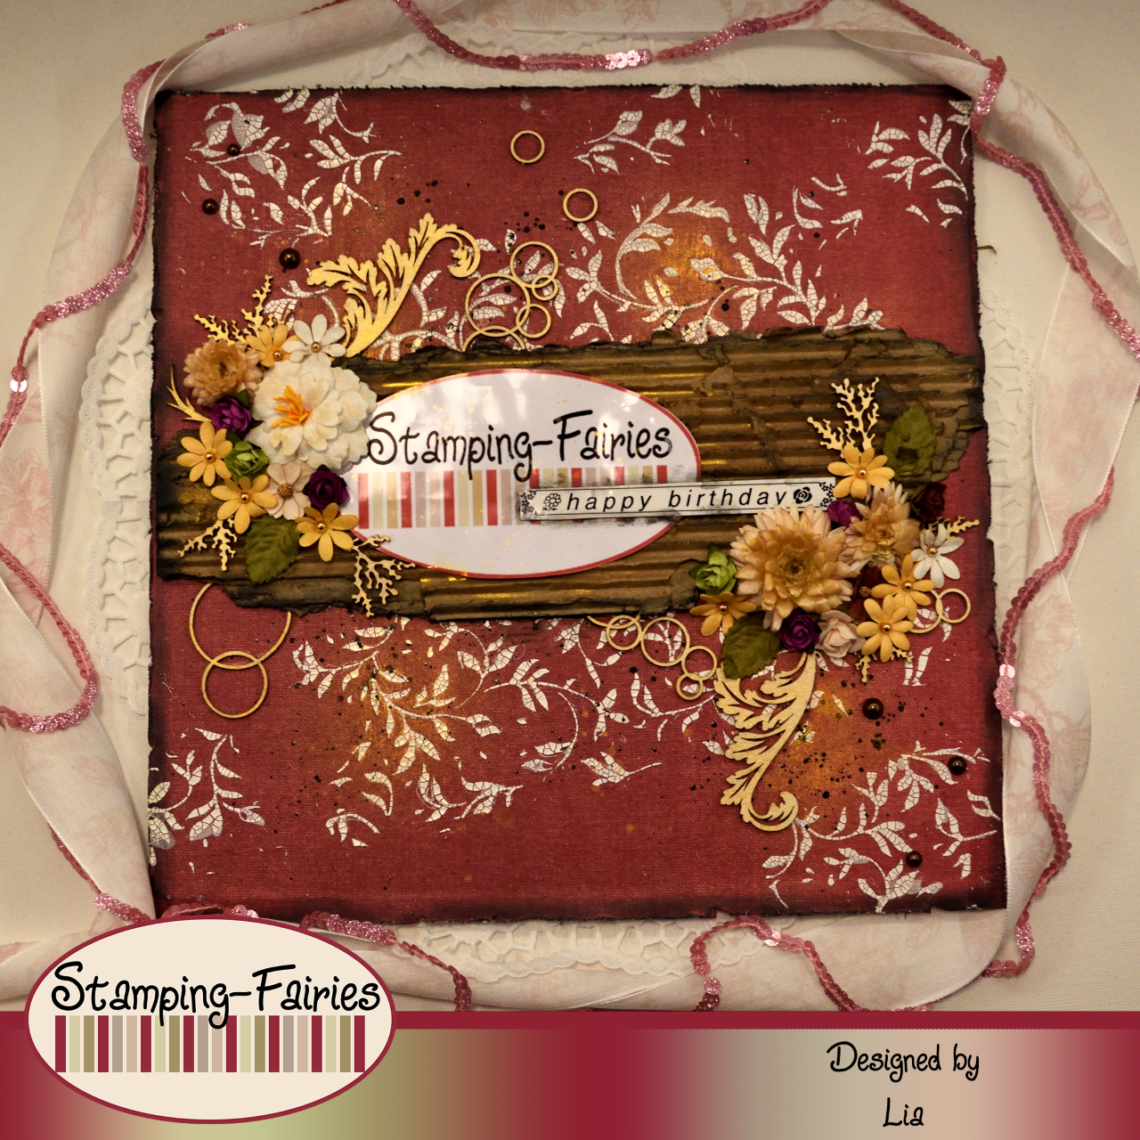
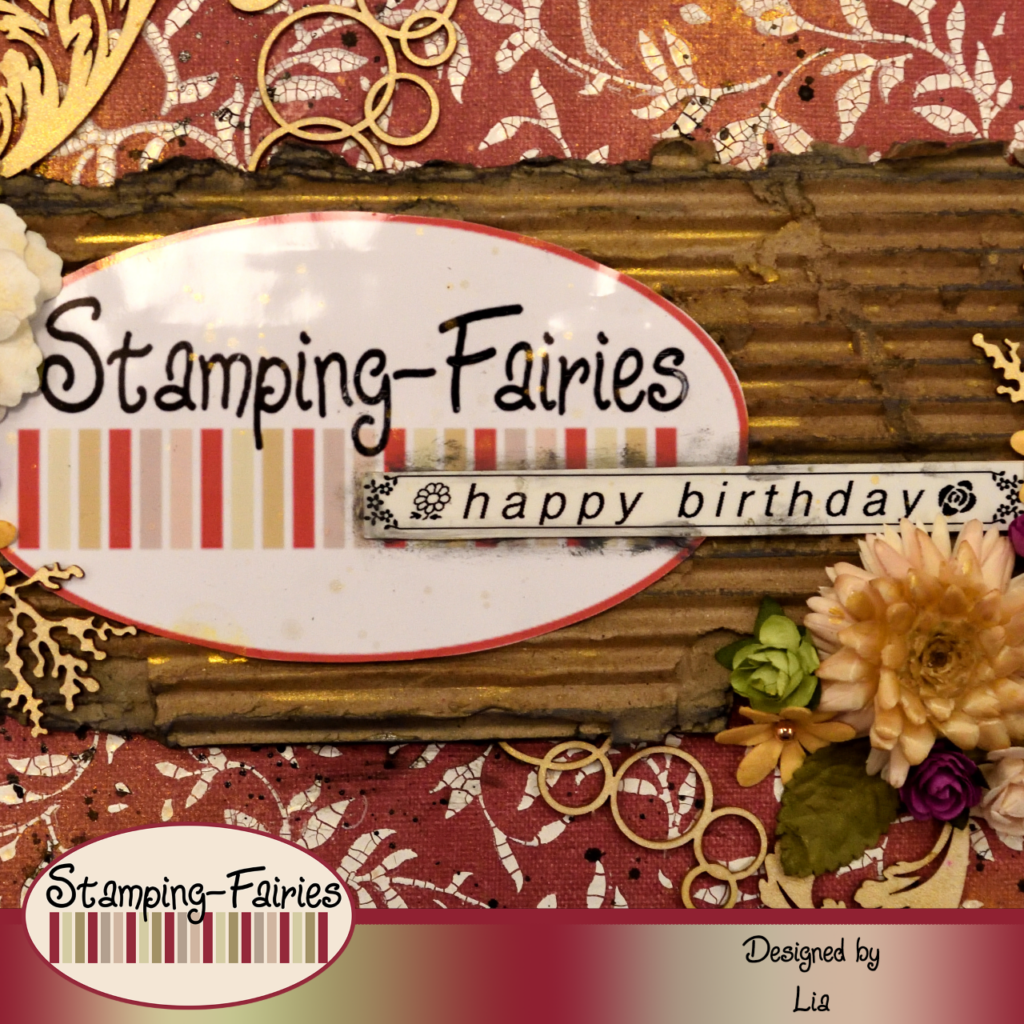
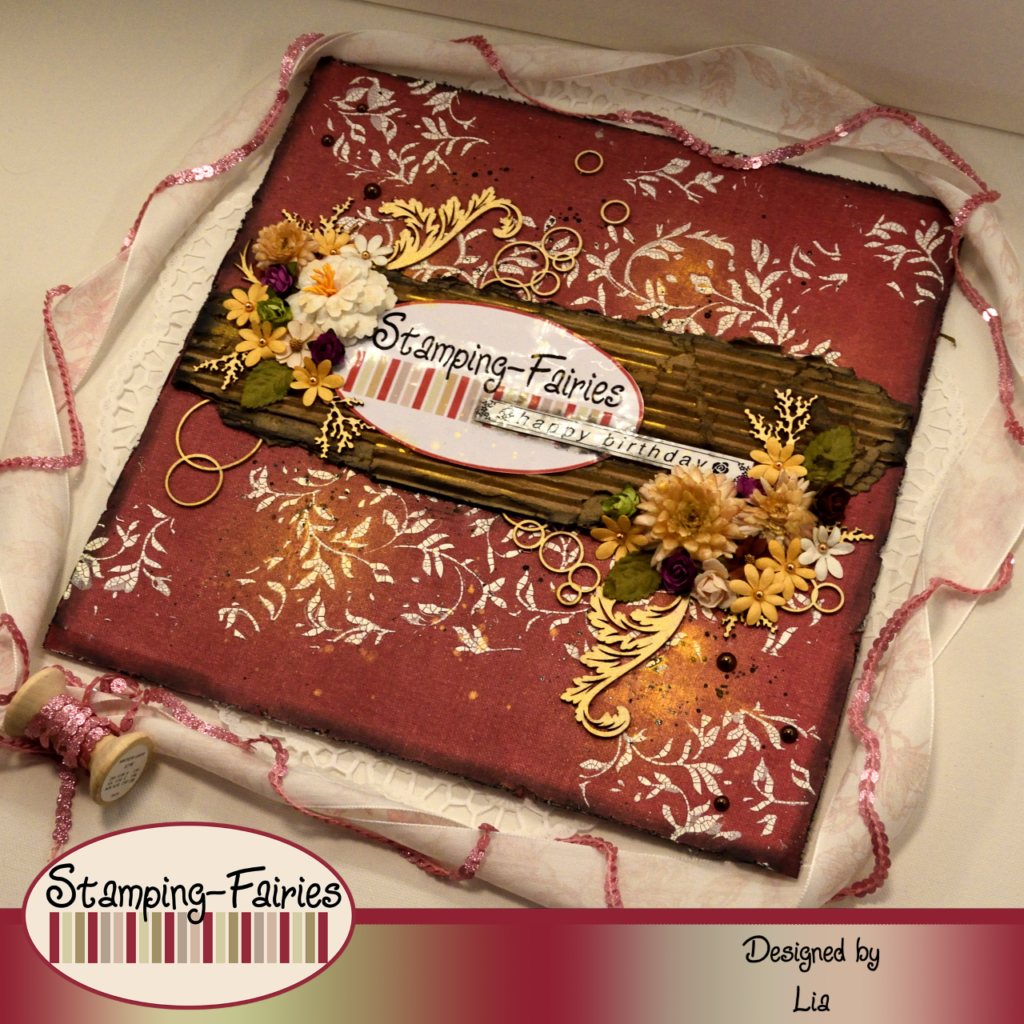
Today’s project is basically a scrapbook layout. I chose a 12×12 inch pattern paper from the Hello Autumn P13 Paper Pad, attached it on a piece of cardboard and then I covered it with Clear Gesso to create a nice surface for my mediums. Once the Gesso was dry, I distressed the edges of my paper with my scissors and then I darkened them using Black Soot Distress Oxide ink. I wanted to add some delicate texture on my background so I chose this lovely Stamperia stencil called „Leaf“ and Ranger Texture Crackle Paste and I added the leafy design on pretty much everywhere, concentrating it mostly on the center. I left the Paste to dry and then I sprayed the background with the Sunflower Sparkle Perfect Pearls Mists. Let me tell you, I love Perfect Pearls. Anything with Mica in it is a given that it will give a lovely pearlescent effect! I dried my project and then I used some Rohrer & Klingner black ink to splatter everywhere! A very good black medium to use for splatter is Black Soot Distress Paint, but I always have these inks on my desk so I just grab them! I dried the ink and my background was ready!
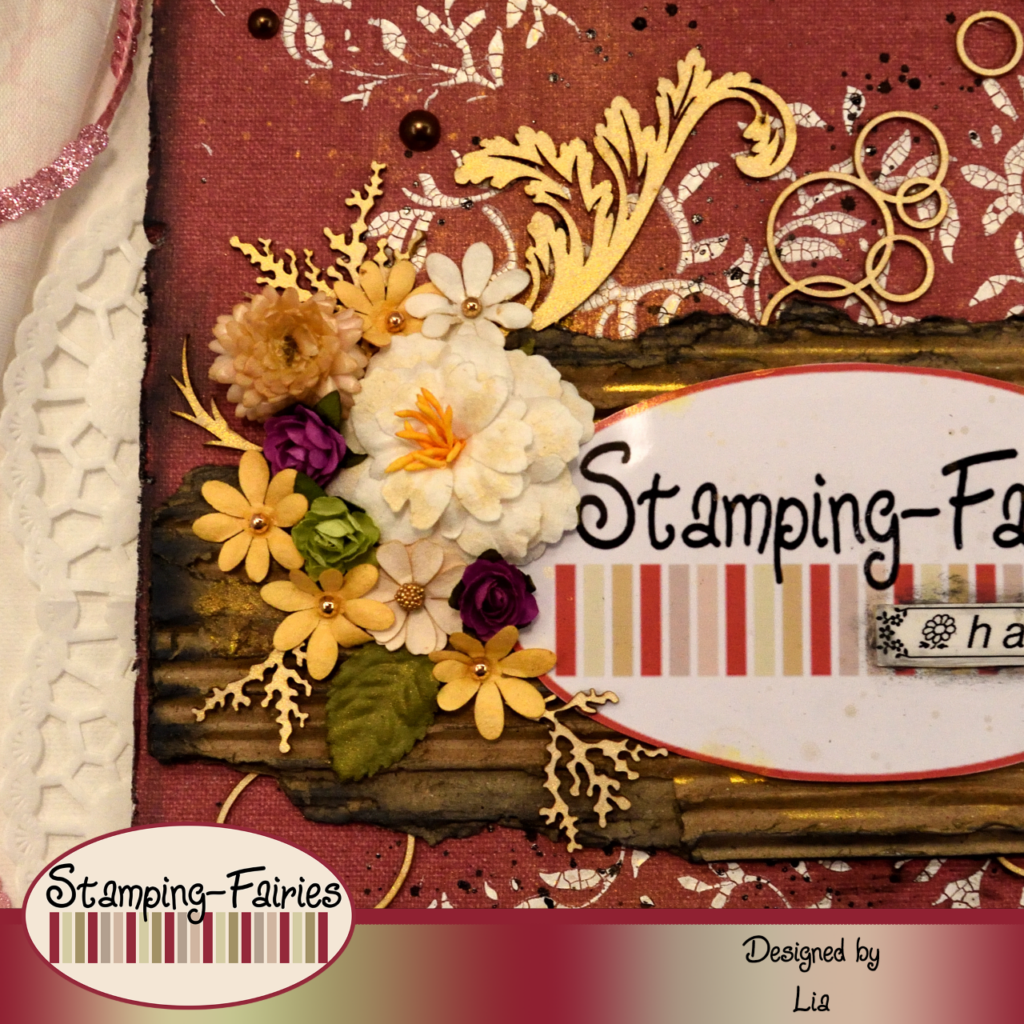
My focal point for this project is my sentiment for which I will tell you in a bit. My embellishments are mostly Prima flowers and SnipArt Chipboards. From Prima flowers, I used the sets „Floral Song/Spring Abstract“, „Little Farm/Farm Sweet Farm“ and „Lovely Sweet/Spring Abstract“. From SnipArt Chipboards, I used the sets „Openwork Circles“, „Corals“ and „Swirls“. I also used a few dried straw flowers from my garden. To create a base for everything, I used a piece of cardboard from a box. That was actually a box from Stamping Fairies. I wet the surface of the cardboard to make it easier to remove the top layer and expose the corduroy texture. I attached the cardboard on the center of my pattern paper and I arranged everything else on and around it.
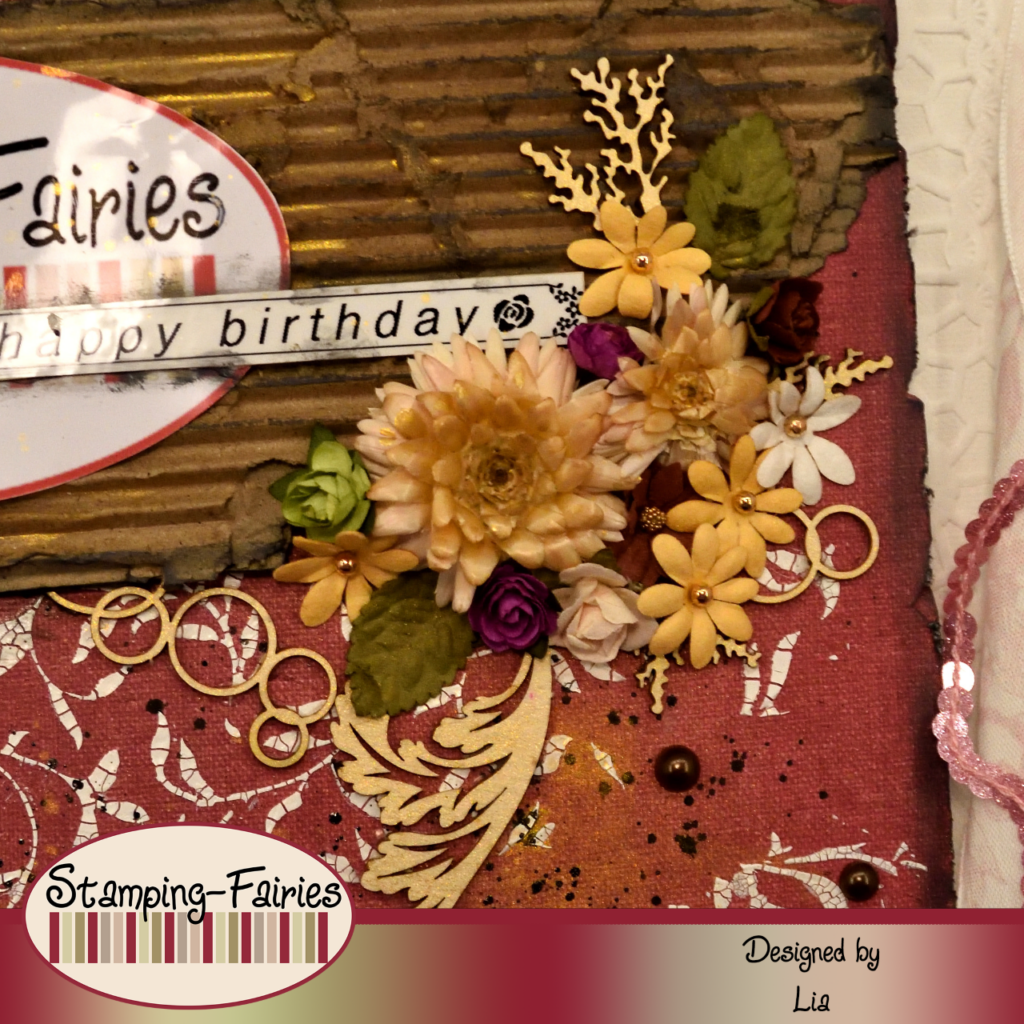
My sentiment consists of two parts. The first is the Stamping Fairies logo and it is printed in full colour on the printer. The second part says „Happy Birthday“ and it is printed on my new label maker! I attached everything on the cardboard piece, on the center of my pattern paper and then I used a little bit of Black Soot Distress Oxide ink with a stiff brush to darken the edges of my „Happy Birthday“ stripe. I used the Perfect Pearls Mists again, to add some splatter. Then I took of the nozzle from the bottle and used a brush to add more golden Mica on the flowers and on the cardboard all around my sentiment. I finished this project by adding a few Idea-Ology Droplets from the Halloween set.
And that was the project for today! I was going to turn it into a Halloween project, but it wouldn’t fit the Birthday theme… So, Happy Birthday Stamping Fairies! May there be a lot more Birthday Septembers, with a lot more amazing products and fun projects! Our Birthday challenge will be running until the end of the month. You can find more information about it in the Stamping Fairies profiles in Instagram and Facebook. I really hope you like today’s project! I hope you got inspired! We will see each other again next Monday! Until then, stay creative and have fun!
*Deutsche Version*
Hallo zusammen! Willkommen zurück zu einem weiteren Mixed-Media-Projekt. September ist der Geburtstagsmonat der Stamping Fairies und natürlich dreht sich bei unserer Challenge für diesen Monat alles um Geburtstage! Mein erstes Septemberprojekt besteht darin, Stamping Fairies alles Gute zum Geburtstag zu wünschen! Beginnen wir mit den Materialien, die ich verwendet habe:
Materialien
- P13 Paper Pad – Hello Autumn 12″ x 12″
- Prima Marketing – Art Basic – Gesso Clear
- Stamperia Stencil – Leaf
- Ranger Texture Paste Opaque Crackle
- Perfect Pearls Mists – Sunflower Sparkle
- Ranger – Tim Holtz Distress Oxide Pad – Black Soot
- Prima Marketing Mulberry Paper Flowers
- SnipArt Chipboards
- Tim Holtz – idea-ology – Droplets – Halloween
- Tonic Craft Tacky Glue
Das heutige Projekt ist im Grunde ein Scrapbook Layout. Ich habe ein 12 x 12 Zoll großes Musterpapier aus dem Hello Autumn P13 Papierblock ausgewählt, es auf ein Stück Pappe geklebt und es dann mit Clear Gesso bedeckt, um eine schöne Oberfläche für meine Medien zu schaffen. Sobald das Gesso trocken war, habe ich die Kanten meines Papiers mit meiner Schere bearbeitet und sie dann mit Black Soot Distress Oxide Tinte abgedunkelt. Ich wollte meinem Hintergrund eine zarte Textur hinzufügen, also habe ich mich für diese schöne Stamperia Schablone namens „Leaf“ und die Ranger Texture Crackle Paste entschieden und das Blattdesign fast überall hinzugefügt, wobei ich es hauptsächlich auf die Mitte konzentriert habe. Ich habe die Paste trocknen lassen und dann den Hintergrund mit den Sunflower Sparkle Perfect Pearls Mists besprüht. Lasst euch sagen, ich liebe Perfect Pearls. Alles, was Mica enthält, erzeugt mit Sicherheit einen schönen Perlmutteffekt! Ich habe mein Projekt getrocknet und dann etwas schwarze Tusche von Rohrer & Klingner überall verspritzt! Ein sehr gutes schwarzes Medium für Spritzer ist Black Soot Distress Paint, aber ich habe diese Tuschen immer auf meinem Schreibtisch, also schnappe ich sie mir einfach! Ich habe die Tinte getrocknet und mein Hintergrund war fertig!
Mein Schwerpunkt bei diesem Projekt liegt auf meinem Spruch, von dem ich euch gleich berichten werde. Meine Verzierungen bestehen hauptsächlich aus Prima Blumen und SnipArt Spanplatten. Von den Prima Blumen habe ich die Sets „Floral Song/Spring Abstract“, „Little Farm/Farm Sweet Farm“ und „Lovely Sweet/Spring Abstract“ verwendet. Von den SnipArt Chipboards habe ich die Sets „Openwork Circles“, „Corals“ und „Swirls“ verwendet. Ich habe auch ein paar getrocknete Strohblumen aus meinem Garten verwendet. Um eine Basis für alles zu schaffen, habe ich ein Stück Pappe aus einer Schachtel verwendet. Das war eigentlich eine Schachtel von Stamping Fairies. Ich habe die Oberfläche des Kartons befeuchtet, damit sich die oberste Schicht leichter entfernen lässt und die Wellpappe freigelegt wird. Ich habe den Karton in der Mitte meines Musterpapiers befestigt und alles andere darauf und darum herum angeordnet.
Mein Spruch besteht aus zwei Teilen. Das erste ist das Stamping Fairies Logo und kommt in voller Farbe auf dem Tintenstrahldrucker gedruckt. Der zweite Teil lautet „Alles Gute zum Geburtstag“ und ist von meinem neuen Etikettendrucker gedruckt! Ich habe alles auf dem Kartonstück in der Mitte meines Musterpapiers befestigt und dann mit einem steifen Pinsel ein wenig Black Soot Distress Oxide Tinte aufgetragen, um die Ränder meines „Happy Birthday“ Streifens abzudunkeln. Ich habe erneut die Perfect Pearls Mists verwendet, um etwas Spritzer hinzuzufügen. Dann habe ich die die Flasche geöffnet um mit einem Pinsel mehr goldenes Mica auf die Blumen und auf den Karton rund um mein Motiv aufgetragen. Ich habe dieses Projekt abgeschlossen, indem ich ein paar Idea-Ology Droplets aus dem Halloween Set hinzugefügt habe.
Und das war das Projekt für heute! Ich wollte daraus ein Halloween Projekt machen, aber so würde es nicht zum Geburtstagsthema passen… Also, Happy Birthday Stamping Fairies! Möge es noch viele weitere Geburtstags-September mit noch viel mehr tollen Produkten und schönen Projekten geben! Unsere Geburtstags Challenge läuft bis Ende des Monats. Weitere Informationen dazu findet ihr in den Stamping Fairies Profilen auf Instagram und Facebook. Ich hoffe sehr, dass euch das Projekt gefällt! Ich hoffe, ihr habt euch inspirieren lassen! Wir sehen uns nächsten Montag wieder! Bis dahin bleibt kreativ und habt Spaß!

Hip Hip Hooray!