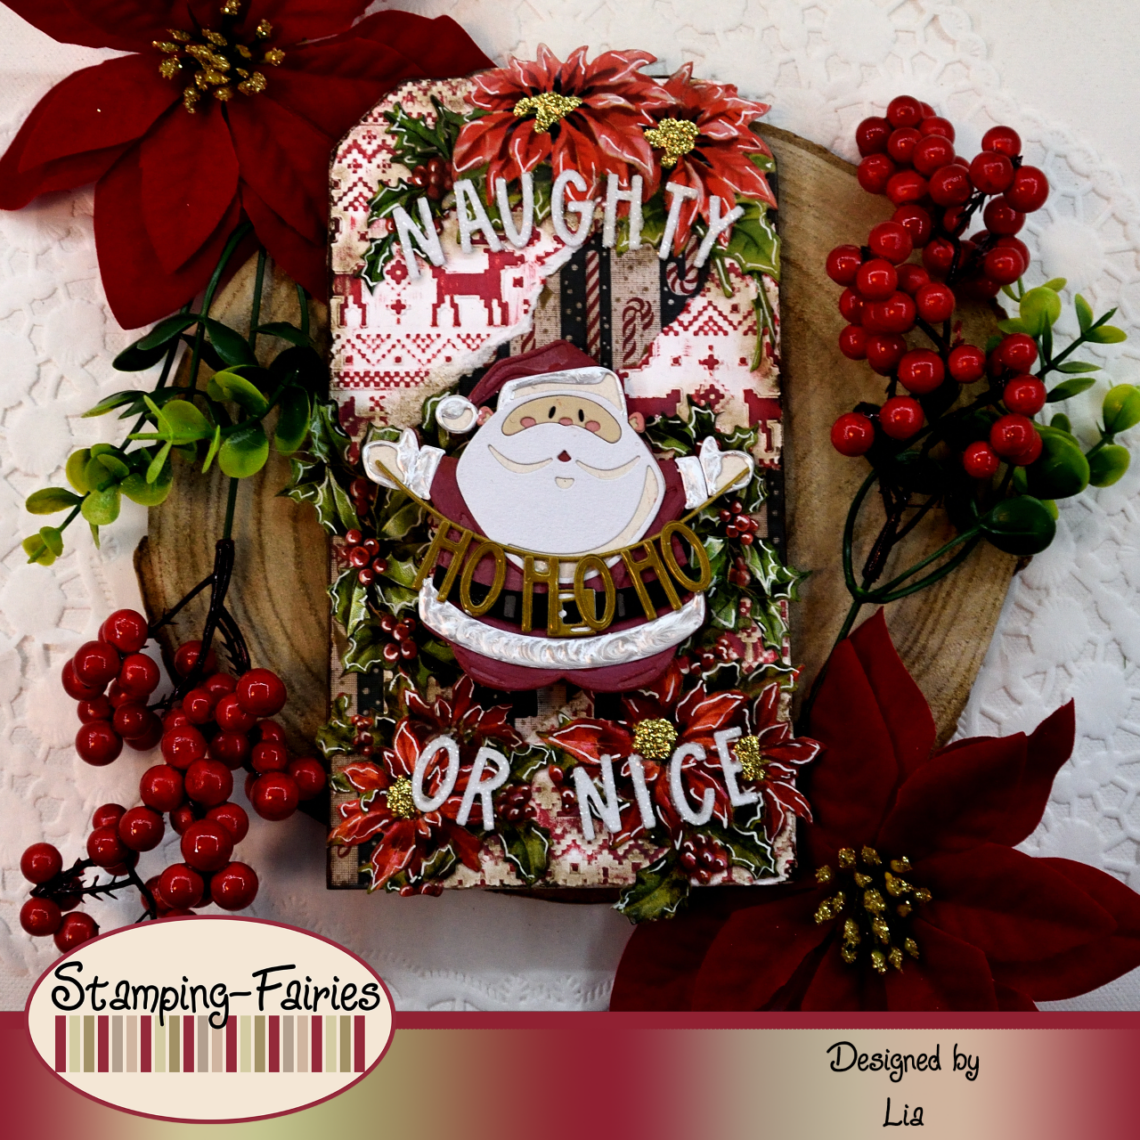
Naughty or Nice
*German version below | Deutsche Version unten*
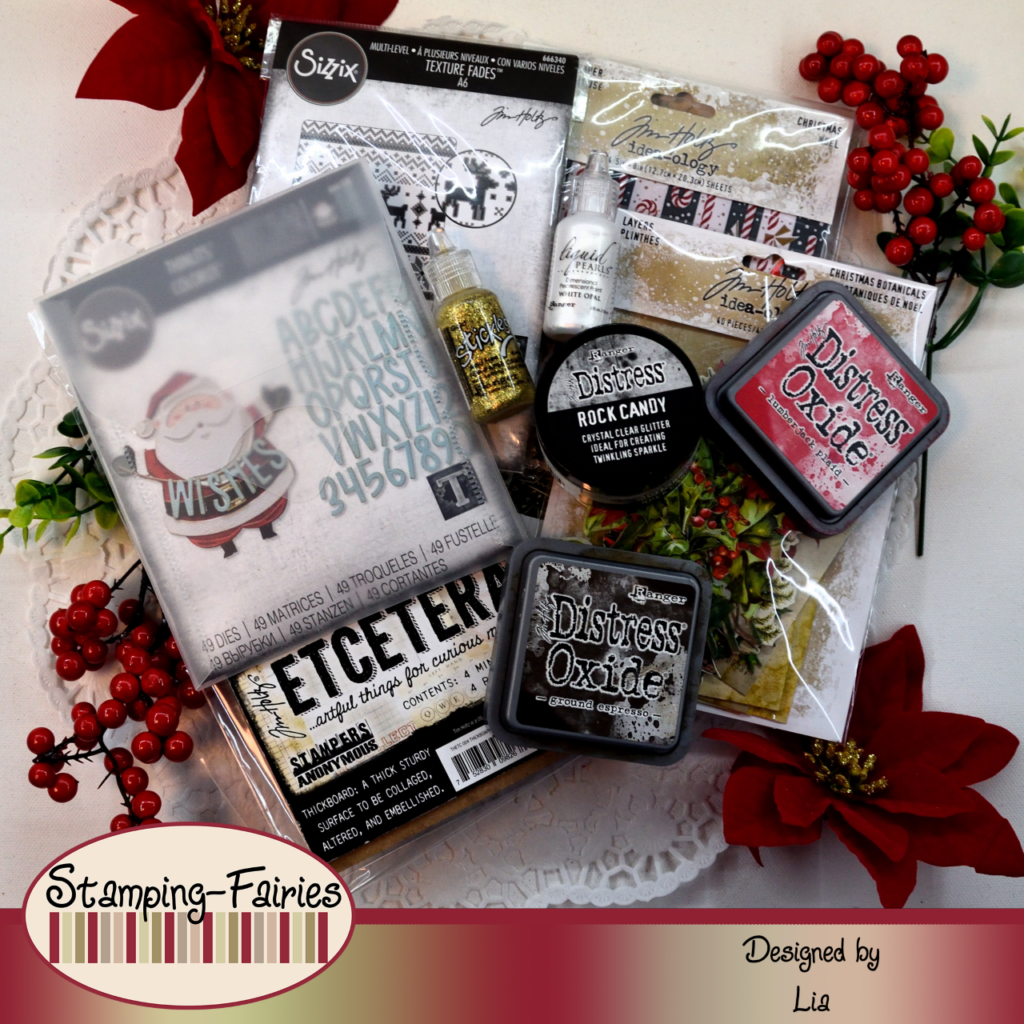
Hello everyone! Welcome back to another mixed media project. This is my first Christmas project for Stamping Fairies this year! I am starting the season with something really beautiful, made with products by Tim Holtz, of course! Let’s start with the materials I used:
Materials (If something is not in stock, please simply click on “Product reminder”/ “Produkterinnerung”)
- Tim Holtz – Mini Thickboard Tag 11,5 x 20 cm
- Tim Holtz Worn Wallpaper – Christmas
- Ranger Multi Medium
- Ranger – Tim Holtz Distress Oxide Pad
- Sizzix Tim Holtz -Texture Fades – Holiday Knit
- Tim Holtz – Layers Christmas Botanicals
- Sizzix Tim Holtz Thinlits – Santa Greetings, Colorize
- Carta Bella – Coordinating Solid Paper Pack – 12″ x 12″ – Halloween
- Ranger Glossy Accents
- Liquid Pearls – White Opal
- Distress Stickles Dry Glitter – Clear Rock Candy
- Stickles -Glitter Glue Gold
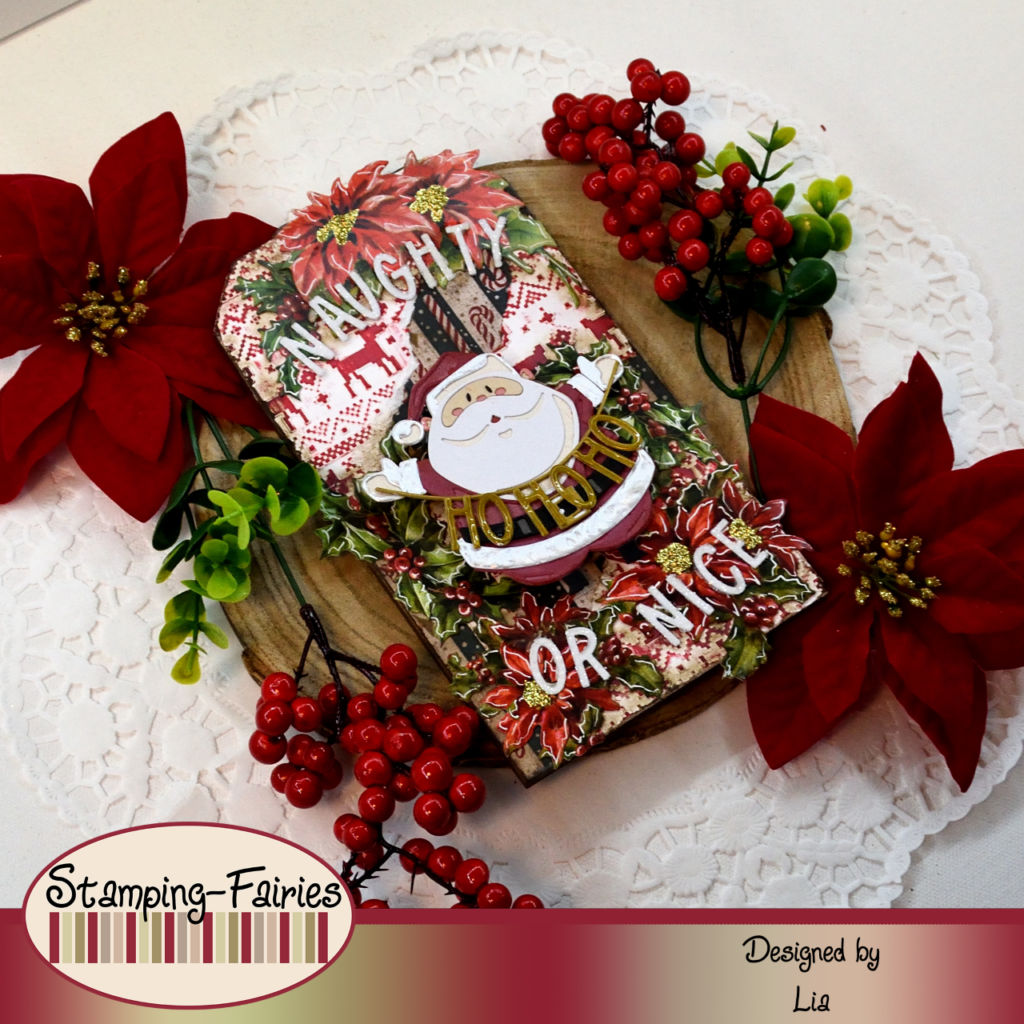
For this project, I worked on an Etcetera Tag and I started with the background. I chose one of the papers from a Worn Wallpaper Christmas package and I used Multi Medium Matte to attach it on the Tag. I used a wood file to remove the excess paper and then I darkened the edges and the whole panel with Ground Espresso Distress Oxide ink. It looked good but it was a little bit buzzy and dark and my images would not stand out on it. So, I used the Holiday Knit Texture Fades Embossing Folder and some white cardstock, and I created a nice textured element to add to my background. The Texture Fade Embossing Folders add a lot of texture but that means that the paper can easily break during the process of embossing. To prevent that, I usually mist my paper with some water. The water softens the fibers of the paper and makes it more pliable, preventing it from breaking. I get lovely results every time! So, I embossed the paper and then I rubbed my Lumberjack Plaid Distress Oxide ink pad on the surface of the paper, not pressing it too much, to add some colour on all of that lovely texture. I tore the embossed paper in three pieces and attached it on the Tag. I used the wood file to get rid of any excess paper and I darkened the edges with Ground Espresso Distress Oxide in. And with that, my background was done!
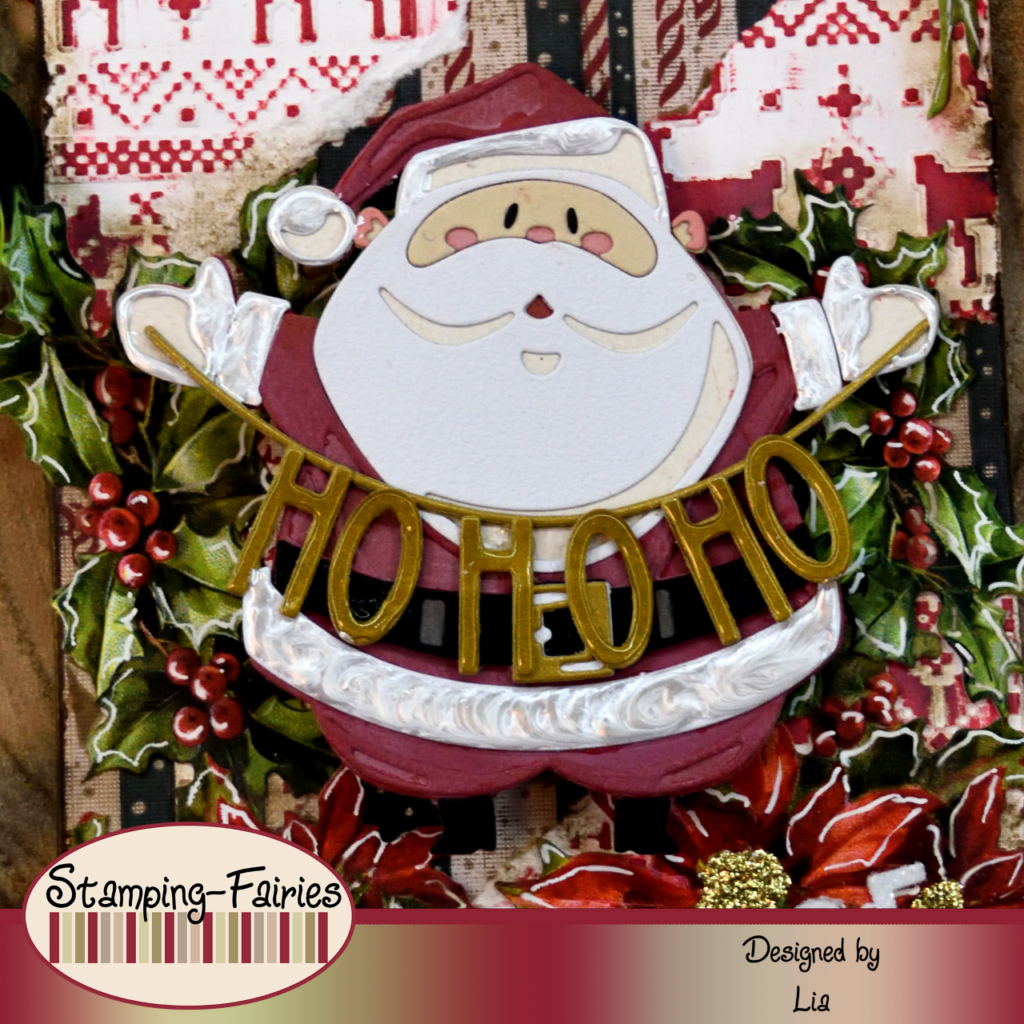
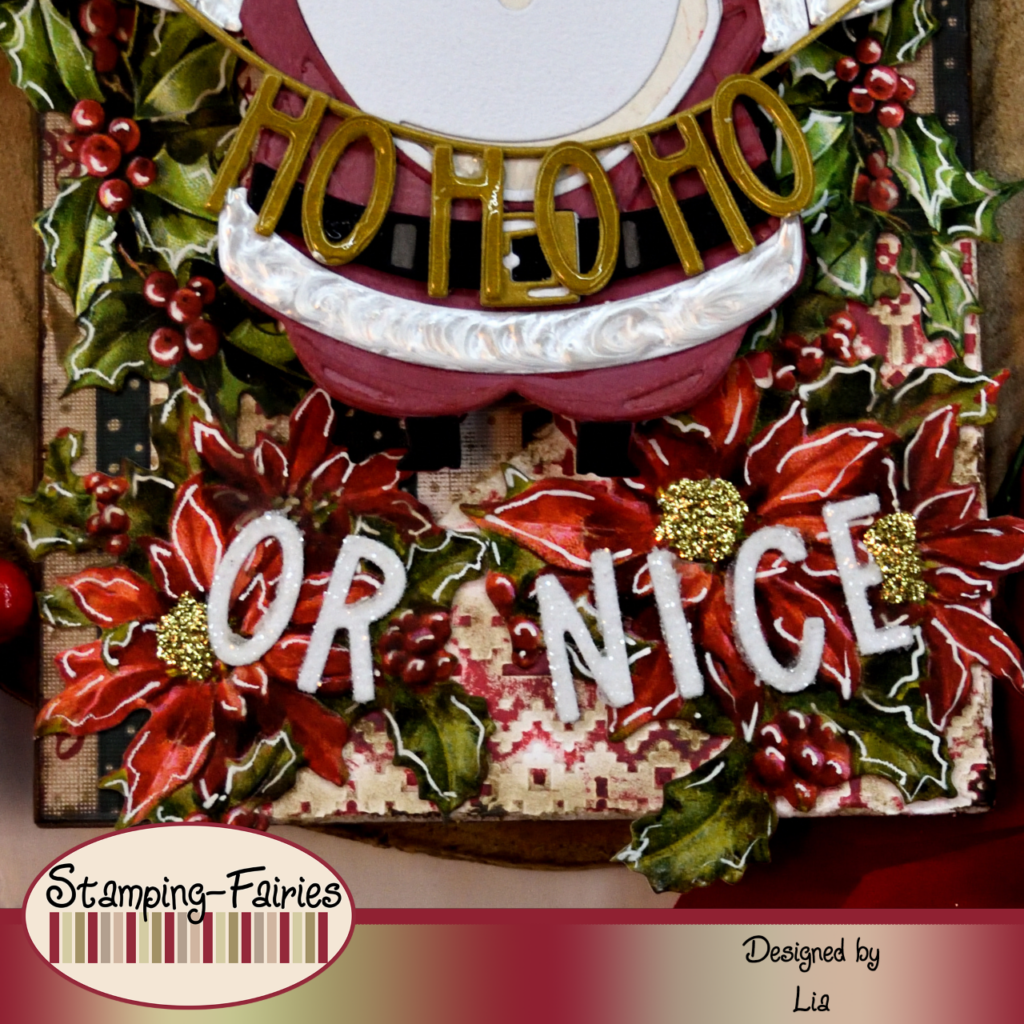
It was time to prepare my images. I wanted some Poinsettias, so I chose a few pieces from the Idea-Ology Layers Christmas Botanicals pack and attached them on the Tag. I added some shadows, using Ground Espresso Distress Oxide ink with a stiff brush, and some highlights, with a white Gelly Roll pen. For my main image, I build a Santa using the Sizzix Santa Greetings Thinlits Colorize set. I love this Santa! He looks so jolly! I used papers from the Carta Bella – Halloween Coordinating Solid Paper Pack along with pieces from my scrap bin. I know the paper pack says Halloween, but some of those colours were just perfect for my Santa, so I used them! I used the letters of the Thinlits set and gold cardstock, to cut a „Ho Ho Ho“ for his banner and then I used Ranger Glossy Accents on the letters to make them look a little more dimensional. I thought my Santa needed something to separate the white of his beard from the white of his cloths, so I used White Opal Liquid Pearls on the white parts of his cloths. I put my Santa on action wobblers, so he could be… well… wobbly! I only had small wobblers so I used two of them. He ended up really funny and now I am going to play with him until the wobblers will brake!!!

For my sentiment, I used the letter dies from the Sizzix Santa Greetings Thinlits Colorize set to cut my phrase. I applied a little bit of Multi Medium Matte on my work surface, I laid the letters in it and then I dipped them in the container with the Rock Candy glitter. So my letters are all coated with sparkly glitter. They really look like candy! My sentiment says „Naughty or Nice“ and I think it goes perfectly with my Santa! As a last little bit of embellishment, I used some Gold Stickles on the centers of the Poinsettias. I just wanted to add a little bit more sparkle, but I think I liked the Tag without it a little better.
And that was the project for today! I think I might have already broken one of the Action Wobblers of the Santa! I understand now, why everybody were so excited with these little wobbly things. Christmas season is only just starting! There will be a lot more fun coming soon. I really hope you like today’s project! I hope you got inspired! We will see each other again next Monday! Until then, stay creative and have fun!
*Deutsche Version*
Hallo zusammen! Willkommen zurück zu einem weiteren Mixed-Media-Projekt. Dies ist mein erstes Weihnachtsprojekt für Stamping Fairies! Ich beginne die Saison mit etwas wirklich Schönem, natürlich mit Produkten von Tim Holtz! Beginnen wir mit den Materialien, die ich verwendet habe:
Materialien (wenn etwas nicht auf Lager ist, bitte einfach auf „Produkterinnerung“ klicken)
- Tim Holtz – Mini Thickboard Tag 11,5 x 20 cm
- Tim Holtz Worn Wallpaper – Christmas
- Ranger Multi Medium
- Ranger – Tim Holtz Distress Oxide Pad
- Sizzix Tim Holtz -Texture Fades – Holiday Knit
- Tim Holtz – Layers Christmas Botanicals
- Sizzix Tim Holtz Thinlits – Santa Greetings, Colorize
- Carta Bella – Coordinating Solid Paper Pack – 12″ x 12″ – Halloween
- Ranger Glossy Accents
- Liquid Pearls – White Opal
- Distress Stickles Dry Glitter – Clear Rock Candy
- Stickles -Glitter Glue Gold
Für dieses Projekt habe ich an einem Etcetera Tag gearbeitet und mit dem Hintergrund begonnen. Ich habe eines der Papiere aus einem Worn Wallpaper Christmas Paket ausgewählt und es mit Multi Medium Matte auf dem Tag befestigt. Ich habe das überschüssige Papier mit einer Holzfeile entfernt und dann die Kanten und die gesamte Platte mit Ground Espresso Distress Oxide Tinte abgedunkelt. Es sah gut aus, aber es war etwas unruhig und dunkel und meine Bilder fielen darauf nicht auf. Also habe ich die Prägeschablone Holiday Knit Texture Fades und etwas weißen Karton verwendet und ein schönes Strukturelement erstellt, das ich meinem Hintergrund hinzufügen kann. Die Texture Fade Embossing Folders verleihen viel Textur, aber das bedeutet, dass das Papier beim Prägen leicht brechen kann. Um das zu verhindern, besprühe ich mein Papier normalerweise mit etwas Wasser. Das Wasser macht die Fasern des Papiers weicher, macht es geschmeidiger und verhindert so ein Brechen. Ich erhalte jedes Mal tolle Ergebnisse! Also habe ich das Papier geprägt und dann mit meinem Lumberjack Plaid Distress Oxide Stempelkissen über die Oberfläche des Papiers gerieben, ohne zu stark darauf zu drücken, um der ganzen schönen Textur etwas Farbe zu verleihen. Ich habe das geprägte Papier in drei Stücke gerissen und es am Tag befestigt. Ich habe die Holzfeile verwendet, um überschüssiges Papier zu entfernen, und die Ränder mit Ground Espresso Distress Oxide abgedunkelt. Und damit war mein Hintergrund fertig!
Zeit, meine Bilder vorzubereiten. Ich wollte ein paar Weihnachtssterne, also wählte ich ein paar Stücke aus dem Idea-Ology Layers Christmas Botanicals Paket aus und befestigte sie am Etikett. Ich habe einige Schatten mit Ground Espresso Distress Oxide Tinte und einem steifen Pinsel hinzugefügt und einige Highlights mit einem weißen Gelly Roll Stift. Für mein Hauptbild habe ich einen Weihnachtsmann mit dem Sizzix Santa Greetings Thinlits Colorize Set gebaut. Ich liebe diesen Weihnachtsmann! Er sieht so lustig aus! Ich habe Papiere aus dem Carta Bella – Halloween Coordinating Solid Paper Pack zusammen mit Stücken aus meiner Restesammlung verwendet. Ich weiß, dass auf der Papierpackung „Halloween“ steht, aber einige dieser Farben waren einfach perfekt für meinen Weihnachtsmann, also habe ich sie verwendet! Ich habe die Buchstaben des Thinlits Sets und Goldkarton verwendet, um ein „Ho Ho Ho“ für sein Banner auszuschneiden, und dann habe ich Ranger Glossy Accents auf die Buchstaben aufgetragen, damit sie etwas dreidimensionaler aussehen. Ich dachte, mein Weihnachtsmann bräuchte etwas, um das Weiß seines Bartes vom Weiß seiner Kleidung zu trennen, also habe ich White Opal Liquid Pearls auf die weißen Teile seiner Kleidung aufgetragen. Ich habe meinen Weihnachtsmann auf Action-Wobblers gestellt, damit er… na ja… wackelig sein kann! Ich hatte nur kleine Wobblers, also habe ich zwei davon verwendet. Am Ende ist er wirklich lustig geworden und jetzt werde ich mit ihm spielen, bis die Wobblers kaputt gehen!!!
Für meinen Spruch habe ich die Buchstabenstanzen aus dem Sizzix Santa Greetings Thinlits Colorize Set verwendet, um meinen Satz auszuschneiden. Ich habe ein wenig Multi Medium Matte auf meine Arbeitsfläche aufgetragen, die Buchstaben hineingelegt und sie dann in den Behälter mit dem Rock Candy Glitzer getaucht. Deshalb sind meine Buchstaben alle mit glitzerndem Glitzer überzogen. Sie sehen wirklich aus wie Süßigkeiten! Mein Spruch lautet „Frech oder nett“ und ich denke, dass es perfekt zu meinem Weihnachtsmann passt! Als letzte kleine Verschönerung habe ich einige Gold Stickles in die Mitte der Weihnachtssterne geklebt. Ich wollte nur ein bisschen mehr Glanz hinzufügen, aber ich denke, dass mir das Tag ohne es etwas besser gefallen hat.
Und das war das Projekt für heute! Ich glaube, ich habe vielleicht schon einen der Action Wobblers des Weihnachtsmanns kaputt gemacht! Ich verstehe jetzt, warum alle von diesen kleinen wackeligen Dingern so begeistert waren. Die Weihnachtszeit fängt gerade erst an! Bald wird es noch viel mehr Spaß geben. Ich hoffe sehr, dass euch das Projekt gefällt! Ich hoffe, ihr habt euch inspirieren lassen! Wir sehen uns nächsten Montag wieder! Bis dahin bleibt kreativ und habt Spaß!