
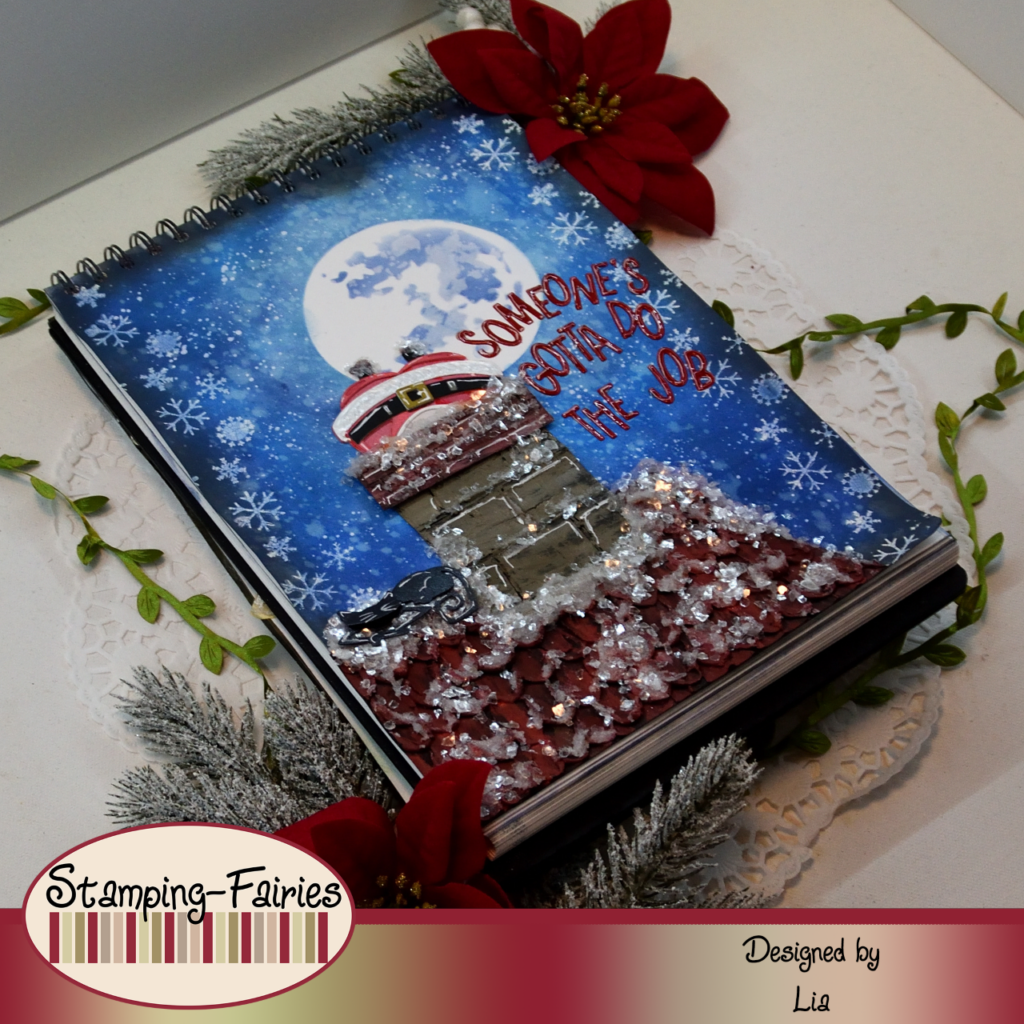
Someone’s gotta do the job
*German version below | Deutsche Version unten*
Hello everyone! Welcome back to another mixed media project. Some years ago, I painted a mug to use it as a gift. The picture I painted was that of a Santa Clause stuck upside down in a chimney. I thought I could recreate that funny scene for today’s project. I hope it will entertain you! Let’s start with the materials I used:
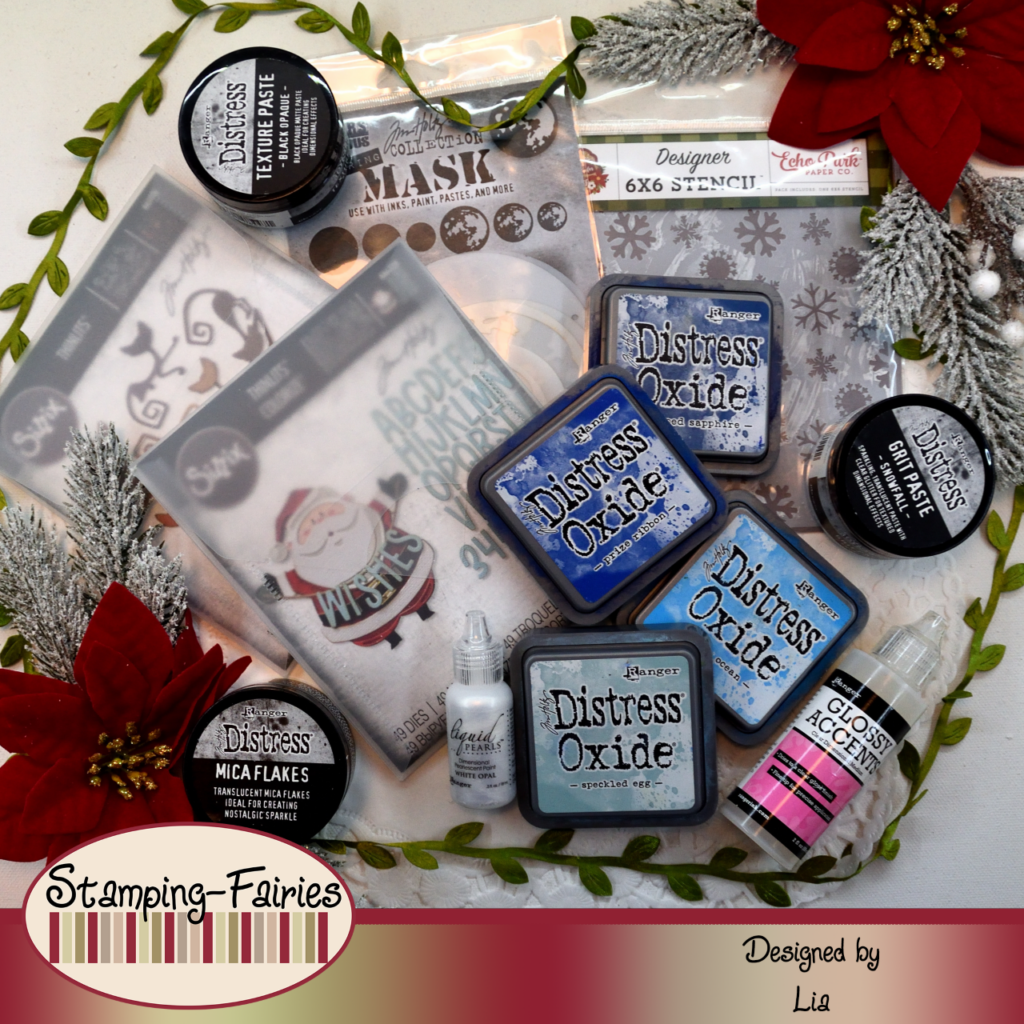
Materials (If something is not in stock, please simply click on “Product reminder”/ “Produkterinnerung”)
- Ranger – Tim Holtz Distress Oxide Pads
- Tim Holtz Layering Mask – Moon Mask
- Echo Park Stencil – Snow Globe
- Ranger Texture Paste Opaque Crackle
- Cardstock
- Tim Holtz Texture Paste – Black Opaque
- Distress Paints
- Sizzix Tim Holtz Thinlits – Santa Greetings, Colorize
- Sizzix Tim Holtz Thinlits – Mischievous
- Tim Holtz Distress Grit Paste – Snowfall
- Distress – Mica Flakes
- Ranger Glossy Accents
- Tonic Craft Tacky Glue
For this project, I worked in my Art Journal and I started with the background. I wanted to create a night sky with a big full moon. I used the bigger moon from the Tim Holtz Layering Moon Mask stencil and I started by placing the mask part on my page and ink blending a dark blue sky around it. For my colouring, I used Distress Oxide inks in colours Speckled Egg, Salty Ocean, Prize Ribbon, Chipped Sapphire and a little bit of Black Soot around the edges of the page. I removed the moon mask and I placed the moon stencil on the white area and then I ink blended the moon details using whatever blue ink was left on my brush. I sprayed the page with water, dabbed the water with a paper towel and then I dried the page. I wanted to add some white splatter and for that I used Picket Fence Distress Paint. I dried my page again and then I added some snowflake details on the two sides, using the Echo Park Snow Globe stencil and Ranger Texture Crackle Paste. And with that, my background was done!

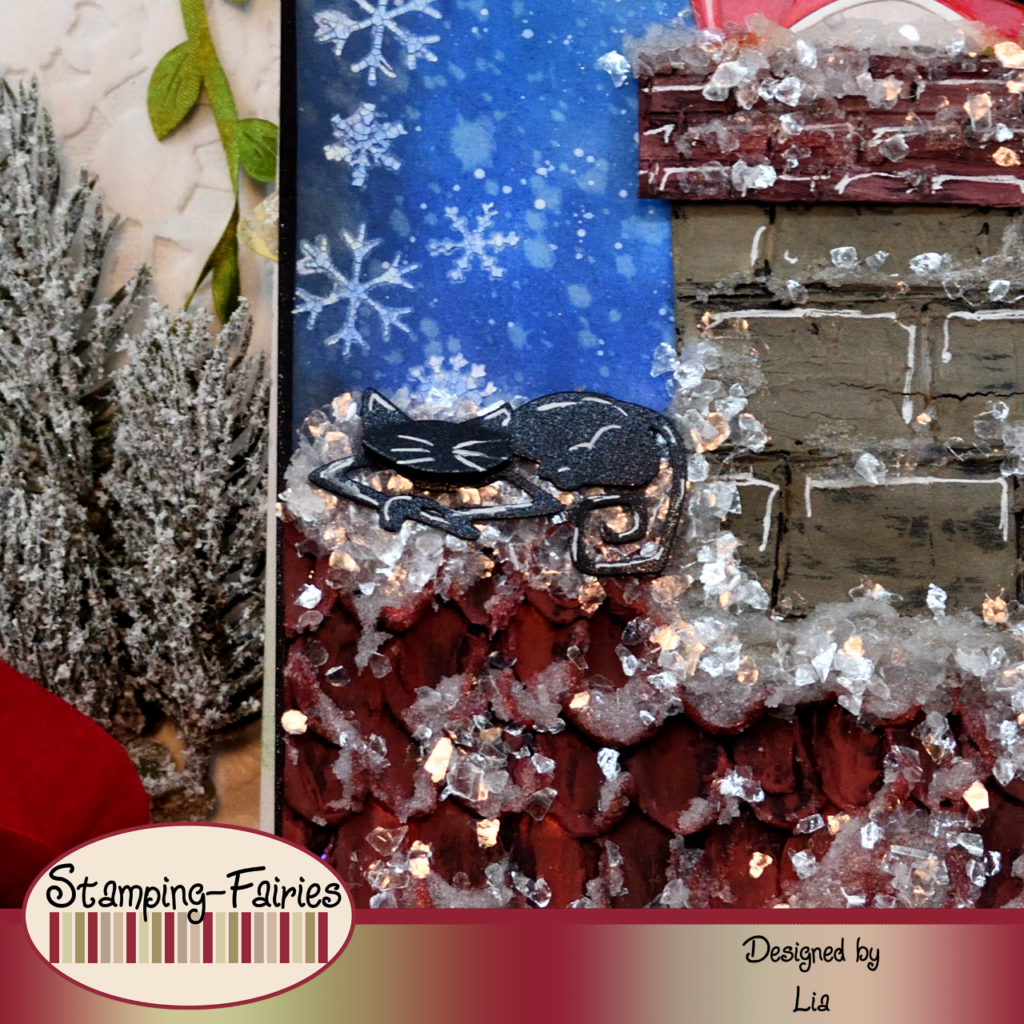
It was time to prepare my images. Of course the main focus is on the Santa Claus, who is mostly cut out of white watercolour paper with the Sizzix Santa Greetings Colorize Thinlits set. His cloths are coloured with Distress Oxide inks in colours Barn Door, Fired Brick and Lumberjack Plaid. The black and grey parts are cut out of black and grey cardstock and I used a little bit of gold cardstock for his belt buckle. I put the Santa together and then I used White Opal Liquid Pearls on the white parts of his cloths. I wanted to add a cat sitting on the roof, so I used the Sizzix Mischievous Thinlits set and black cardstock to cut the cat that’s laying down. To create my roof and the chimney, first I sketched and cut the shapes out of black cardstock. I used Ranger Black Opaque Texture Paste to build the shingles (one by one…!!!) on the roof and the stone on the chimney. I left the Black Paste to dry and then I coloured everything with Distress Paints in colours Barn Door, Walnut Stain and Lost Shadow, mixed all together in different ratios. I put all the pieces together and I had a roof with a chimney and a Santa Clause stuck in it!
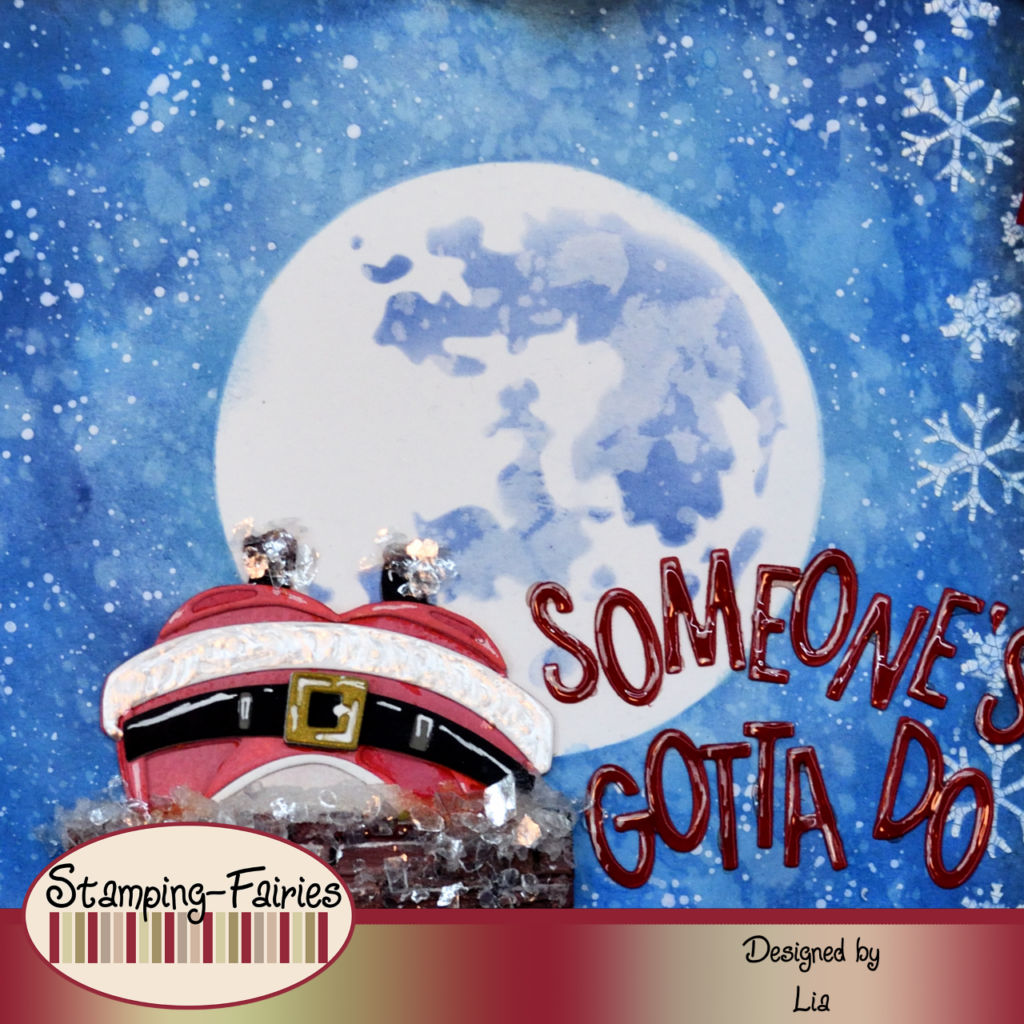
For my sentiment, I used the letters from the Sizzix Santa Greetings Colorize Thinlits set and red cardstock. I placed the letters on my page, making sure that they are not in a straight line. My sentiment says „Someone’s gotta do the job“ and it seems fit for a Santa stuck in a chimney. I bet he regrets his job choices (LOL)! Since I had all of my elements on the page, I went on and added Snowfall Distress Grit Paste all over the roof, the chimney and on Sant’s boots, because he has been stuck there, upside down, for some time and his boots got covered with snow!!! Then I sprinkled some Distress Mica Flakes on the Snowfall Grit Paste. In the end, I covered the letters of the sentiment with Glossy Accents, to make them stand out a little bit better.

And that was the project for today! I had a lot of fun building this scene. I hope the Santa will not put me in the naughty list because of this project… Who am I kidding? I do not care… I will do it again!!! I really hope you like today’s project! I hope you got inspired! We will see each other again next Monday! Until then, stay creative and have fun!
*Deutsche Version*
Hallo zusammen! Willkommen zurück zu einem weiteren Mixed Media Projekt. Vor einigen Jahren habe ich eine Tasse bemalt, um sie als Geschenk zu verwenden. Das Bild, das ich gemalt habe, war das eines Weihnachtsmanns, der kopfüber in einem Schornstein steckte. Ich dachte, ich könnte diese lustige Szene für das heutige Projekt nachstellen. Ich hoffe, es wird euch unterhalten! Beginnen wir mit den Materialien, die ich verwendet habe:
Materialien (wenn etwas nicht auf Lager ist, bitte einfach auf „Produkterinnerung“ klicken)
- Ranger – Tim Holtz Distress Oxide Pads
- Tim Holtz Layering Mask – Moon Mask
- Echo Park Stencil – Snow Globe
- Ranger Texture Paste Opaque Crackle
- Cardstock
- Tim Holtz Texture Paste – Black Opaque
- Distress Paints
- Sizzix Tim Holtz Thinlits – Santa Greetings, Colorize
- Sizzix Tim Holtz Thinlits – Mischievous
- Tim Holtz Distress Grit Paste – Snowfall
- Distress – Mica Flakes
- Ranger Glossy Accents
- Tonic Craft Tacky Glue
Für dieses Projekt habe ich in meinem Kunstjournal gearbeitet und mit dem Hintergrund begonnen. Ich wollte einen Nachthimmel mit einem großen Vollmond schaffen. Ich habe den größeren Mond aus der Tim Holtz Layering Moon Mask Schablone verwendet und zunächst den Maskenteil auf meiner Seite platziert und mit Tinte einen dunkelblauen Himmel darum herum verblendet. Für meine Kolorierung habe ich Distress Oxide Tinten in den Farben Speckled Egg, Salty Ocean, Prize Ribbon, Chipped Sapphire und etwas Black Soot an den Rändern der Seite verwendet. Ich habe die Mondmaske entfernt, die Mondschablone auf dem weißen Bereich platziert und dann die Monddetails mit Tinte verblendet, wofür ich die blaue Tinte verwendet habe, die noch auf meinem Pinsel übrig war. Ich habe die Seite mit Wasser besprüht, das Wasser mit einem Papiertuch abgetupft und dann die Seite getrocknet. Ich wollte etwas weiße Spritzer hinzufügen und habe dafür Picket Fence Distress Paint verwendet. Ich habe meine Seite noch einmal getrocknet und dann auf beiden Seiten einige Schneeflockendetails hinzugefügt, indem ich die Echo Park Snow Globe Schablone und die Ranger Texture Crackle Paste verwendet habe. Und damit war mein Hintergrund fertig!

Zeit, meine Bilder vorzubereiten. Im Mittelpunkt steht natürlich der Weihnachtsmann, der mit dem Sizzix Santa Greetings Colorize Thinlits Set größtenteils aus weißem Aquarellpapier ausgeschnitten wird. Seine Kleider sind mit Distress Oxide Tinten in den Farben Barn Door, Fired Brick und Lumberjack Plaid gefärbt. Die schwarzen und grauen Teile sind aus schwarzem und grauem Karton ausgeschnitten und für seine Gürtelschnalle habe ich ein wenig goldenen Karton verwendet. Ich habe den Weihnachtsmann zusammengesetzt und dann die weißen Teile seiner Kleidung mit White Opal Liquid Pearls bemalt. Ich wollte eine Katze hinzufügen, die auf dem Dach sitzt, also habe ich das Sizzix Mischievous Thinlits Set und schwarzen Karton verwendet, um die liegende Katze auszuschneiden. Um mein Dach und den Schornstein zu gestalten, habe ich zunächst die Formen aus schwarzem Karton skizziert und ausgeschnitten. Ich habe Ranger Black Opaque Texture Paste verwendet, um die Ziegel (eine nach der anderen…!!!) für das Dach und den Stein auf dem Schornstein zu bauen. Ich habe die schwarze Paste trocknen lassen und dann alles mit Distress Paints in den Farben Barn Door, Walnut Stain und Lost Shadow eingefärbt, alles in unterschiedlichen Verhältnissen gemischt. Ich habe alle Teile zusammengefügt und hatte ein Dach mit einem Schornstein und einem darin steckenden Weihnachtsmann!
Für meinen Spruch habe ich die Buchstaben aus dem Sizzix Santa Greetings Colorize Thinlits Set und roten Karton verwendet. Ich habe die Buchstaben auf meiner Seite platziert und darauf geachtet, dass sie nicht in einer geraden Linie stehen. Mein Spruch sagt: „Einer muss den Job machen“ und es scheint passend für einen Weihnachtsmann zu sein, der im Schornstein steckt. Ich wette, er bereut seine Berufswahl (LOL)! Da ich alle meine Elemente auf der Seite hatte, habe ich Snowfall Distress Grit Paste auf das gesamte Dach, den Schornstein und auf Santas Stiefel aufgetragen, weil er dort seit einiger Zeit kopfüber feststeckt und seine Stiefel mit Schnee bedeckt sind!!! Dann habe ich ein paar Distress Mica Flakes auf die Snowfall Grit Paste gestreut. Am Ende habe ich die Buchstaben des Spruchs mit Glossy Accents überzogen, um sie etwas besser hervorzuheben.
Und das war das Projekt für heute! Es hat mir viel Spaß gemacht, diese Szene aufzubauen. Ich hoffe, der Weihnachtsmann wird mich wegen dieses Projekts nicht auf die Liste der Bösen setzen … Ich kann euch nichts vormachen. Es ist mir egal… Ich werde es wieder tun!!! Ich hoffe sehr, dass euch das Projekt gefällt! Ich hoffe, ihr habt euch inspirieren lassen! Wir sehen uns nächsten Montag wieder! Bis dahin bleibt kreativ und habt Spaß!

Ein lieber Gruß


