Spring
*German version below | Deutsche Version unten*
Hello everyone! Welcome back to another mixed media project. As you know, our April Challenge Theme is Spring and nothing represents Spring better than flowers! So, for this project, I created a little flower composition. Let’s start with the materials I used:
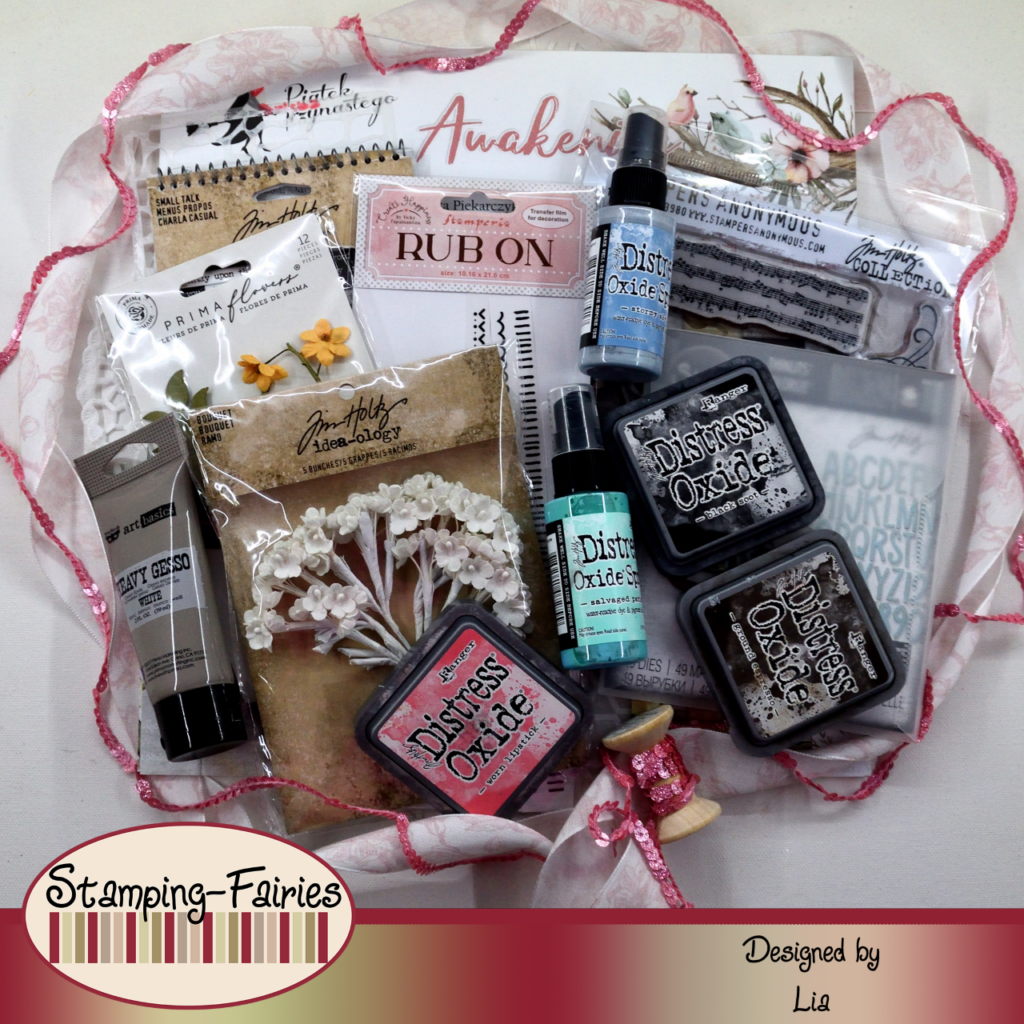
Materials (If something is not in stock, please simply click on “Product reminder”/ “Produkterinnerung”)
- 20 x 20 cm Canvas
- Piatek Trzynastego Paper Pad – Awakening 12″ x 12″
- Ranger Multi Medium – Matte
- Finnabair Art Basics – Heavy Gesso White (Tube)
- Stamperia Stencil – Bricks
- Ranger Texture Paste Opaque Crackle
- Distress Oxide Sprays
- Ranger – Tim Holtz Distress Oxide Pads
- Tim Holtz Stamp set – The Poinsettia
- Stamperia Rub On Transfers – Border/Black
- A small photo frame
- Burlap, lace ribbon and some string
- Prima Marketing Paper Flowers
- Tim Holtz idea-ology – Bouquet
- Pink Cardstock
- Sizzix Tim Holtz Thinlits – Santa Greetings, Colorize
- Tim Holtz Small Talk Sticker Book
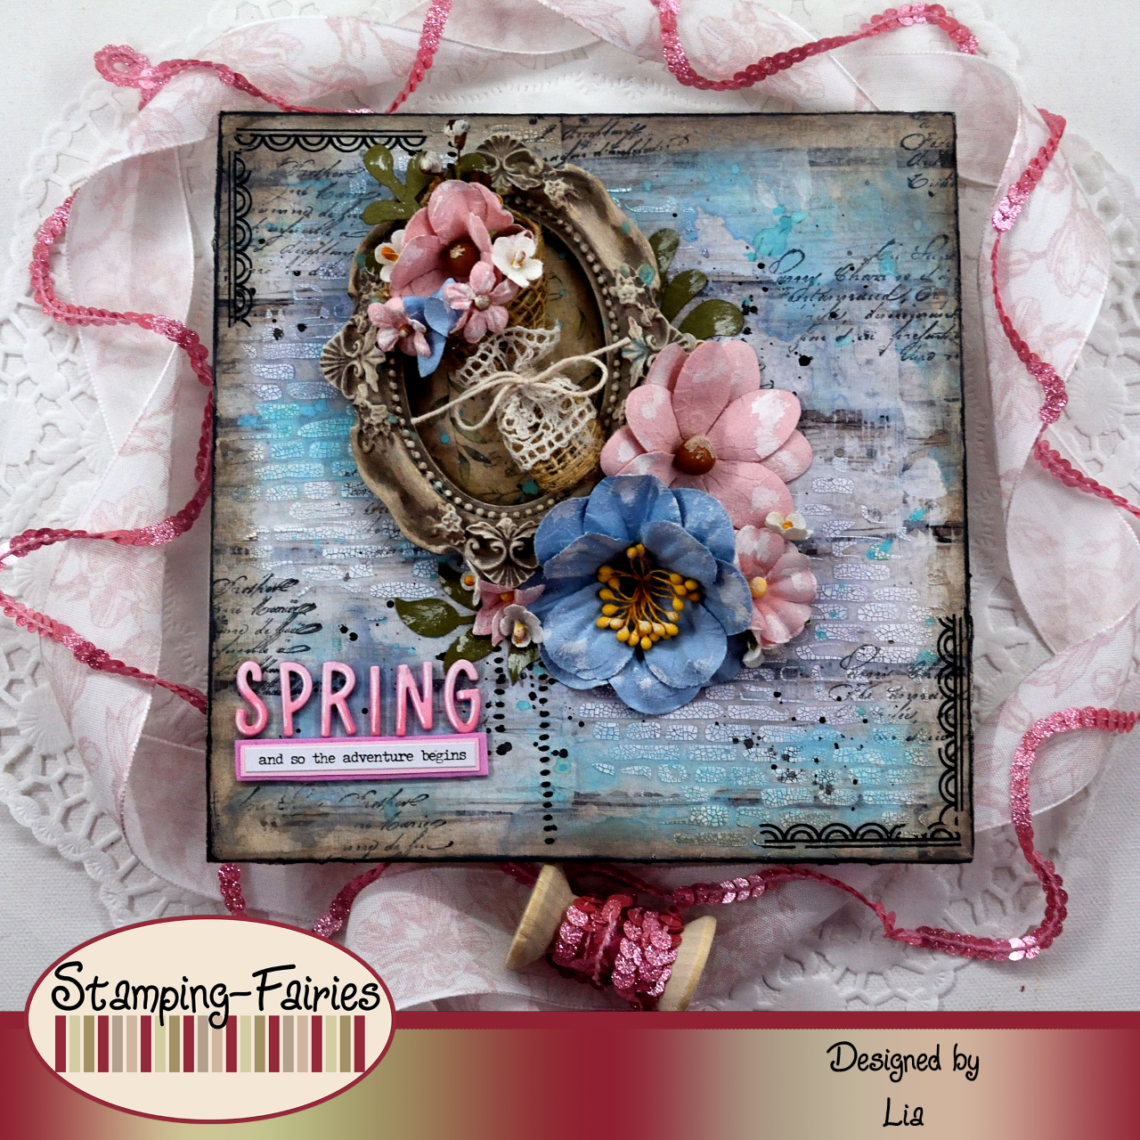
For this project, I chose a canvas as my base and I started with the background. I used a page from the Piatek Trzynastego Awakening Paper Pad and I glued it on my canvas using Multi Medium Matte. I smoothed the edges of the paper, using a sanding block, and then I used a spatula to apply a thin layer of Gesso on my project. The paper I used is really nice to work on but the pattern was a bit too strong. So I used the Gesso to tone it down. Moving on, I used the Stamperia Bricks stencil with Ranger Texture Crackle Paste, to add some texture on some areas of the project. I allowed the past to dry and then I used Stormy Sky and Salvaged Patina Distress Oxide Sprays to add some colour on the background. I applied the colour with a paint brush, I sprayed it with water and allowed it to move, I dabbed off the excess and then I dried my project. I also used the Salvaged Patina Distress Oxide Spray to splatter the canvas. I used Ground Espresso and Black Soot Distress Oxide inks to darken the edges of the canvas and then I added some text detail on my project, using the Black Soot Distress Oxide ink with a stamp from the Tim Holtz The Poinsettia stamp set. I splattered my project with black ink and my background was mostly done!
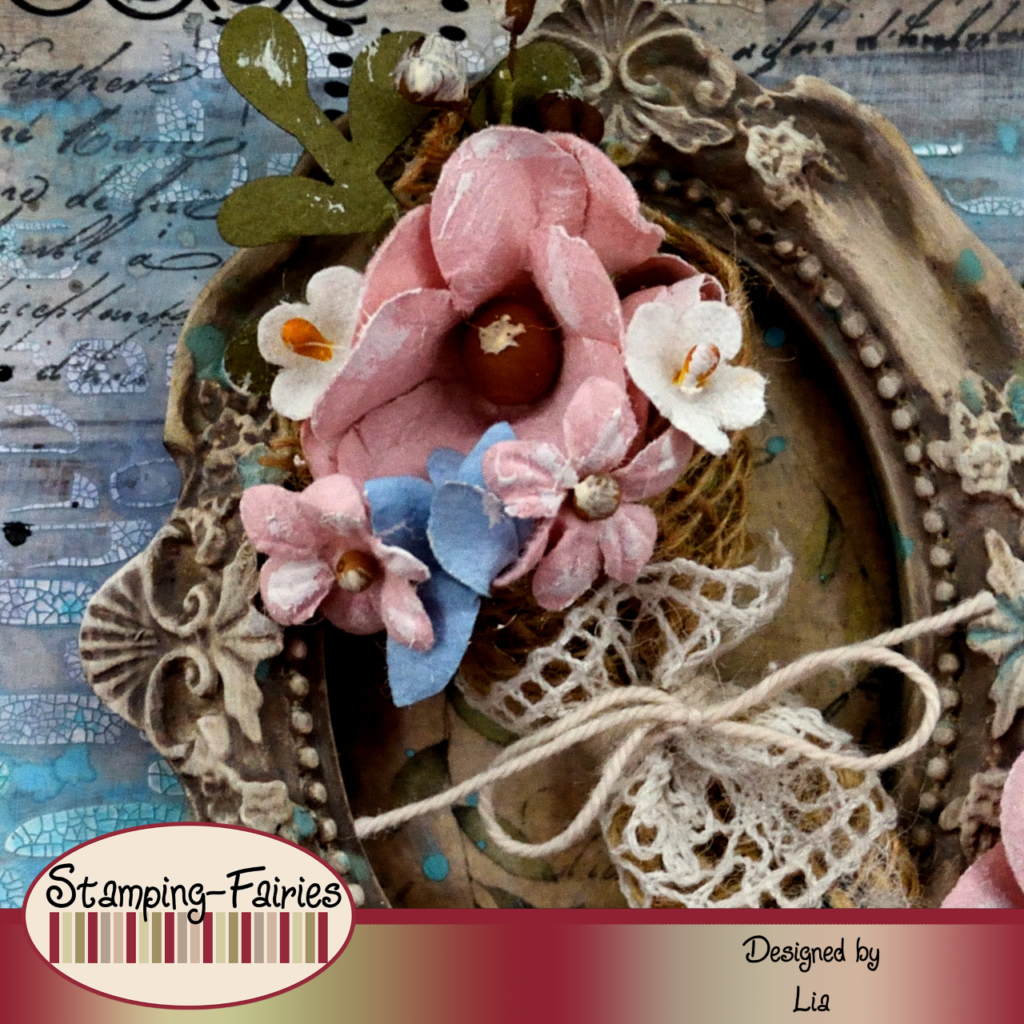
Time to prepare my images! I was thinking of a flower bouquet in a frame. I had this lovely little picture frame that was just the perfect size. It was painted gold but I wanted it to look like old stone. So, I covered the frame with white Gesso, allowed it to dry and then I coloured it. I covered it completely with Ground Espresso Distress Oxide ink and then I used a slightly wet towel to remove most of the colour. The ink stained the white and gave it a nice tint. There is also some darker ink left on the sunken areas of the frame, which I really like. I used the leftover piece of my background paper and I cut an insert for my frame and then I treated that paper insert with Ground Espresso Distress Oxide ink. I splattered the frame and the insert with Salvaged Patina Distress Oxide ink and I attached them on my project. And that was when I got the idea of using some Rub On Transfers. I used the Stamperia Border/Black Rub On Transfers and I tried to make them look like they come out from behind the frame. I also used them on the top left and bottom right corners of the canvas. With that done, it was time to deal with my flowers. I created a little flower wrap, using some Burlap, some lace ribbon and a little string. I attached the flower wrap in the frame and then I added the flowers. My flowers come from three different Prima Flower sets and the Idea-Ology Bouquet. I arranged the flowers in the flower wrap and I also created a flowers composition on the bottom right corner of the frame.

My sentiment consists of two parts. The first part is cut out of pink cardstock, with the alphabet dies from the Sizzix Santa Greetings Colorize Thinlits set. I added a little bit of Worn Lipstick Distress Oxide ink on the bottom part of the letters, just to make them a little bit more interesting, and I attached them on letters cut out of pink fun foam. The second part of my sentiment comes from the Idea-Ology Small Talk sticker book. This sentiment stripe is attached on pink cardstock and then all together attached on pink fun foam. All together, the sentiment says „Spring. And so the adventure begins“. I really feel like every Spring is the beginning of a new adventure! In the end, I added some highlights on the letters, using a white Gelly Roll pen, and on the flowers, using a stiff brush and some white Gesso.

And that was the project for today! I was in a light colour mood this time. I find that I really like playing with the inks! It is messy but really enjoyable! Just a reminder: our Spring Challenge will be running until the end of the month. You can find more information about it in the Stamping Fairies profiles on Instagram and Facebook. I really hope you like today’s project! I hope you got inspired! We will see each other again next Monday! Until then, stay creative and have fun!
*Deutsche Version*
Hallo zusammen! Willkommen zurück zu einem weiteren Mixed-Media Projekt. Wie ihr wisst, ist unser April Challenge Thema der Frühling und nichts repräsentiert den Frühling besser als Blumen! Deshalb habe ich für dieses Projekt eine kleine Blumenkomposition erstellt. Beginnen wir mit den Materialien, die ich verwendet habe:
Materialien (wenn etwas nicht auf Lager ist, bitte einfach auf „Produkterinnerung“ klicken)
- 20 x 20 cm Leinwand
- Piatek Trzynastego Paper Pad – Awakening 12″ x 12″
- Ranger Multi Medium – Matte
- Finnabair Art Basics – Heavy Gesso White (Tube)
- Stamperia Stencil – Bricks
- Ranger Texture Paste Opaque Crackle
- Distress Oxide Sprays
- Ranger – Tim Holtz Distress Oxide Pads
- Tim Holtz Stamp set – The Poinsettia
- Stamperia Rub On Transfers – Border/Black
- Ein kleiner Fotorahmen
- Sackleinen, Spitzenband und etwas Schnur
- Prima Marketing Paper Flowers
- Tim Holtz idea-ology – Bouquet
- Pink Cardstock
- Sizzix Tim Holtz Thinlits – Santa Greetings, Colorize
- Tim Holtz Small Talk Sticker Book
Für dieses Projekt habe ich eine Leinwand als Basis gewählt und mit dem Hintergrund begonnen. Ich habe eine Seite aus dem Piatek Trzynastego Awakening Paper Pad verwendet und sie mit Multi Medium Matte auf meine Leinwand geklebt. Ich habe die Kanten des Papiers mit einem Schleifblock geglättet und dann mit einem Spachtel eine dünne Schicht Gesso auf mein Projekt aufgetragen. Das Papier, das ich verwendet habe, lässt sich wirklich gut bearbeiten, aber das Muster war etwas zu stark. Also habe ich das Gesso verwendet, um es abzuschwächen. Als nächstes habe ich die Stamperia Bricks Schablone mit Ranger Texture Crackle Paste verwendet, um einigen Bereichen des Projekts etwas Textur hinzuzufügen. Ich habe die Paste trocknen lassen und dann Stormy Sky und Salvaged Patina Distress Oxide Sprays verwendet, um dem Hintergrund etwas Farbe zu verleihen. Ich habe die Farbe mit einem Pinsel aufgetragen, mit Wasser besprüht und sich einwirken lassen, den Überschuss abgetupft und dann mein Projekt getrocknet. Ich habe auch das Salvaged Patina Distress Oxide Spray verwendet, um die Leinwand zu bespritzen. Ich habe Ground Espresso und Black Soot Distress Oxide Tinte verwendet, um die Ränder der Leinwand abzudunkeln, und dann habe ich einige Textdetails zu meinem Projekt hinzugefügt, indem ich die Black Soot Distress Oxide Tinte mit einem Stempel aus dem Stempelset „The Poinsettia“ von Tim Holtz verwendet habe. Ich habe mein Projekt mit schwarzer Tinte bespritzt und mein Hintergrund war größtenteils fertig!

Zeit, meine Bilder vorzubereiten! Ich dachte an einen Blumenstrauß in einem Rahmen. Ich hatte diesen schönen kleinen Bilderrahmen, der genau die perfekte Größe hatte. Er war goldfarben bemalt, aber ich wollte, dass er wie alter Stein aussieht. Also habe ich den Rahmen mit weißem Gesso bedeckt, ihn trocknen lassen und dann gefärbt. Ich habe ihn vollständig mit Ground Espresso Distress Oxide Tinte bedeckt und dann den größten Teil der Farbe mit einem leicht feuchten Tuch entfernt. Die Tinte hat das Weiß gefärbt und ihm einen schönen Farbton gegeben. Außerdem ist an den versunkenen Stellen des Rahmens etwas dunklere Tinte zurückgeblieben, was mir sehr gut gefällt. Ich habe das übrig gebliebene Stück meines Hintergrundpapiers verwendet, eine Einlage für meinen Rahmen ausgeschnitten und diese Papiereinlage dann mit Ground Espresso Distress Oxide Tinte behandelt. Ich habe den Rahmen und die Einlage mit Salvaged Patina Distress Oxide Tinte bespritzt und sie an meinem Projekt befestigt. Und da kam mir die Idee, Rub-On Transfers zu verwenden. Ich habe die Stamperia Border/Black Rub-On Transfers verwendet und versucht, sie so aussehen zu lassen, als ob sie hinter dem Rahmen hervorkämen. Ich habe sie auch in der oberen linken und unteren rechten Ecke der Leinwand verwendet. Nachdem das erledigt war, war es Zeit, mich um meine Blumen zu kümmern. Ich habe aus etwas Sackleinen, etwas Spitzenband und einer kleinen Schnur eine kleine Blumenverpackung hergestellt. Ich habe die Blumenverpackung im Rahmen befestigt und dann die Blumen hinzugefügt. Meine Blumen stammen aus drei verschiedenen Prima Flower Sets und dem Idea-Ology Bouquet. Ich habe die Blumen in der Blumenverpackung arrangiert und außerdem eine Blumenkomposition in der unteren rechten Ecke des Rahmens erstellt.
Mein Spruch besteht aus zwei Teilen. Der erste Teil ist aus rosafarbenem Karton ausgeschnitten, mit den Alphabet Stanzformen aus dem Sizzix Santa Greetings Colorize Thinlits Set. Ich habe ein wenig Worn Lipstick Distress Oxide Tinte auf den unteren Teil der Buchstaben aufgetragen, um sie etwas interessanter zu machen, und sie auf den gleichen Buchstaben befestigt, die ich nochmal aus rosafarbenem Schaumstoff ausgeschnitten habe. Der zweite Teil meines Spruchs stammt aus dem Idea-Ology Small Talk Stickerbuch. Dieser Stimmungsstreifen wird auf rosafarbenem Karton befestigt und dann alles zusammen auf rosafarbenem Schaumstoff befestigt. Insgesamt lautet der Spruch: „Frühling. Und so beginnt das Abenteuer.“ Ich habe wirklich das Gefühl, dass jeder Frühling der Beginn eines neuen Abenteuers ist! Am Ende habe ich mit einem weißen Gelly Roll Stift einige Highlights auf den Buchstaben und mit einem steifen Pinsel und etwas weißem Gesso auf den Blumen hinzugefügt.

Und das war das Projekt für heute! Diesmal war ich in einer hellen Farbstimmung. Ich finde, dass es wirklich Spaß macht, mit den Tinten zu spielen! Es ist chaotisch, aber wirklich erfreulich! Nur zur Erinnerung: Unsere Frühlings Challenge bis Ende des Monats läuft. Weitere Informationen dazu findet ihr in den Stamping Fairies Profilen auf Instagram und Facebook. Ich hoffe sehr, dass euch das Projekt gefällt! Ich hoffe, ihr habt euch inspirieren lassen! Wir sehen uns nächsten Montag wieder! Bis dahin bleibt kreativ und habt Spaß!


Liebe Grüße
Das könnte dich auch interessieren
Aus eins mach drei: Kunterbunte Kolibris

ATC’s mit „Karamell“ Collage Medium