Build a Snowman
*German version below | Deutsche Version unten*
Hello everyone! Welcome back to another mixed media project. Today’s project evolved on its own. I was just „playing“ with some products and that’s what I ended up with. I thought you might be interested to see it. Let’s start with the materials I used:
Materials (If something is not in stock, please simply click on “Product reminder”/ “Produkterinnerung”)
- Ranger – Tim Holtz Distress Oxide Pads
- Echo Park 6″ x 6″ Stencil – Snowy Swirls
- Tim Holtz Layering Stencil – Poinsettia
- Nuvo Glimmer Paste – Raspberry Rhodolite
- Distress Paint – Picket Fence
- VersaFine Clair – Acorn
- VersaFine Onyx Black
- Tim Holtz Stamp Set – Mr. Frostie
- Tim Holtz Mini-Recoil Snips
- Liquid Pearls
- Distress Spritz – Uncharted Mariner

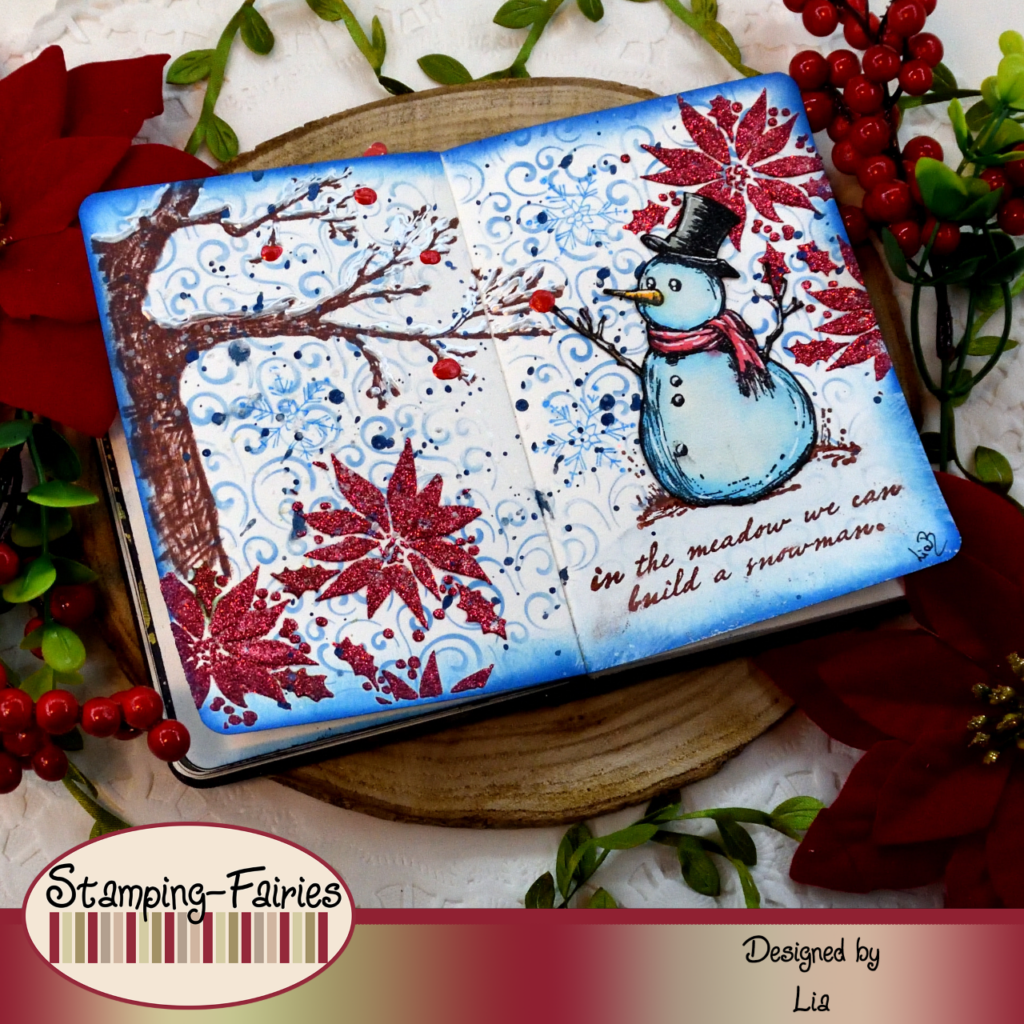
For this project, I worked in a small Art journal. As I said, I was just „playing“ with the product. I started with the background. I used the Echo Park Snowy Swirls stencil with Distress Oxide inks. I meant to use Speckled Egg but I think I had a little bit of Salty Ocean on my brush, so I ended up with the colour you see in the pictures. To add some texture, I used the Poinsettia Layering Stencil with Raspberry Rhodolite NUVO Glimmer Paste on the lower left and upper right corner of my project. This paste is really beautiful and sparkly. A word of caution though. It dries like concrete, so it would be better not to let it dry on your stencils or any other tools. At this point I knew I was going to use a Snowman on this project. So, I used Picket Fence (white) Distress Paint to create a little white hill on the lower right side of the project, for my Snowman to sit upon. I used the smaller snowflake stamp from the Tim Holtz Mr. Frostie stamp set, with Salty Ocean Distress oxide ink and I stamped a few snowflakes. I used Salty Ocean and Prize Ribbon Distress Oxide inks to darken the edges of my pages and the background was done.

Time to work on my images. First, I stamped the tree branch from the Tim Holtz Mr. Frostie stamp set, with VersaFine Clair Acorn (brown) ink. This image is pretty short, so I used a small, flat, stiff brush and the same brown ink and I sketched the rest of the tree trunk. I also filled in some colour, to make the tree look more coherent. Then, I used White Opal Liquid Pearls and I lined all the flat areas of the tree with it. I was just trying to create the impression of snow sitting on the tree. While my snow was drying, I worked on my Snowman. I stamped the little Snowman from the Tim Holtz Mr. Frostie stamp set on watercolour paper with VersaFine Onyx Black ink. Then I coloured him with Distress Oxide inks used as watercolours. I used Speckled Egg and Salty Ocean for the blue parts, Lumberjack Plaid for the red scarf, Carved Pumpkin for the carrot nose and a little bit of Black Soot for the hat. I dried the colours and then I cut the Snowman, using the Tim Holtz Recoil Snips. Before I attach the Snowman on my project, I added some splatters on my pages. I diluted some White Opal Liquid Pearls and splattered with it, dried it and then I added more splatter, this time with the Uncharted Mariner Distress Spritz. I dried my project and then I used the VersaFine Clair Acorn ink to stamp the Snowman on the spot where I was going to place him. I did that because I wanted all of those little grasses all around the Snowman’s base, but I could not cut all that detail. Plus, it looks way better like that. So, I placed my coloured Snowman on the stamped Snowman.

My sentiment also comes from the Tim Holtz Mr. Frostie stamp set. It is stamped directly on the page, right under the Snowman, with VersaFine Acorn ink. It says: „In the meadow we can build a Snowman“. I might not have created a meadow, but I definitely have a Snowman! In the end, I added red baubles on my tree, using Carnation Red Liquid Pearls.

And that was the project for today! I love the song “Walking in a Winter Wonderland”! And now Tim Holtz has given us a Snowman stamp set, to build our own Winter Worderland! Isn’t that cool? I really hope you like today’s project! I hope you got inspired! We will see each other again next Monday! Until then, stay creative and have fun!
*Deutsche Version*
Hallo zusammen! Willkommen zurück zu einem weiteren Mixed-Media Projekt. Das heutige Projekt hat sich ganz von selbst entwickelt. Ich habe einfach mit einigen Produkten „gespielt“ und das ist das Ergebnis. Ich dachte, es könnte euch interessieren. Beginnen wir mit den Materialien, die ich verwendet habe:
Materialien (wenn etwas nicht auf Lager ist, bitte einfach auf „Produkterinnerung“ klicken)
- Ranger – Tim Holtz Distress Oxide Pads
- Echo Park 6″ x 6″ Stencil – Snowy Swirls
- Tim Holtz Layering Stencil – Poinsettia
- Nuvo Glimmer Paste – Raspberry Rhodolite
- Distress Paint – Picket Fence
- VersaFine Clair – Acorn
- VersaFine Onyx Black
- Tim Holtz Stamp Set – Mr. Frostie
- Tim Holtz Mini-Recoil Snips
- Liquid Pearls
- Distress Spritz – Uncharted Mariner
Für dieses Projekt habe ich in einem kleinen Kunstjournal gearbeitet. Wie gesagt, ich habe nur mit dem Produkt „gespielt“. Ich habe mit dem Hintergrund angefangen. Ich habe die Echo Park Snowy Swirls Schablone mit Distress Oxide Tinten verwendet. Eigentlich wollte ich Speckled Egg verwenden, aber ich glaube, ich hatte ein bisschen Salty Ocean auf meinem Pinsel, also landete ich bei der Farbe, die ihr auf den Bildern seht. Um etwas Textur hinzuzufügen, habe ich die Poinsettia Layering Stencil mit Raspberry Rhodolite NUVO Glimmer Paste in der unteren linken und oberen rechten Ecke meines Projekts verwendet. Diese Paste ist wirklich schön und funkelnd. Aber seid gewarnt. Sie wird fest wie Beton, also ist es besser, sie nicht auf euren Schablonen oder anderen Werkzeugen trocknen zu lassen. Zu diesem Zeitpunkt wusste ich, dass ich bei diesem Projekt einen Schneemann verwenden würde. Also habe ich Picket Fence (weiß) Distress Paint verwendet, um unten rechts im Projekt einen kleinen weißen Hügel zu schaffen, auf dem mein Schneemann sitzen kann. Ich habe den kleineren Schneeflockenstempel aus dem Stempelset „Mr. Frostie“ von Tim Holtz mit Salty Ocean Distress Oxide Tinte verwendet und ein paar Schneeflocken gestempelt. Ich habe die Ränder meiner Seiten mit Salty Ocean und Prize Ribbon Distress Oxide Tinten abgedunkelt und der Hintergrund war fertig.


Zeit, an meinen Bildern zu arbeiten. Zuerst habe ich den Ast aus dem Stempelset „Mr. Frostie“ von Tim Holtz mit VersaFine Clair Acorn (brauner) Tinte gestempelt. Dieses Bild ist ziemlich kurz, also habe ich einen kleinen, flachen, steifen Pinsel und dieselbe braune Tinte verwendet und den Rest des Baumstamms skizziert. Ich habe auch etwas Farbe ausgefüllt, damit der Baum zusammenhängender aussieht. Dann habe ich White Opal Liquid Pearls verwendet und die Oberseite aller flachen Bereiche des Baums damit bedeckt. Ich habe nur versucht, den Eindruck von Schnee auf dem Baum zu erwecken. Während mein Schnee trocknete, habe ich an dem Schneemann gearbeitet. Ich habe den kleinen Schneemann aus dem Stempelset „Mr. Frostie“ von Tim Holtz mit VersaFine Onyx Black Tinte auf Aquarellpapier gestempelt. Dann habe ich ihn mit Distress Oxide Tinten ausgemalt, die ich als Aquarellfarbe verwendet habe. Ich habe Speckled Egg und Salty Ocean für die blauen Teile verwendet, Lumberjack Plaid für den roten Schal, Carved Pumpkin für die Karottennase und ein wenig Black Soot für den Hut. Ich habe die Farben getrocknet und dann den Schneemann mit den Tim Holtz Recoil Snips ausgeschnitten. Bevor ich den Schneemann an meinem Projekt befestigt habe, habe ich etwas Spritzer auf meine Seiten hinzugefügt. Ich habe einige White Opal Liquid Pearls verdünnt und verspritzt, sie getrocknet und dann noch mehr Spritzer hinzugefügt, diesmal mit dem Uncharted Mariner Distress Spritz. Ich habe mein Projekt getrocknet und dann den Schneemann mit der VersaFine Clair Acorn Tinte gestempelt, an die Stelle, wo ich ihn platzieren wollte. Das habe ich getan, weil ich all diese kleinen Gräser rund um die Basis des Schneemanns haben wollte, aber ich konnte nicht all diese Details ausschneiden. Außerdem sieht es so viel besser aus. Also habe ich meinen farbigen Schneemann auf dem gestempelten Schneemann platziert.
Mein Spruch stammt auch aus dem Stempelset Mr. Frostie von Tim Holtz. Er ist mit VersaFine Acorn Tinte direkt auf die Seite gestempelt, direkt unter den Schneemann. Er lautet: „Auf der Wiese können wir einen Schneemann bauen“. Ich habe vielleicht keine Wiese geschaffen, aber einen Schneemann habe ich auf jeden Fall! Zum Schluss habe ich mit Carnation Red Liquid Pearls rote Kugeln an meinen Baum gehängt.

Und das war das Projekt für heute! Ich liebe das Lied „Walking in a Winter Wonderland“! Und jetzt hat Tim Holtz uns ein Schneemann Stempelset gegeben, mit dem wir unser eigenes Winter Wunderland bauen können! Ist das nicht cool? Ich hoffe sehr, dass euch das heutige Projekt gefällt! Ich hoffe, ihr habt euch inspirieren lassen! Wir sehen uns nächsten Montag wieder! Bis dahin bleibt kreativ und habt Spaß!

Pinguin Geburtstag

Fröhliche Weihnachten
Das könnte dich auch interessieren
Golden Oldies Oktober 2021
Bundle Girl with a Rose