Bee You
*German version below | Deutsche Version unten*
Hello everyone! Welcome back to another Mixed Media project. For today’s project, I prepared a small series of ATCs. I do not make ATCs very often, but I wanted to play with something small this time. I think they came out pretty nice! Let’s start with the materials I used:
Materials
(If something is not in stock,
please simply click on “Product reminder”/ “Produkterinnerung”)
- Prima Marketing – Art Basics – Gesso Clear
- Ranger – Tim Holtz Distress Oxide Pads
- Sizzix Sidekick Side-Order Thinlits/ Texture Fades – Vault Floristry
- Tim Holtz Stamp Set – The Poinsettia
- Archival Ink – Jet Black
- Distress – Foundry Wax – Gilded
- Tim Holtz Layering Stencil – Crest
- Tim Holtz Distress Grit Paste – Snowfall
- Tim Holtz Texture Paste – Black Opaque
- Distress Spritz – Antique Linen
- Cardstock
- Sizzix Tim Holtz Thinlits – Funky Insects
- Tim Holtz Small Talk Stickers
- Nuvo Crystal Drops – Gloss Ebony Black

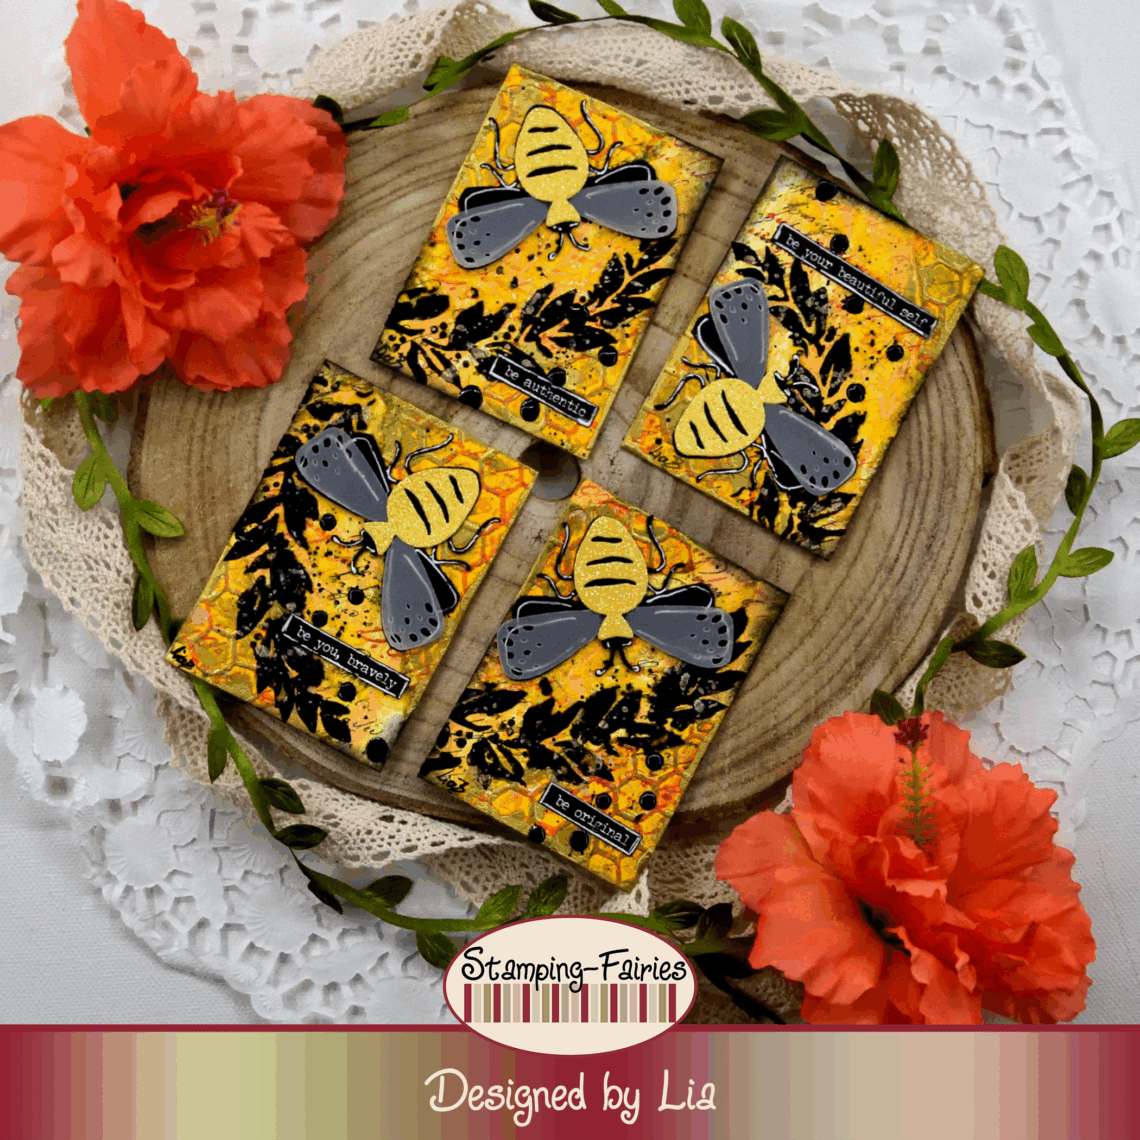
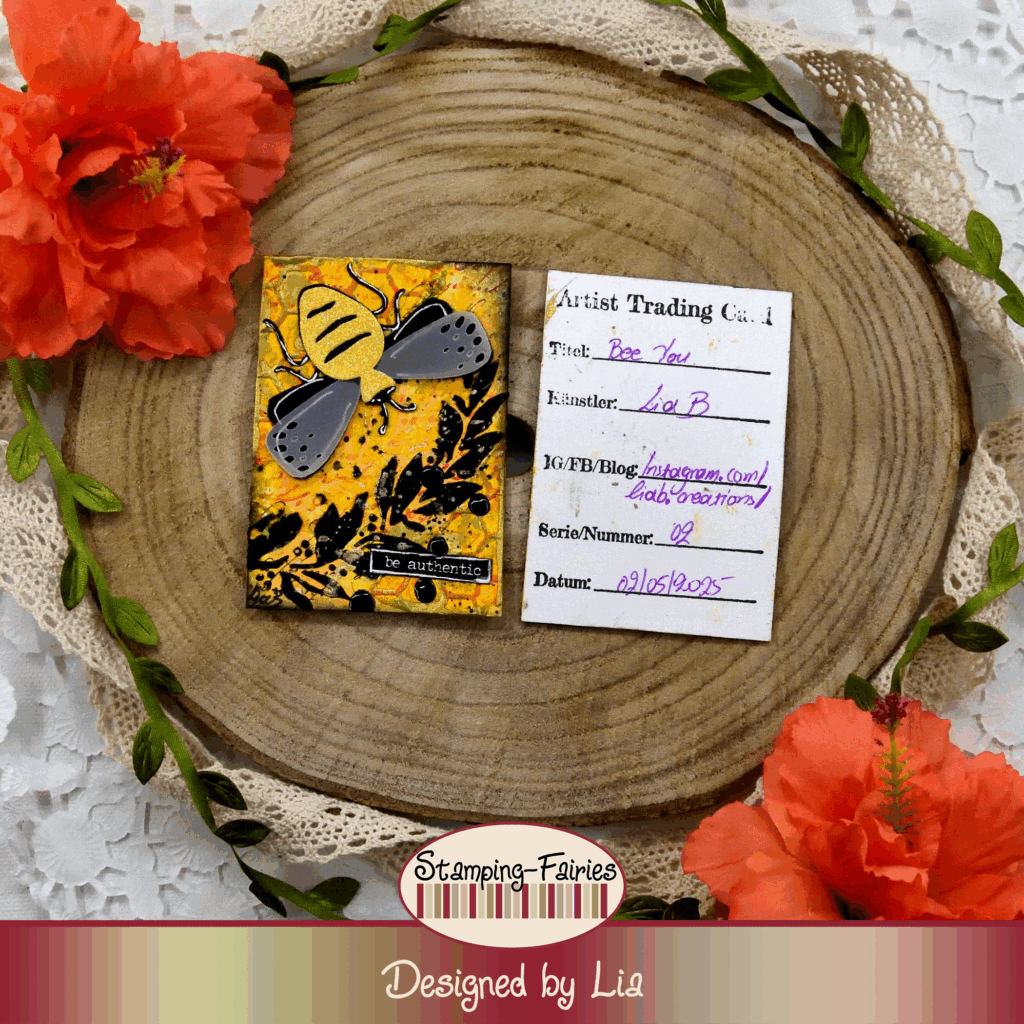
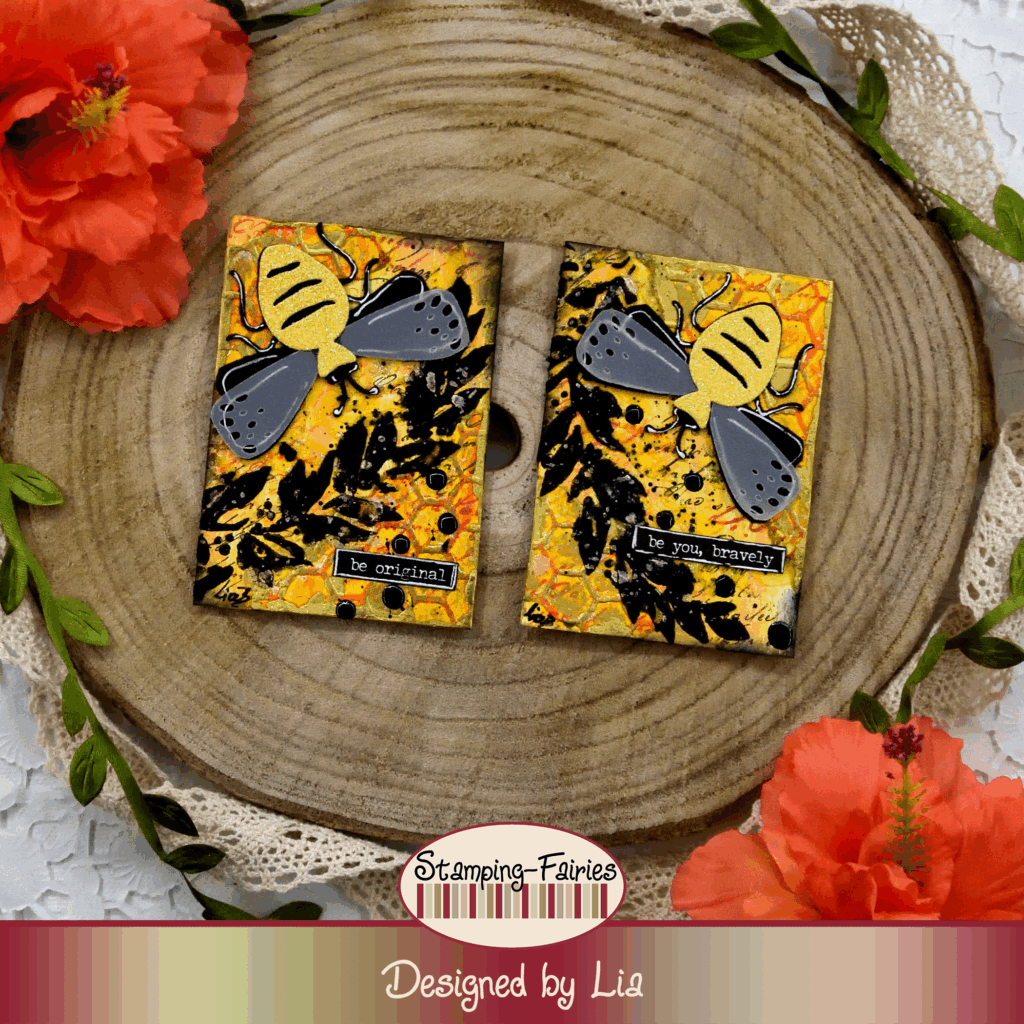
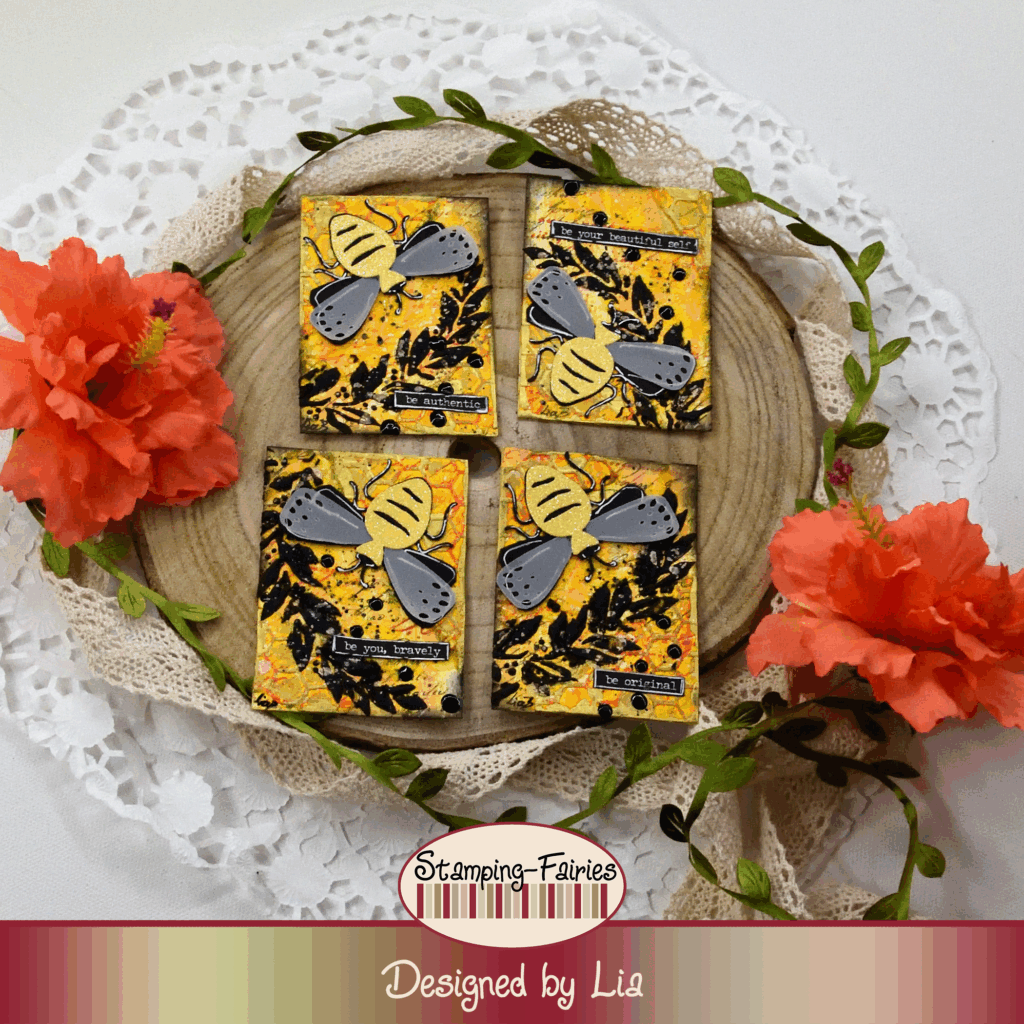
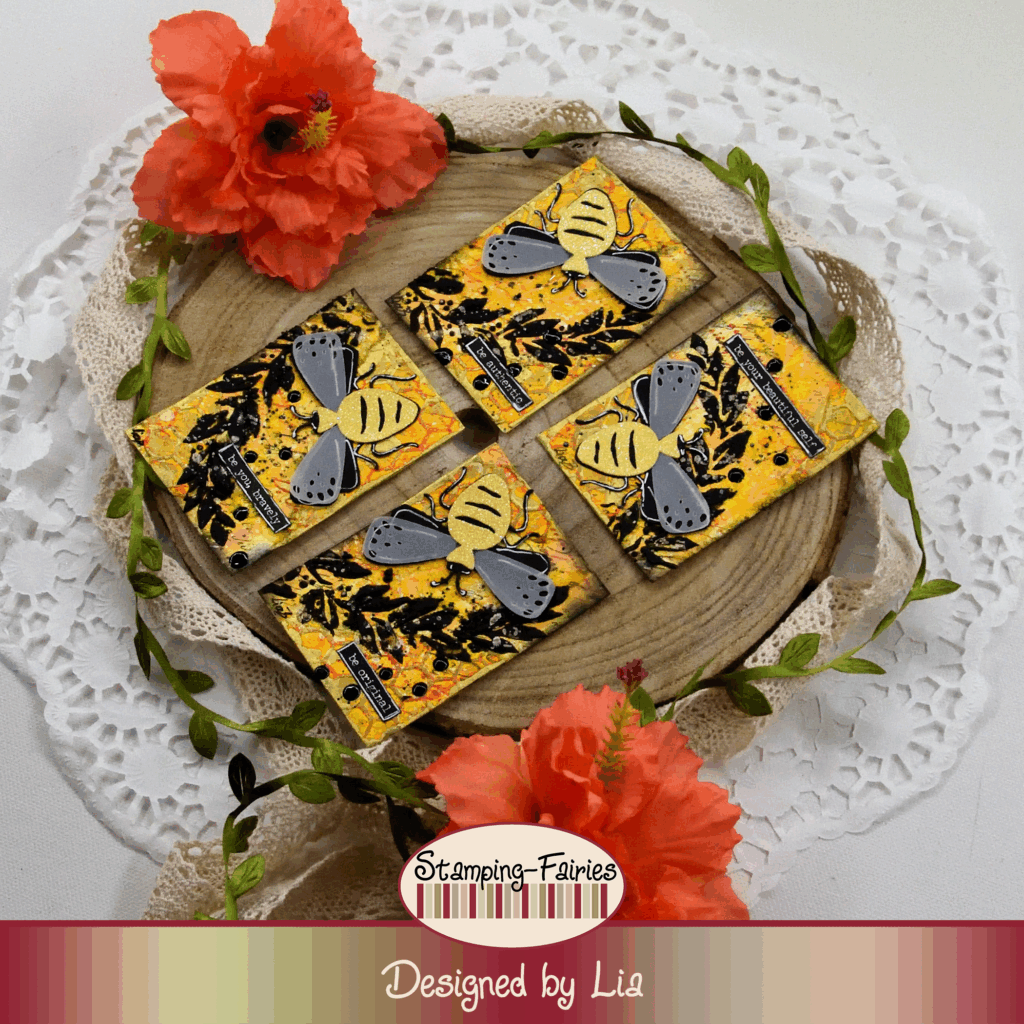
To begin with this project, I cut my ATCs (Artist Trading Cards) out of mixed media paper. An ATC is about 6 x 9 cm (2,5 x 3,5 inches). To break the white of the cards, I used Mustard Seed and Wild Honey Distress Oxide inks and I just rubbed the ink pads on the paper, starting from the top and moving to the bottom of the cards. I wanted to add a honeycomb design. So, I used the Texture Fade folder from the Sizzix Vault Floristry Sidekick Side-Order set with yellow cardstock to create the honeycomb design. I lightly rubbed my Crackling Campfire Distress Oxide ink pad over the honeycomb design, and then I tore the paper and attached the pieces on two corners of each card. You know how much I love text details. I used this lovely, delicate text stamp from the Tim Holtz The Poinsettia stamp set, with Jet Black Archival ink and with Crackling Campfire Distress Oxide ink and I added the text details on the flat areas and over the honeycomb design. I wanted some gold on this project and to add that, I used Gilded Foundry Wax. I applied the wax with my finger and then I heat set it. Foundry Wax needs to be heat set, otherwise it turns into dust and just falls off. After all of the things I added to these cards, I still wanted more texture. So, I used the Crest Layering stencil with Distress Grit Paste Snowfall. I made sure to use only the branch part of the stencil and I applied the design on the middle area of the cards, which was flat. I left the paste to dry and then I realized that it was not strong enough. I wanted something much bolder! So, I used the same part of the same stencil but with Distress Black Opaque Texture Paste, and I placed this design right next to the Snowfall branches. I left the Black paste to dry and then I splattered the cards with Antique Linen Distress Spritz and with black calligraphy ink. I used Jet Black Archival ink to darken the edges of the cards on the spots where there was no Foundry Wax, and the backgrounds were ready!
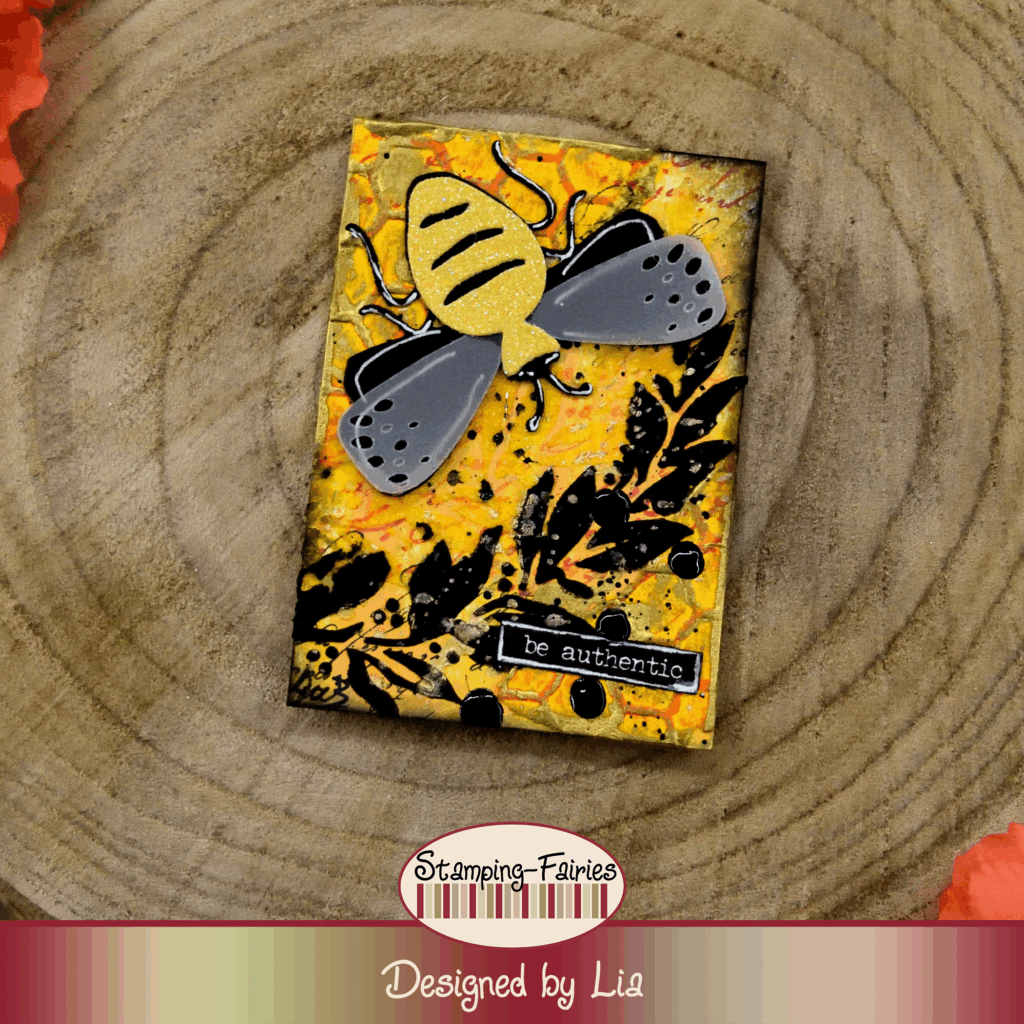

For my main image, I made a bee! I used the die that looked like a bee, from the Sizzix Funky Insects Thinlits set. I used black cardstock for the main body, yellow glitter cardstock for the upper body detail piece and some vellum for the upper part of the wings. I really love this bee!

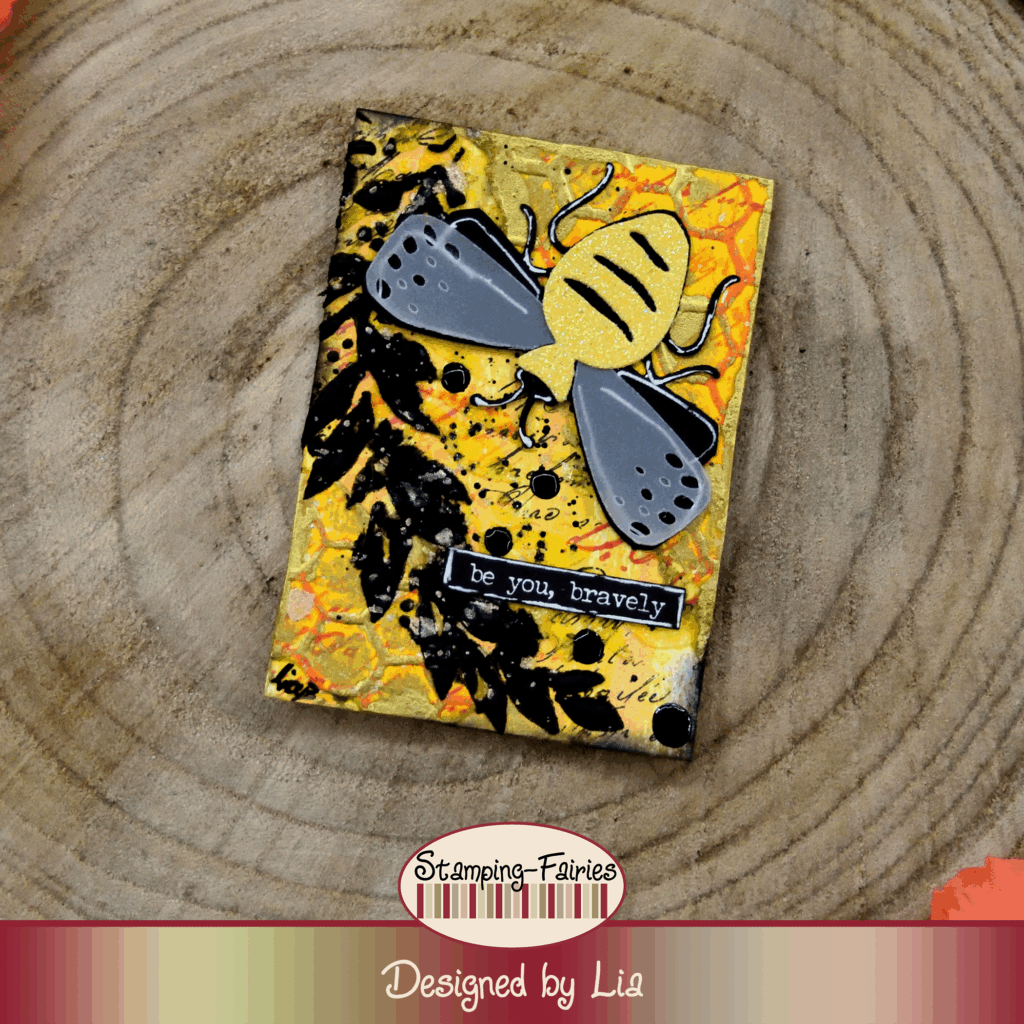
My sentiments come from the Idea-Ology Small Talk Sticker Book. I chose the black strips and placed them on my cards. All of them are inspirational sentiments, encouraging people to be themself. The sentiments say: „Be authentic“, „Be your beautiful self“, „Be original“ and „Be you, bravely“. I used the wordplay with the word Bee, but I also really like these sentiments! As a last little bit of embellishment, I added some black dots with the Nuvo Ebony Black Crystal Drops.


And that was the project for today! I really believe I have more success making things when I just play! Having fun is the goal when crafting. Also, I do not use yellow very often. I might mix it in with other colours, but to have a full on yellow – gold project is rare. Yet, I really like it! Yellow is such a cheerful colour, don’t you think? I really hope you like today’s project! I hope you got inspired! We will see each other again next Monday! Until then, stay creative and have fun!
*Deutsche Version*
Hallo zusammen! Willkommen zurück zu einem weiteren Mixed-Media Projekt. Für das heutige Projekt habe ich eine kleine Serie von ATCs vorbereitet. Ich mache nicht oft ATCs, aber dieses Mal wollte ich mit etwas Kleinem experimentieren. Ich finde, sie sind ziemlich gut geworden! Beginnen wir mit den Materialien, die ich verwendet habe:
Materialien
(wenn etwas nicht auf Lager ist,
bitte einfach auf „Produkterinnerung“ klicken)
- Prima Marketing – Art Basics – Gesso Clear
- Ranger – Tim Holtz Distress Oxide Pads
- Sizzix Sidekick Side-Order Thinlits/ Texture Fades – Vault Floristry
- Tim Holtz Stamp Set – The Poinsettia
- Archival Ink – Jet Black
- Distress – Foundry Wax – Gilded
- Tim Holtz Layering Stencil – Crest
- Tim Holtz Distress Grit Paste – Snowfall
- Tim Holtz Texture Paste – Black Opaque
- Distress Spritz – Antique Linen
- Cardstock
- Sizzix Tim Holtz Thinlits – Funky Insects
- Tim Holtz Small Talk Stickers
- Nuvo Crystal Drops – Gloss Ebony Black

Zu Beginn dieses Projekts habe ich meine ATCs (Artist Trading Cards / Künstler-Sammelkarten) aus Mixed-Media Papier ausgeschnitten. Eine ATC ist etwa 6 x 9 cm (2,5 x 3,5 Zoll) groß. Um das Weiß der Karten aufzulockern, habe ich die Mustard Seed und Wild Honey Distress Oxide Tinten verwendete. Ich habe die Stempelkissen einfach von oben nach unten über das Papier gerieben. Ich wollte ein Wabenmuster hinzufügen. Also habe ich den Texture Fade Folder aus dem Sizzix Vault Floristry Sidekick Side-Order Set mit gelbem Karton verwendet, um das Wabenmuster zu erstellen. Ich habe mit meinem Crackling Campfire Distress Oxide Stempelkissen leicht über das Wabenmuster gerieben, dann das Papier zerrissen und die Stücke an zwei Ecken jeder Karte befestigt. Ihr wisst ja, wie sehr ich Textdetails liebe. Ich habe diesen schönen, filigranen Textstempel aus dem Stempelset „The Poinsettia“ von Tim Holtz mit Jet Black Archivtinte und Crackling Campfire Distress Oxide Tinte verwendet und die Textdetails auf die flachen Bereiche und über das Wabenmuster aufgetragen. Ich wollte etwas Gold für dieses Projekt und habe dafür Gilded Foundry Wax verwendet. Ich habe das Wachs mit dem Finger aufgetragen und anschließend mit Hitze fixiert. Foundry Wax muss mit Hitze fixiert werden, sonst wird es zu Staub und fällt einfach ab. Nach all den Elementen, die ich diesen Karten hinzugefügt habe, wünschte ich mir noch mehr Struktur. Deshalb habe ich die Crest Layering Schablone mit Distress Grit Paste Snowfall verwendet. Ich habe darauf geachtet, nur den Zweigteil der Schablone zu verwenden und das Design auf den mittleren, flachen Bereich der Karten aufgetragen. Ich habe die Paste trocknen lassen und dann festgestellt, dass sie nicht stark genug war. Ich wollte etwas viel kräftigeres! Also habe ich denselben Teil der Schablone, aber mit Distress Black Opaque Texture Paste, verwendet und dieses Design direkt neben die Zweige von Snowfall platziert. Ich habe die schwarze Paste trocknen lassen und die Karten anschließend mit Antique Linen Distress Spritz und schwarzer Kalligrafietinte bespritzt. Mit Jet Black Archival Ink habe ich die Kartenränder an den Stellen verdunkelt, an denen ich kein Foundry Wax verwendet hatte. Und damit waren meine Hintergründe fertig!

Für mein Hauptbild habe ich eine Biene gemacht! Ich habe die Stanzform mit der Bienenform aus dem Sizzix Funky Insects Thinlits Set verwendet. Für den Hauptteil habe ich schwarzen Karton verwendet, für das Detailstück des Oberkörpers gelben Glitzerkarton und für den oberen Teil der Flügel Pergamentpapier. Ich liebe diese Biene!
Meine Sprüche stammen aus dem Idea-Ology Small Talk Sticker Book. Ich habe die schwarzen Streifen ausgewählt und auf meine Karten geklebt. Sie alle sind inspirierende Sprüche, die ermutigen, sich selbst zu sein. Die Sprüche lauten: „Sei authentisch“, „Sei dein schönes Selbst“, „Sei originell“ und „Sei du selbst, mutig“. Ich habe das Wortspiel mit dem Wort „Biene“ (Bee) verwendet, aber ich mag diese Sprüche auch sehr! Als letztes kleines Detail habe ich mit den Nuvo Ebony Black Crystal Drops noch ein paar schwarze Punkte hinzugefügt.
Und das war das Projekt für heute! Ich glaube, dass ich mehr Erfolg beim Basteln habe, wenn ich einfach nur spiele! Spaß ist das Ziel beim Basteln. Außerdem verwende ich Gelb nicht sehr oft. Manchmal mische ich es mit anderen Farben, aber ein komplett gelb-goldenes Projekt ist selten. Trotzdem gefällt es mir sehr gut! Gelb ist so eine fröhliche Farbe, findet ihr nicht? Ich hoffe sehr, dass euch das heutige Projekt gefällt! Ich hoffe, ihr habt euch inspirieren lassen! Wir sehen uns nächsten Montag wieder! Bis dahin bleibt kreativ und habt Spaß!