Little Cooky
*German version below | Deutsche Version unten*
Hello everyone! I am Lia and I am here today with a new mixed media project. I love using photos on my projects, especially photos of my little nephew. So, I made a sweet project for my sweet little boy! Let’s start with the materials I used:
Materials
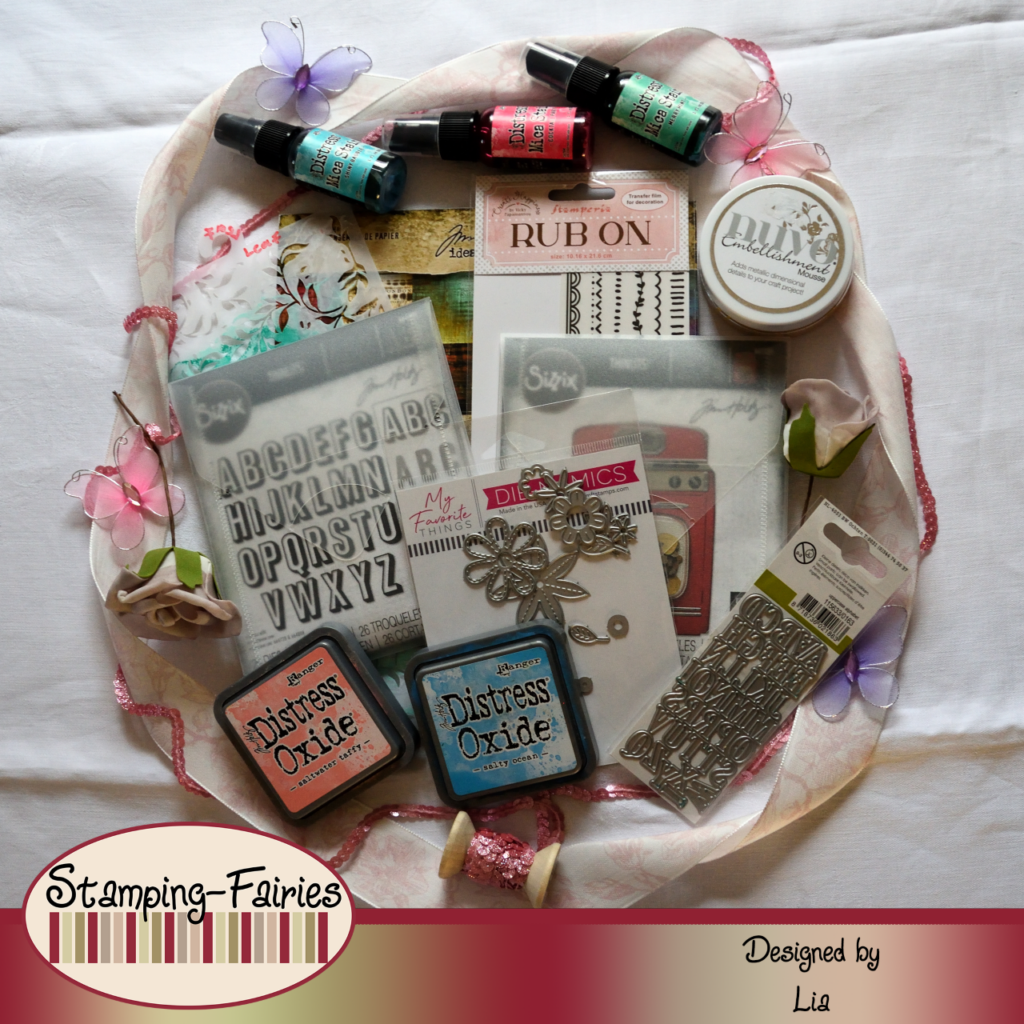
- Canvas
- Craft & You Paper Set – Baby Toys
- Ranger Multi Medium – Matte
- Stamperia Stencil – Leaf
- Ranger Texture Paste Opaque Crackle
- Distress Mica Stain Set – Holiday Set# 4
- Nuvo Mousse – Indian Gold
- Sizzix Tim Holtz Thinlits – Retro Oven
- Tim Holtz Paper Stash – 8″ x 8″ Abandoned
- A photo
- Die-namics – DBD Stitched Wildflower
- Tim Holtz – idea-ology – Droplets – Christmas
- Liquid Pearls – White Opal
- Mixed Media Paper
- Ranger – Tim Holtz Distress Oxide Pads
- Sizzix Tim Holtz Thinlits – Alphanumerics Shadow Upper
- Craft Emotions – Alphabet Typewriter
- Stamperia Rub On Transfers – Border/Black
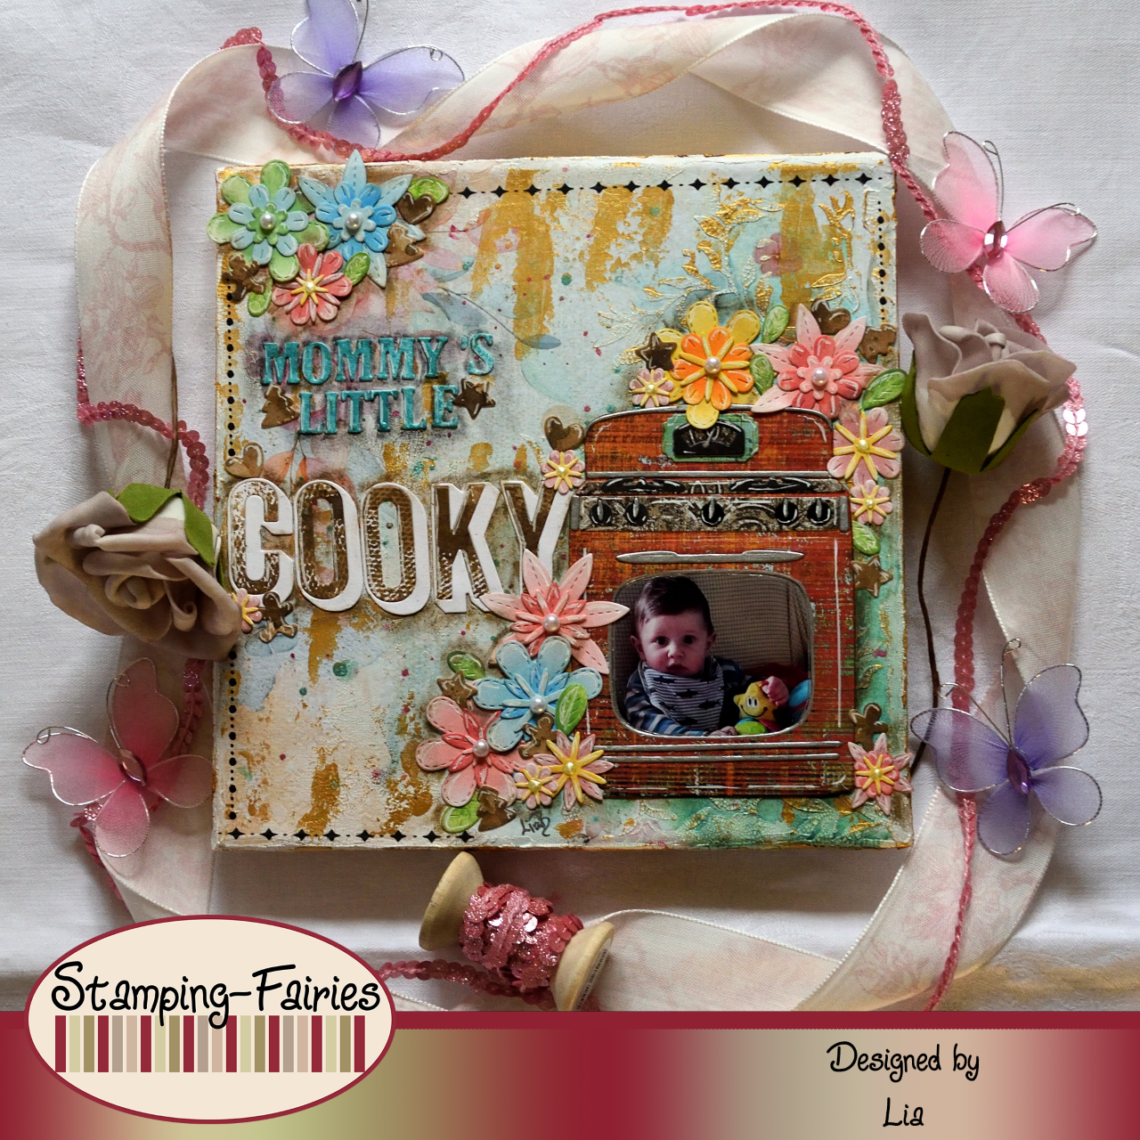
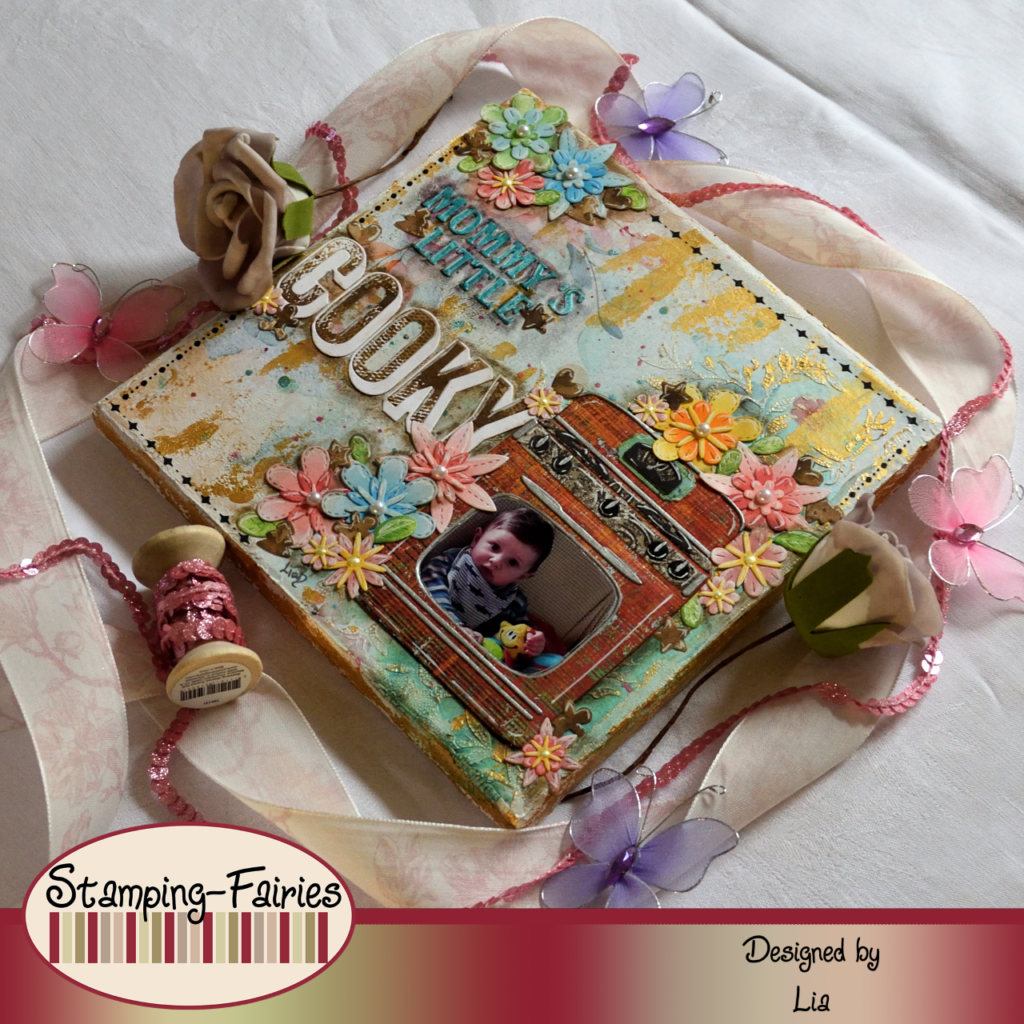
I worked on a 20x20cm canvas this time. As always, I started with the background. First, I cut a 20x20cm piece of one of the papers from the Baby Toys Paper collection by Craft & You and I glued it on my canvas with Multi Medium. A way to make this process easier, is to slightly wet the paper so it will be more pliable and it will be easier to attach it on the surface. I left the paper to dry and then I used the Stamperia Leaf stencil and Ranger Texture Crackle Paste, to add a little bit of texture on the background. I applied some Crackle Paste just with the spatula on random places on the project and I covered the sides of the canvas as well. I did the same process using Indian Gold Nuvo Embellishment Mousse and then I used all three colours of the Holiday set 4 Distress Mica Stains and splattered some colour on my project. And with that, my background was done!

It was time to prepare my images and, oh, that was fun!!! I wanted to use my little nephew ’s photo and I wanted to make it seem somewhat funny. So, I chose this lovely Sizzix Thinlits dies set called Retro Oven and cut all the pieces using papers from the Idea-Ology Abandoned Paper Stash collection. I love the style of these papers! Of course, Tim Holtz products are always really fun to work with! So, the oven is all made out of these papers. I just had to use a silver Gelly Roll pen on some of the pieces, because they were not standing out as much as I wanted them to. The oven has an opening, which can be turned into a shaker but I inserted the photo right there, placing my nephew in the oven!!! This Thinlits set also has a few dies that cut cookies and I used them with mixed media paper coloured with Ground Espresso Distress Oxide ink. My flowers are cut out of white mixed media paper, using the Die-namics DBD Stitched Wildflower set. I coloured them using several colours of Distress Oxide inks. For the centers of the bigger flowers, I used some white Idea-Ology Droplets from the Christmas set. For the centers of the smaller flowers, I just used some Liquide Pearls in colour White Opal. I really love how everything turned out!

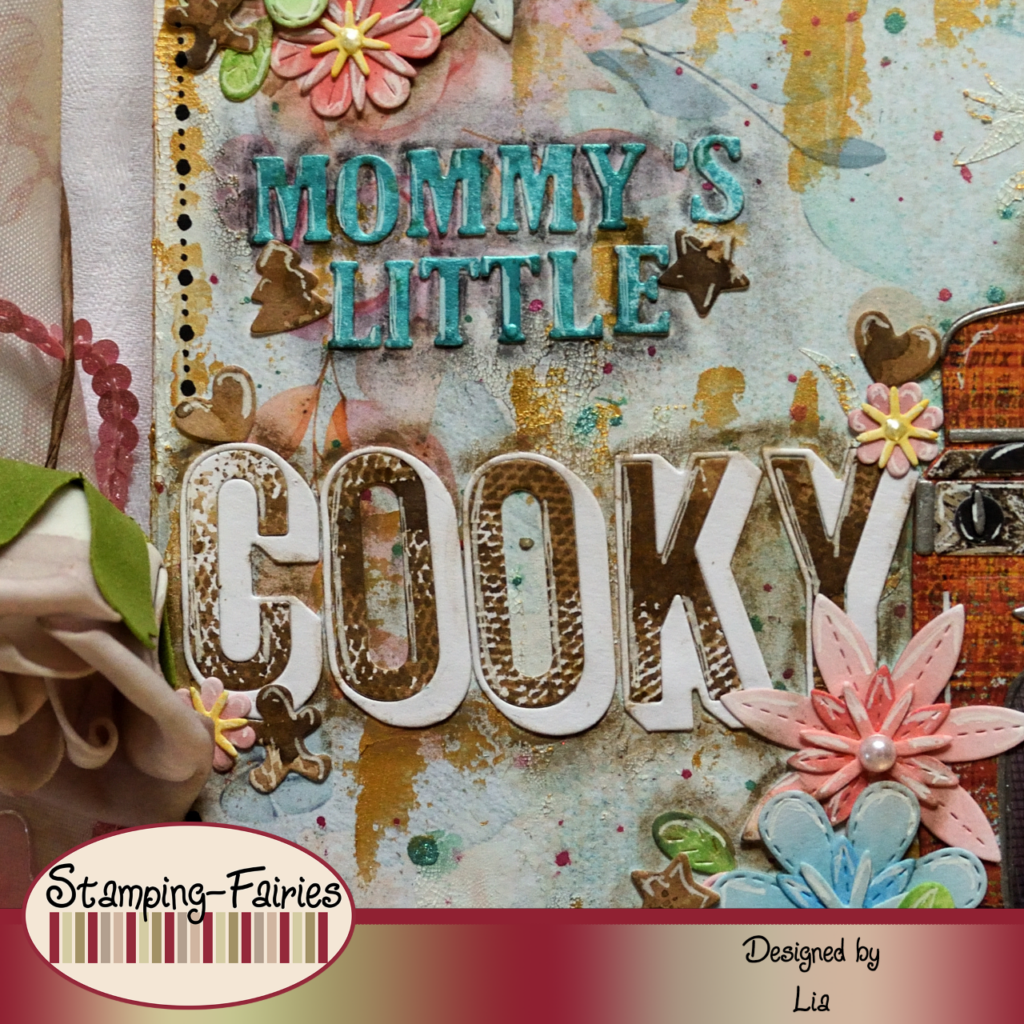
My sentiment consists of two parts, cut in different styles. The first part is cut with a Craft Emotions Alphabet dies set and coloured with the Shiny Bauble Distress Mica Stain from the Holiday set 4. The second part is cut with the Sizzix Alphanumeric Shadow Upper Thinlits set. The shadow parts of the letters are left white and the actual letters are coloured with Ground Espresso Distress Oxide ink. All together, the sentiment says „Mammy’s Little Cooky“. I do not know about his mom, but that little boy is definitely his auntie’s little cooky! As a last bit of embellishment, I used the Stamperia Border/Black Rub Ons around the edges of the project.
And that was the project for today! I really like working like that with the colours and the pastes and getting messy! A lot of the products I used on this project are on sale right now. There is a big sale at Stamping Fairies shop that starts from 20% and goes all the way up to 65%. So, if you want to replenish or add to your craft supplies, now is a good time to do so! I really hope you like today’s project! I hope you got inspired! We will see each other again next Monday! Until then, stay creative and have fun!
*Deutsche Version*
Hallo zusammen! Ich bin Lia und ich bin heute mit einem neuen Mixed-Media-Projekt hier. Ich liebe es, bei meinen Projekten Fotos zu verwenden, insbesondere Fotos meines kleinen Neffen. Also habe ich ein süßes Projekt für meinen süßen kleinen Jungen gemacht! Beginnen wir mit den Materialien, die ich verwendet habe:
Materialien
- Leinwand
- Craft & You Paper Set – Baby Toys
- Ranger Multi Medium – Matte
- Stamperia Stencil – Leaf
- Ranger Texture Paste Opaque Crackle
- Distress Mica Stain Set – Holiday Set# 4
- Nuvo Mousse – Indian Gold
- Sizzix Tim Holtz Thinlits – Retro Oven
- Tim Holtz Paper Stash – 8″ x 8″ Abandoned
- Ein Foto
- Die-namics – DBD Stitched Wildflower
- Tim Holtz – idea-ology – Droplets – Christmas
- Liquid Pearls – White Opal
- Mixed-Media-Papier
- Ranger – Tim Holtz Distress Oxide Pads
- Sizzix Tim Holtz Thinlits – Alphanumerics Shadow Upper
- Craft Emotions – Alphabet Typewriter
- Stamperia Rub On Transfers – Border/Black
Dieses Mal habe ich auf einer 20 x 20 cm großen Leinwand gearbeitet. Wie immer habe ich mit dem Hintergrund begonnen. Zuerst habe ich ein 20 x 20 cm großes Stück eines der Papiere aus der Baby Toys Paper-Kollektion von Craft & You ausgeschnitten und es mit Multi Medium auf meine Leinwand geklebt. Eine Möglichkeit, diesen Vorgang zu vereinfachen, besteht darin, das Papier leicht anzufeuchten, damit es geschmeidiger wird und sich leichter auf der Oberfläche befestigen lässt. Ich habe das Papier trocknen lassen und dann die Stamperia Leaf-Schablone und die Ranger Texture Crackle Paste verwendet, um dem Hintergrund ein wenig Textur zu verleihen. Ich habe etwas Crackle Paste einfach mit dem Spachtel auf zufällige Stellen des Projekts aufgetragen und auch die Seiten der Leinwand abgedeckt. Ich habe den gleichen Vorgang mit Indian Gold Nuvo Embellishment Mousse durchgeführt und dann alle drei Distress Mica Stains des Holiday-Sets 4 verwendet und etwas Farbe auf mein Projekt gespritzt. Damit war mein Hintergrund fertig!
Zeit, meine Bilder vorzubereiten, und das hat Spaß gemacht!!! Ich wollte das Foto meines kleinen Neffen verwenden und es etwas lustig wirken lassen. Also habe ich mich für dieses schöne Sizzix Thinlits-Stanzformenset namens „Retro Oven“ entschieden und alle Teile aus Papier aus der Idea-Ology Abandoned Paper Stash-Kollektion ausgeschnitten. Ich liebe den Stil dieser Papiere! Natürlich macht die Arbeit mit Tim Holtz-Produkten immer richtig Spaß! Der Ofen besteht also komplett aus diesen Papieren. Bei einigen Teilen musste ich nur einen silbernen Gelly Roll-Stift verwenden, weil sie nicht so hervorstachen, wie ich es wollte. Der Ofen hat eine Öffnung, die in einen Shaker umgewandelt werden kann, aber ich habe genau dort das Foto eingefügt, das meinen Neffen in den Ofen stellt!!! Dieses Thinlits-Set enthält auch ein paar Stanzformen zum Ausstechen von Keksen und ich habe sie mit Mixed-Media-Papier verwendet, das mit Ground Espresso Distress Oxide-Tinte eingefärbt wurde. Meine Blumen sind aus weißem Mixed-Media-Papier ausgeschnitten, mit dem Die-namics DBD Stitched Wildflower-Set. Ich habe sie mit Distress Oxide-Tinten in mehreren Farben eingefärbt. Für die Mitte der größeren Blumen habe ich einige weiße Idea-Ology-Droplets aus dem Christmas Set verwendet. Für die Mitte der kleineren Blüten habe ich einfach einige Liquide Pearls in der Farbe White Opal verwendet. Ich finde es wirklich toll, wie sich alles entwickelt hat!
Mein Spruch besteht aus zwei Teilen, die in unterschiedlichen Stilen geschnitten sind. Der erste Teil wird mit einem Alphabet-Stanzformen-Set von Craft Emotions ausgeschnitten und mit dem Shiny Bauble Distress Mica Stain aus dem Holiday-Set 4 eingefärbt. Der zweite Teil wird mit dem Sizzix Alphanumeric Shadow Upper Thinlits-Set ausgeschnitten. Die Schattenteile der Buchstaben bleiben weiß und die eigentlichen Buchstaben werden mit Ground Espresso Distress Oxide-Tinte eingefärbt. Alles in allem lautet der Spruch „Mamas kleiner Keks“. Ich weiß nicht wie seine Mutter das sieht, aber dieser kleine Junge ist definitiv der kleine Keks seiner Tante! Als letzte Verzierung habe ich die Stamperia Border/Black Rub Ons an den Rändern des Projekts verwendet.
Und das war mein Projekt für heute! Ich mag es wirklich, so mit den Farben und Pasten zu arbeiten und dabei Unordnung zu verursachen! Viele der Produkte, die ich für dieses Projekt verwendet habe, sind derzeit im Angebot. Im Stamping Fairies-Shop gibt es einen großen Ausverkauf, der bei 20 % beginnt und bis zu 65 % geht. Wenn ihr also euren Bastelbedarf auffüllen oder ergänzen möchtet, ist jetzt ein guter Zeitpunkt dafür! Ich hoffe sehr, dass euch das heutige Projekt gefällt! Ich hoffe, ihr habt euch inspirieren lassen! Wir sehen uns nächsten Montag wieder! Bis dahin bleibt kreativ und habt Spaß!

Save the Bees