Halloween Birthday
*German version below | Deutsche Version unten*
Hello everyone! Welcome back to another mixed media project. I prepared a scrapbook page for you today and I mixed our challenge theme, which is Birthday, with Halloween. Because, who said that Birthday and Halloween do not go together??? Let’s start with the materials I used:
Materials (If something is not in stock, please simply click on “Product reminder”/ “Produkterinnerung”)
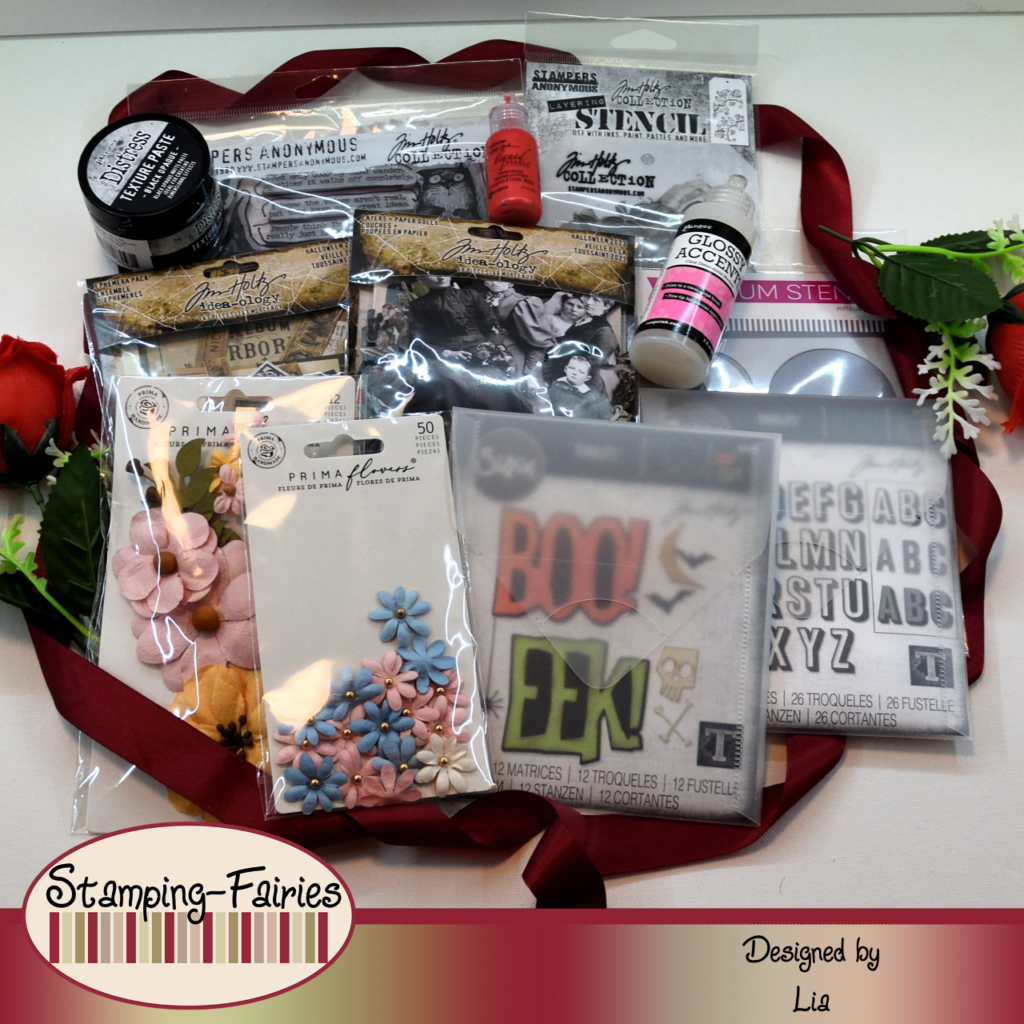
- Kaisercraft – Basecoat IV Collection – Bluestone 12″
- Prima Marketing – Art Basic – Gesso Clear
- Tim Holtz Layering Stencil – Thorned
- Tim Holtz Texture Paste – Black Opaque
- My Favorite Things Big Balloons stencil (Other Balloon products)
- Ranger – Tim Holtz Distress Oxide Pads
- Tim Holtz Stamp Set – Snarky Cat Halloween
- Memento Ink pad – Tuxedo Black
- Alcohol Markers
- Prima Marketing Mulberry Paper Flowers
- Tim Holtz Ephemera Pack – Halloween 2023
- Tim Holtz – Layers + Paper Dolls – Halloween 2023
- Sizzix Tim Holtz Thinlits – Alphanumerics Shadow Upper
- Sizzix Tim Holtz Thinlits – Big Frights (Instead, you could use the Sizzix Tim Holtz Thinlits – Bold Text Halloween)
- Ranger Glossy Accents
- Wendy Vecchi Liquid Pearls – Carnation Red
- Tonic Craft Tacky Glue
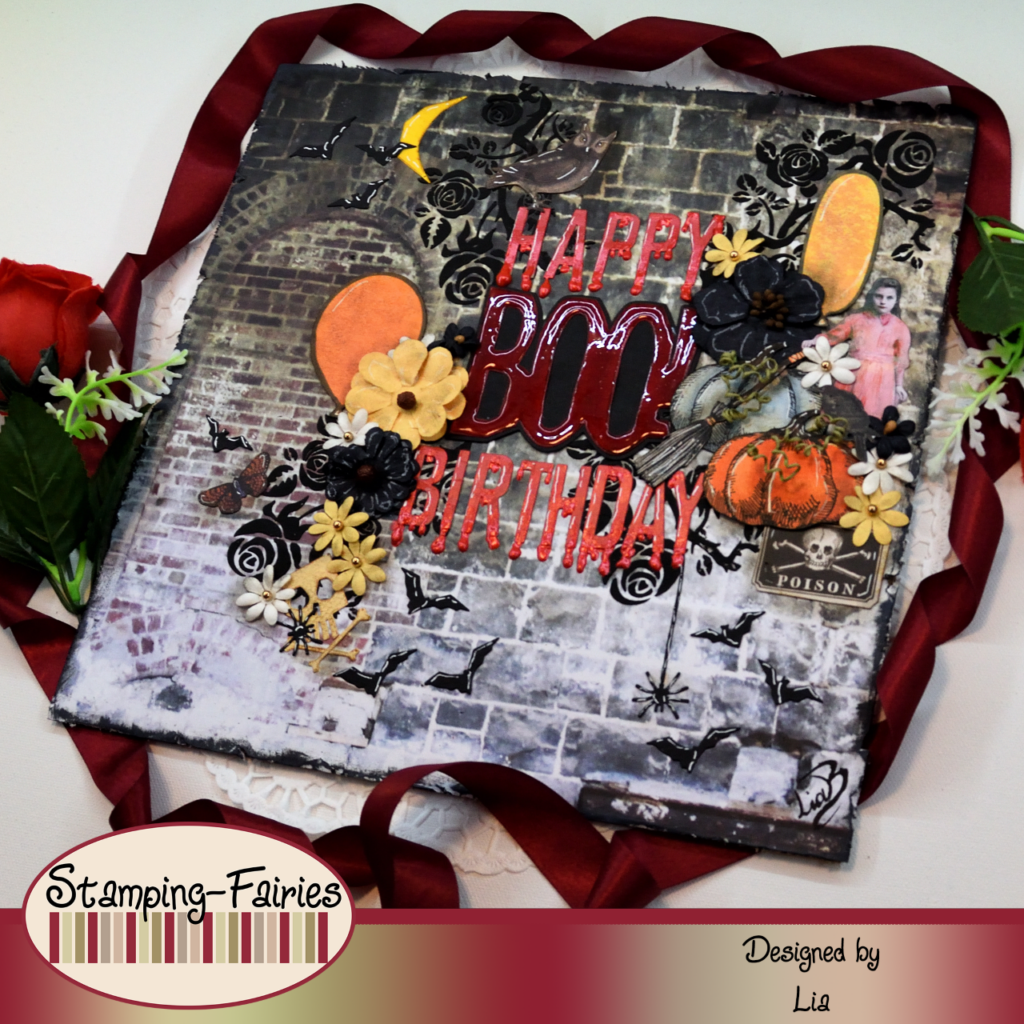
As always, I started with my background. I chose this beautiful Kaisercraft page to work as my base. I thought that this dark background would work perfect for my Halloween-Birthday project. I attached the page on a piece of cardboard, to make it sturdier, and then I covered it with clear Gesso, to create a nice surface for my mediums. Once the Gesso was dry, I used the Tim Holtz Thorned Layering stencil and Distress Black Opaque Texture Paste, just to add some more interest on my page. I was thinking that I wanted to use my Crackle Paste, but the Black Paste won me over this time. This Paste is amazing to use. Its texture is so creamy and it is lovely to work with! I was quite impressed! I roughed up the edges of my page with my scissors and then I darkened them with the Distress Oxide Black Soot ink and my background was ready.
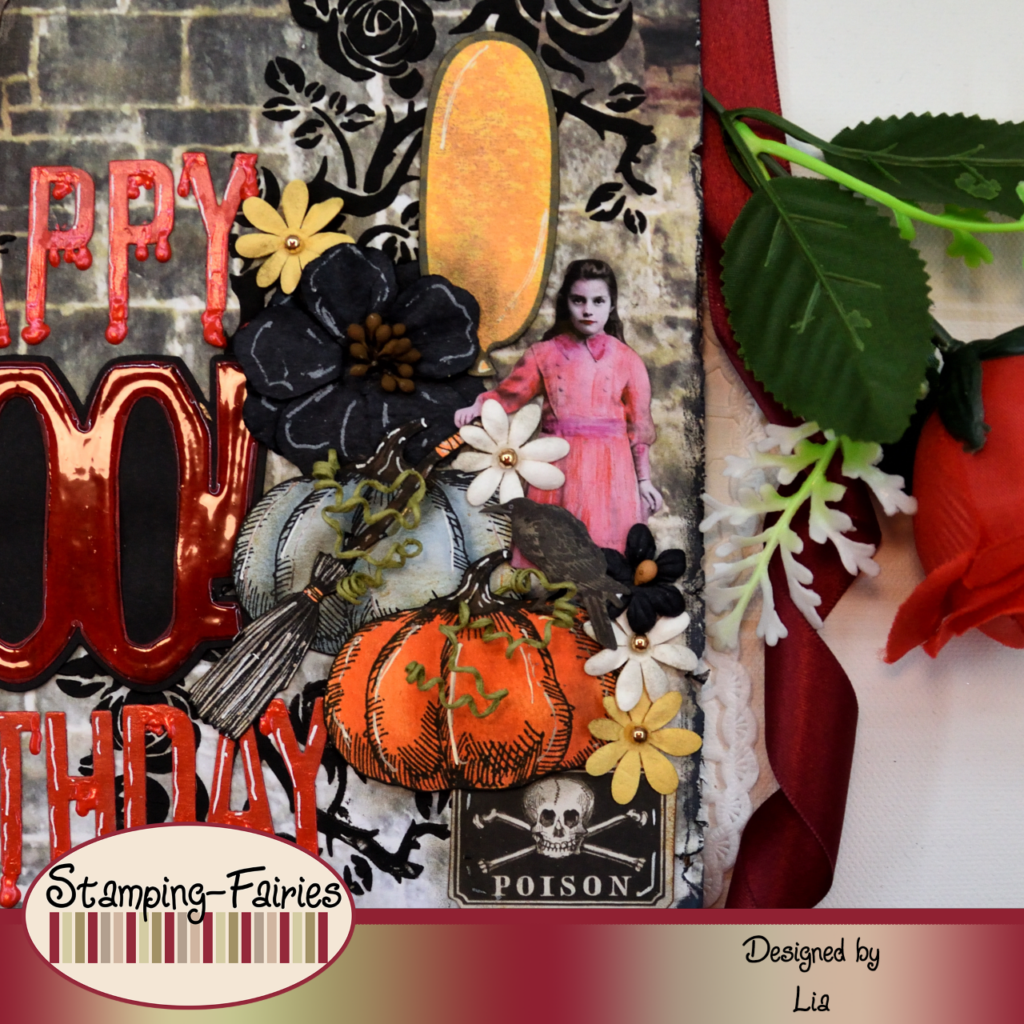
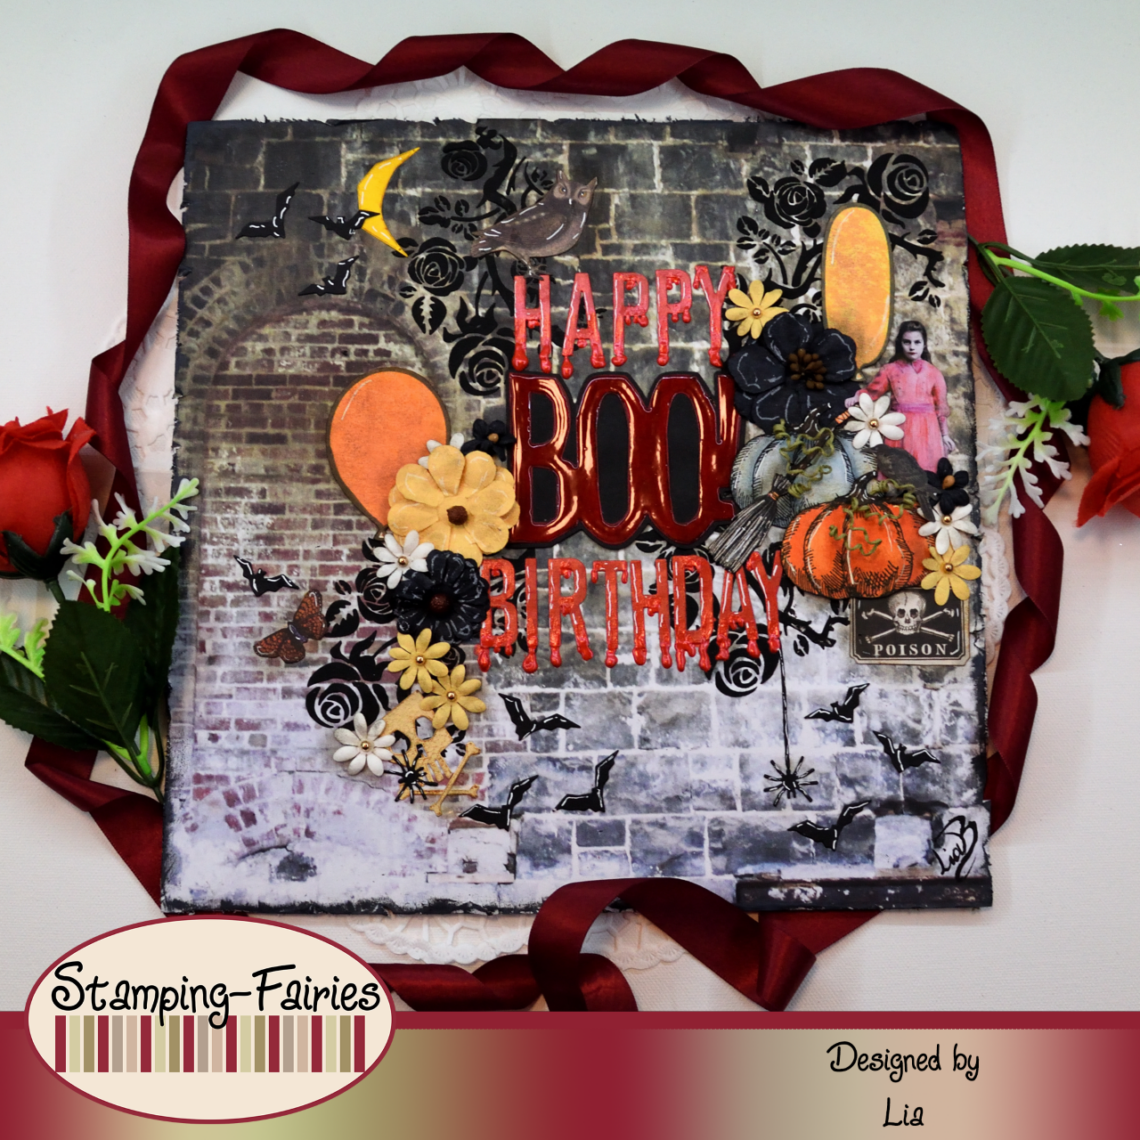
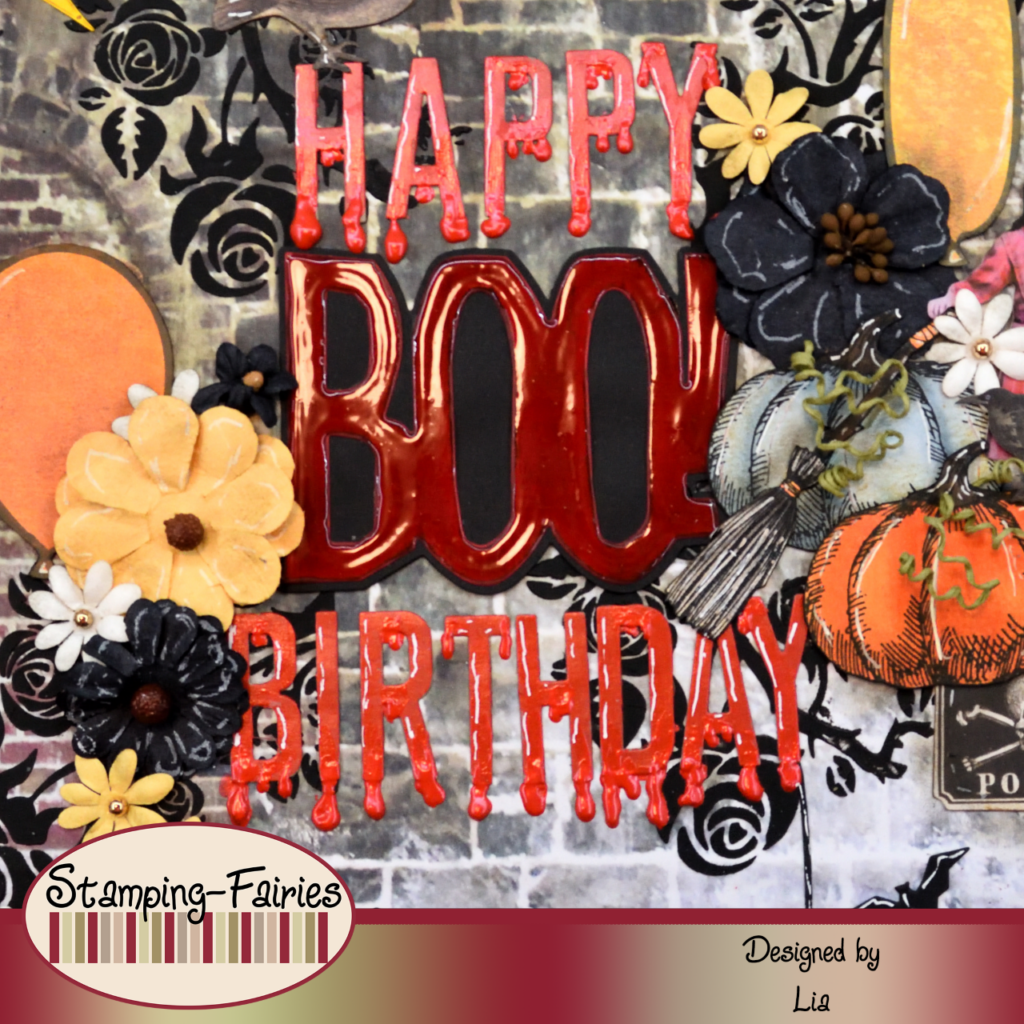
The main focus of this project is my sentiment, for which I will talk in a bit. The decorative pieces around my sentiment come from many different product sets. My pumpkins and the broom are from the Snarky Cat Halloween stamp set. I stamped the images with Memento Tuxedo Black ink and coloured them with alcohol markers. The balloons are made with the MFT Big Balloons stencil and Distress Oxide inks, in colours Carved Pumpkin and Crackling Campfire. Unfortunately, the stencil is no longer available in the shop, but there are several Balloon products one could use as substitute for it. I used a few pieces from the new Tim Holtz Idea-Ology Halloween Ephemera Pack and a paper doll from the new Tim Holtz Idea-Ology Halloween Layers+Paperdolls Pack. My flowers come from two Prima flower sets, the „All Hallows Eve/Thirty-One“ set and the „Lovely Sweet/Spring Abstract“ set. The last little images (bats, scull, moon and spiders) are cut with the Sizzix Big Frights Thinlits set, which is not available in the shop. I noticed that it is not in the shop only after I finished the project. But, the Tim Holtz ephemera pack I used has a lot of these images, cut and ready to used, so I would suggest that as a substitute.
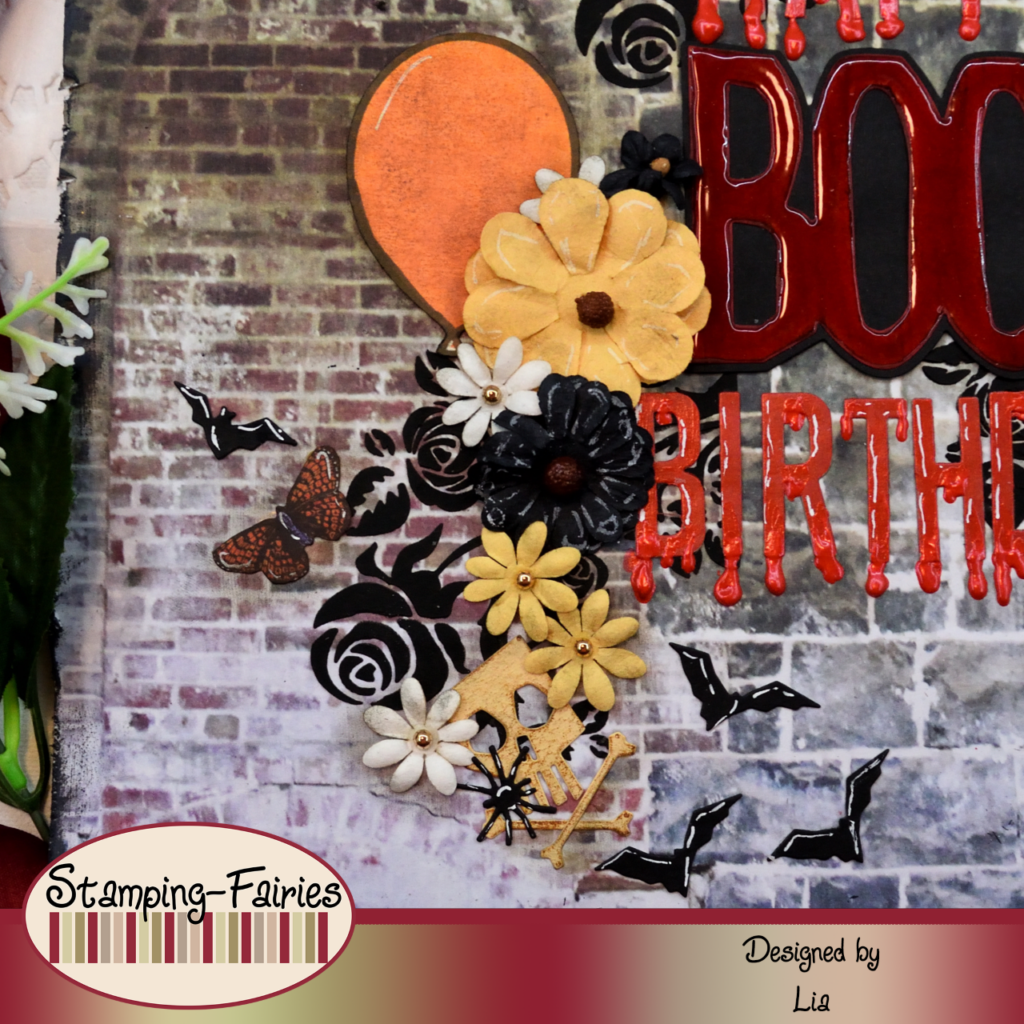
My sentiment consists of two parts. The first part is cut with the Sizzix Alphanumeric Shadow Upper Thinlits Set. I used only the main letters, without the shadow parts, and I coloured them red, using the Carnation Red Liquid Pearls. I placed the letters on my page and then I used my red Liquid Pearls to add some red dripping on them. I was imagining red letters and blood dripping from them. Liquid Pearls can be used as paint, they can be thinned with water and used for some pearl details, or they can be used thick and they dry like enamel dots, which is what I did on this project. The second part of my sentiment is cut with the Sizzix Big Frights Thinlits Set. As I already said, this set is not available in the shop. A substitute for this set could be the Sizzix Bold Text Halloween Thinlits Set. The letters might be a little smaller but they would work. Also, the Bold Text Halloween Set provides a lot more Halloween sentiments. So you could try that one, if you want. Back to my project: I cut the shadow layer of the big BOO out of black cardstock and the main letters out of red cardstock. I put them together and then I covered the red letters with Glossy Accents. The big BOO went between the two words of the rest of the sentiment. All together, it says „Happy BOO Birthday“. I love how spooky it looks!
And that was the project for today! I couldn’t resist turning a Birthday project into a Halloween one! I hope I did well! Our Birthday challenge will be running until the end of the month. You can find more information about it in the Stamping Fairies profiles in Instagram and Facebook. I really hope you like today’s project! I hope you got inspired! We will see each other again next Monday! Until then, stay creative and have fun!
*Deutsche Version*
Hallo zusammen! Willkommen zurück zu einem weiteren Mixed-Media-Projekt. Ich habe heute eine Scrapbook-Seite für euch vorbereitet, die unser Challenge Thema, nämlich Geburtstag, mit Halloween mischt. Denn wer hat gesagt, dass Geburtstag und Halloween nicht zusammenpassen??? Beginnen wir mit den Materialien, die ich verwendet habe:
Materialien (wenn etwas nicht auf Lager ist, bitte einfach auf „Produkterinnerung“ klicken)
- Kaisercraft – Basecoat IV Collection – Bluestone 12″
- Prima Marketing – Art Basic – Gesso Clear
- Tim Holtz Layering Stencil – Thorned
- Tim Holtz Texture Paste – Black Opaque
- My Favorite Things Big Balloons stencil (Weitere Ballonprodukte)
- Ranger – Tim Holtz Distress Oxide Pads
- Tim Holtz Stamp Set – Snarky Cat Halloween
- Memento Ink pad – Tuxedo Black
- Alkoholmarker
- Prima Marketing Mulberry Paper Flowers
- Tim Holtz Ephemera Pack – Halloween 2023
- Tim Holtz – Layers + Paper Dolls – Halloween 2023
- Sizzix Tim Holtz Thinlits – Alphanumerics Shadow Upper
- Sizzix Tim Holtz Thinlits – Big Frights (Stattdessen könnt ihr die Sizzix Tim Holtz Thinlits – Bold Text Halloween verwenden)
- Ranger Glossy Accents
- Wendy Vecchi Liquid Pearls – Carnation Red
- Tonic Craft Tacky Glue
Wie immer habe ich mit meinem Hintergrund begonnen. Ich habe diese wunderschöne Kaisercraft Seite als Grundlage ausgewählt. Ich dachte, dass dieser dunkle Hintergrund perfekt für mein Halloween-Geburtstagsprojekt funktionieren würde. Ich habe die Seite auf ein Stück Pappe geklebt, um sie stabiler zu machen, und sie dann mit klarem Gesso bedeckt, um eine schöne Oberfläche für meine Medien zu schaffen. Sobald das Gesso trocken war, habe ich die Tim Holtz Thorned Layering Schablone und die Distress Black Opaque Texture Paste verwendet, um meine Seite noch interessanter zu gestalten. Ich dachte zuerst, dass ich meine Crackle Paste verwenden wollte, war aber dann von dieser schwarzen Paste mehr überzeugt. Sie ist erstaunlich zu verwenden, die Textur ist sehr cremig und lässt sich wunderbar verarbeiten! Ich war ziemlich beeindruckt! Ich habe die Ränder meiner Seite mit meiner Schere aufgeraut und sie dann mit der Distress Oxide Black Soot-Tinte abgedunkelt und mein Hintergrund war fertig.

Das Hauptaugenmerk dieses Projekts liegt auf meinen Spruch, auf den ich gleich eingehen werde. Die Dekoteile rund um meinen Spruch stammen aus vielen verschiedenen Produktsets. Meine Kürbisse und der Besen stammen aus dem Snarky Cat Halloween Stempelset. Ich habe die Bilder mit Memento Tuxedo Black Tinte gestempelt und sie mit Alkoholmarkern koloriert. Die Ballons werden mit der MFT Big Balloons Schablone und Distress Oxide Tinten in den Farben Carved Pumpkin und Crackling Campfire hergestellt. Leider ist die Schablone nicht mehr im Shop erhältlich, aber es gibt mehrere Ballonprodukte, die man als Ersatz verwenden könnte. Ich habe ein paar Teile aus dem neuen Tim Holtz Idea-Ology Halloween Ephemera Pack und eine Papierpuppe aus dem neuen Tim Holtz Idea-Ology Halloween Layers+Paperdolls Pack verwendet. Meine Blumen stammen aus zwei Prima Blumensets, dem Set „All Hallows Eve/Thirty-One“ und dem Set „Lovely Sweet/Spring Abstract“. Die letzten kleinen Bilder (Fledermäuse, Totenkopf, Mond und Spinnen) werden mit dem Sizzix Big Frights Thinlits Set ausgeschnitten, das nicht im Shop erhältlich ist. Dass es nicht im Shop ist, ist mir erst aufgefallen, nachdem ich das Projekt abgeschlossen hatte. Aber das Ephemera Paket von Tim Holtz, das ich verwendet habe, enthält viele dieser Bilder, geschnitten und gebrauchsfertig, daher würde ich dies als Ersatz vorschlagen.
Mein Spruch besteht aus zwei Teilen. Der erste Teil wird mit dem Sizzix Alphanumeric Shadow Upper Thinlits Set geschnitten. Ich habe nur die Hauptbuchstaben ohne die Schattenteile verwendet und sie mit Carnation Red Liquid Pearls rot eingefärbt. Ich habe die Buchstaben auf meiner Seite platziert und dann mit meinen roten Liquid Pearls etwas rote Tropfen darauf aufgetragen. Ich stellte mir rote Buchstaben vor, von denen Blut tropfte. Liquid Pearls können als Farbe verwendet werden, sie können mit Wasser verdünnt und für einige Perlendetails verwendet werden oder sie können dick aufgetragen werden und trocknen wie Emaille-Punkte, was ich bei diesem Projekt getan habe. Den zweiten Teil meines Spruchs habe ich mit dem Sizzix Big Frights Thinlits Set geschnitten. Wie ich bereits gesagt habe, ist dieses Set nicht im Shop erhältlich. Ein Ersatz für dieses Set könnte das Sizzix Bold Text Halloween Thinlits Set sein. Die Buchstaben könnten etwas kleiner sein, aber sie würden funktionieren. Außerdem sorgt das Bold Text Halloween Set für noch viel mehr Halloween Sprüche. Wenn ihr möchtet, könntet ihr das also ausprobieren. Zurück zu meinem Projekt: Ich habe die Schattenschicht des großen BOO aus schwarzem Karton und die Hauptbuchstaben aus rotem Karton ausgeschnitten. Ich habe sie zusammengesetzt und dann die roten Buchstaben mit Glossy Accents überzogen. Das große BOO stand zwischen den beiden Worten des restlichen Satzes. Alles in allem heißt es „Happy BOO Birthday“. Ich liebe es, wie gruselig es aussieht!
Und das war das Projekt für heute! Ich konnte nicht widerstehen, aus einem Geburtstagsprojekt ein Halloween Projekt zu machen! Ich hoffe, ich habe es gut gemacht! Unsere Geburtstags Challenge läuft bis Ende des Monats. Weitere Informationen dazu findet ihr in den Stamping Fairies Profilen auf Instagram und Facebook. Ich hoffe sehr, dass euch das Projekt gefällt! Ich hoffe, ihr habt euch inspirieren lassen! Wir sehen uns nächsten Montag wieder! Bis dahin bleibt kreativ und habt Spaß!

Schönen Geburtstag

Das könnte dich auch interessieren
The best easter ever
Faraway Places and Daring Adventures