Mr. Frost
*German version below | Deutsche Version unten*
Hello everyone! Welcome back to another mixed media project. Our Christmas/Winter challenge ends tonight, so you still have a little bit of time to participate. For today I prepared a project that follows our Challenge theme. Let’s start with the materials I used:
Materials (If something is not in stock, please simply click on “Product reminder”/ “Produkterinnerung”)
- Craft Tags Ranger -Kraft Cardstock 8″
- Studio Light – Mixed Paper Pad – Cosy Days
- Ranger Multi Medium – Matte
- Distress Mica Stains
- Distress Paint – Picket Fence
- Ranger – Tim Holtz Distress Oxide Pads
- Tim Holtz Layering Stencil – Falling Stars
- Nuvo Mousse – Indian Gold
- Distress – Foundry Wax – Gilded
- Sizzix Tim Holtz Thinlits – Mr. Frost
- Cardstock
- Tim Holtz Distress Grit Paste – Snowfall
- Distress Stickles Dry Glitter – Clear Rock Candy
- Sizzix Tim Holtz Thinlits – Cozy Winter
- Tim Holtz Sticker Book – Christmas
- Tonic Craft Tacky Glue

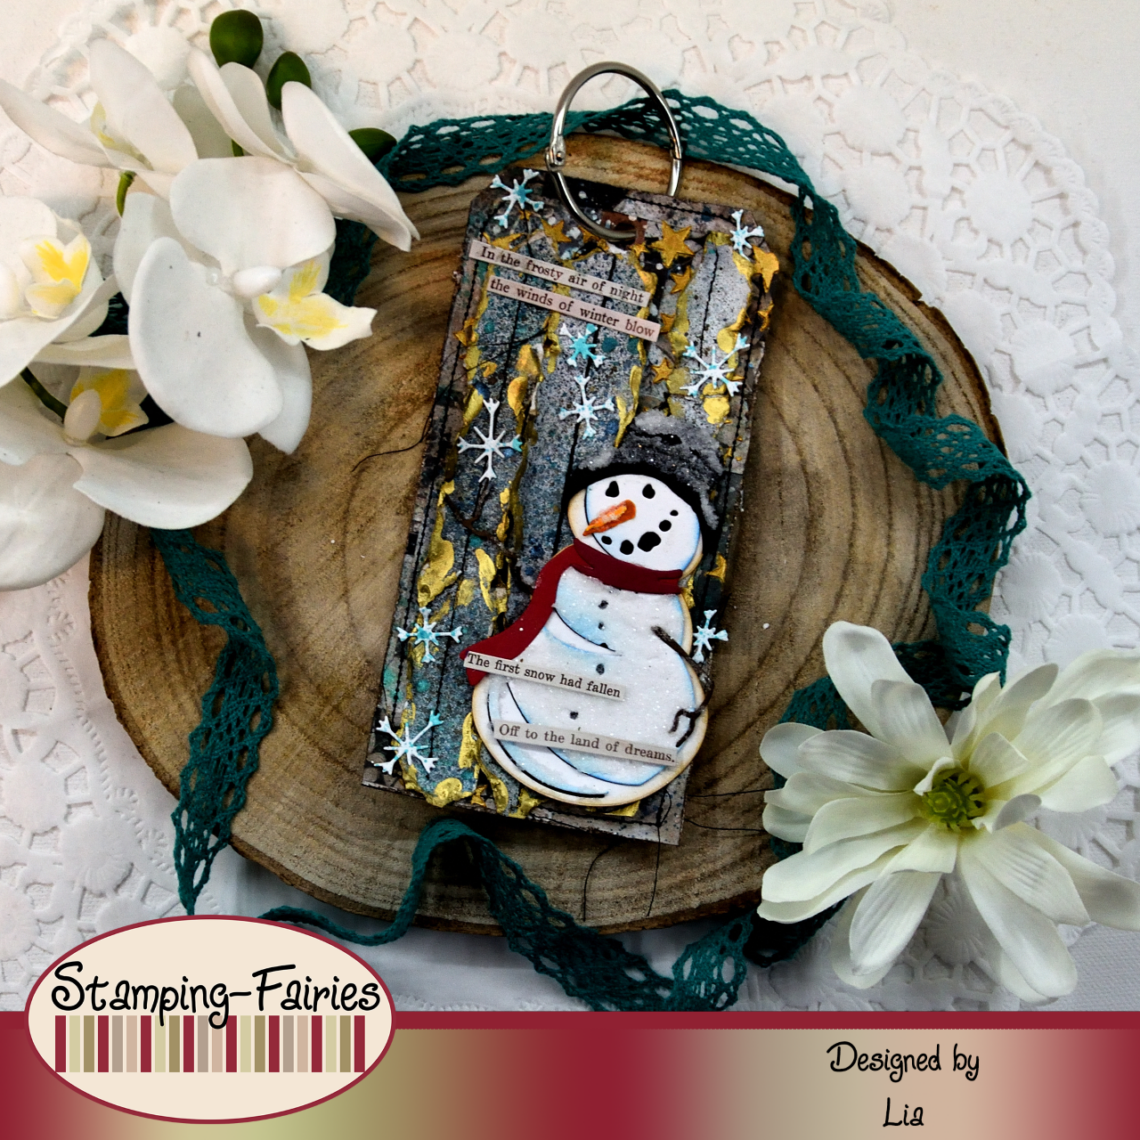
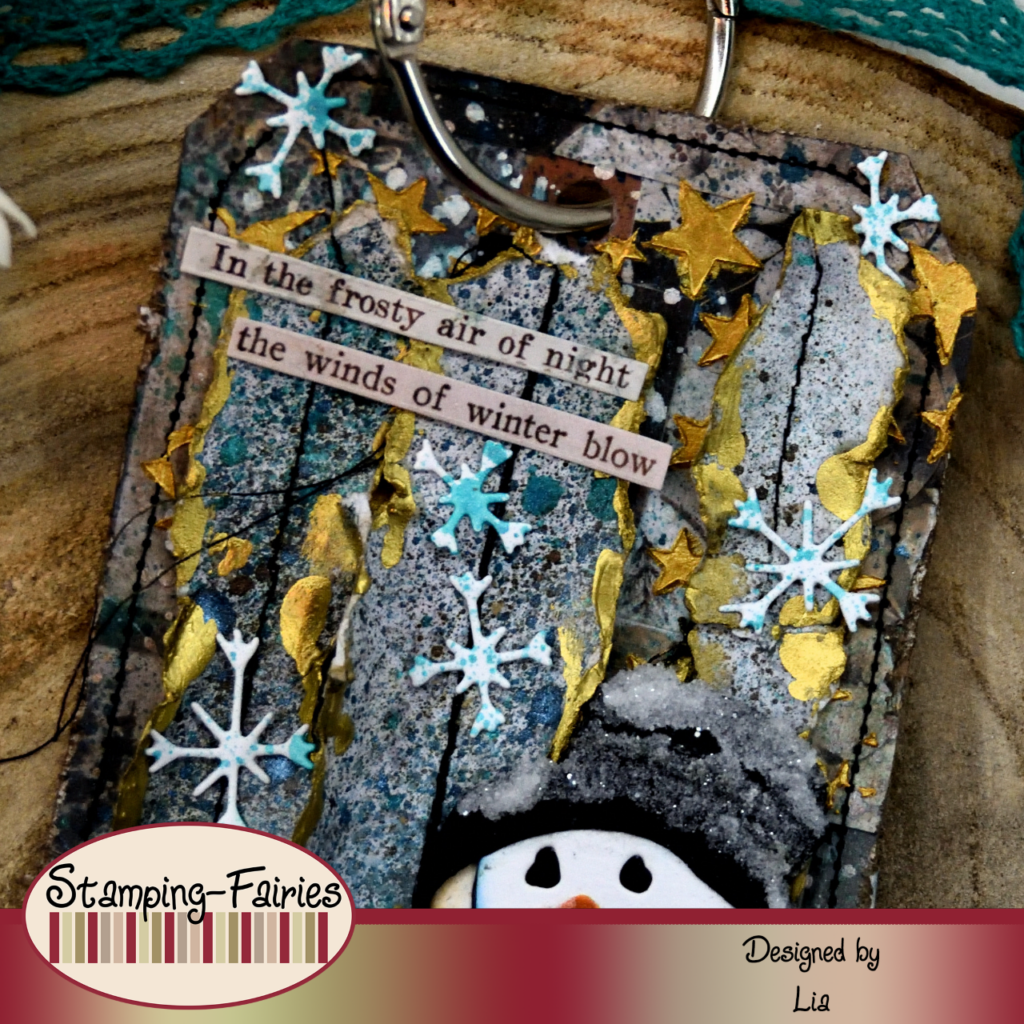
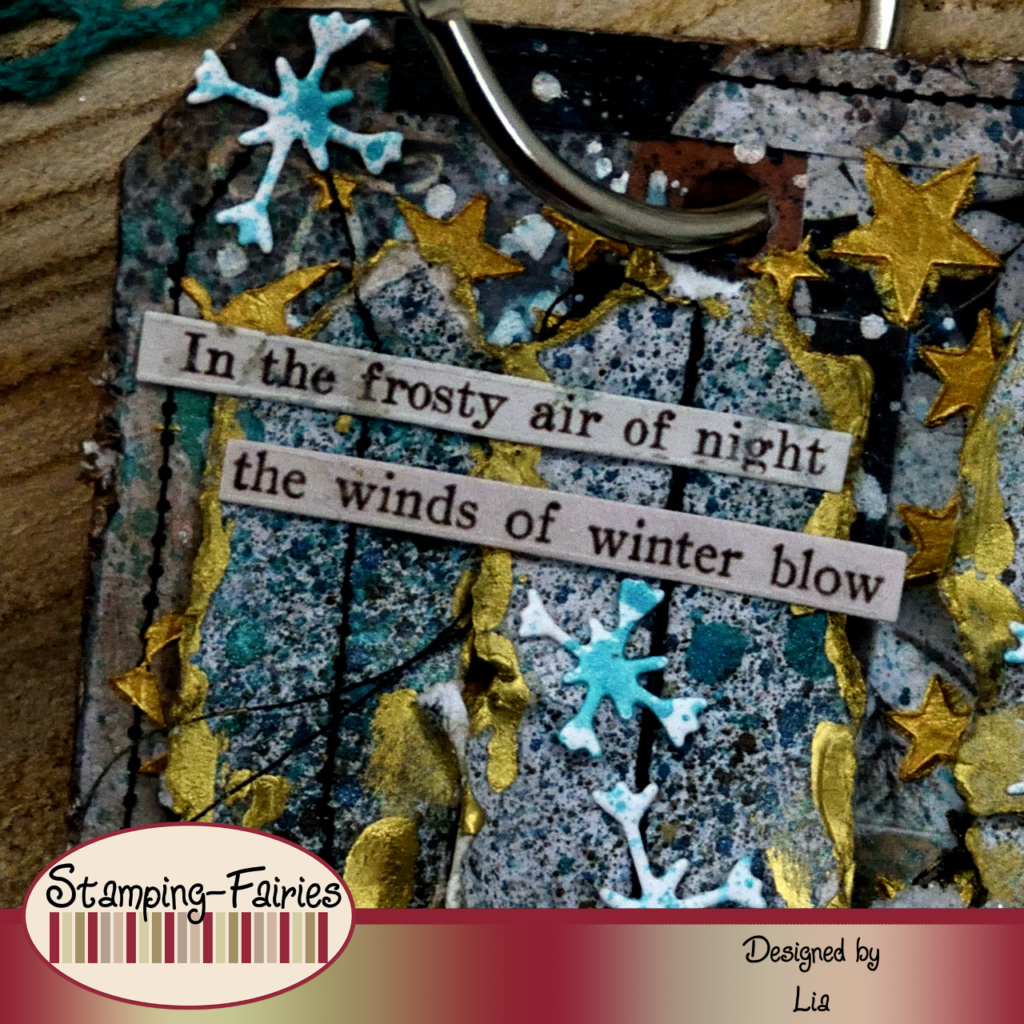
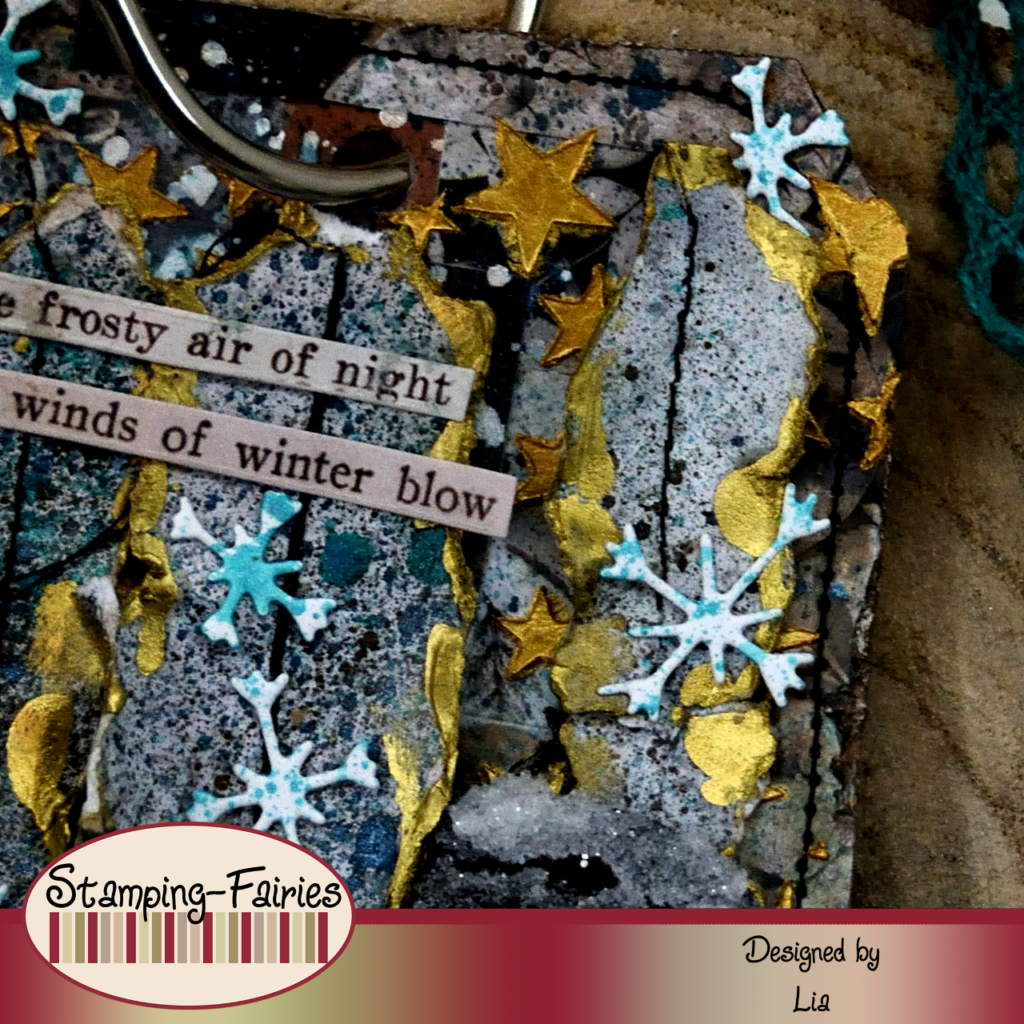
This time, I worked on a Ranger Heavyweight Craft Tag. I really love this surface because it can take a lot of mediums beautifully! I used some pieces of paper and ephemera from the Studio Light Cosy Days Mixed Paper Pad and I glued them on my Tag, using Multi Medium Matte. I dried the glue and then I added some colour on the Tag, using Distress Mica Stain Sprays in colours Fallen Acorn, Winter Frost and Shiny Bauble. I dried the Tag again and I splattered it with Picket Fence Distress Paint. Once the paint was dry, I darkened the edges of the Tag, using Ground Espresso Distress Oxide ink, and then I took the Tag to my sewing machine and added a seam detail all around the edges. And because I really love stencils and dimension, I added some more details using the Falling Stars Layering stencil by Tim Holtz along with Nuvo Indian Gold Embellishment Mousse. Most of all of these layers got covered in the end. I picked out another piece of paper from my Studio Light paper pad and I sprayed it with my Mica Stain Sprays. I tore it in stripes and darkened the edges of the stripes with Ground Espresso Distress Oxide ink. Then I added a seam detail in the middle of each stripe. I wanted to bring some gold on the stripes, so I used Gilded Distress Foundry Wax. If you have never used Foundry Wax, I highly recommend it! This product is magic! It dries fast, so you need to work fast with it and you need to heat set it, otherwise it just fades away. But once you heat set it, it turns so beautiful and sparkly! Anyway, I added the Foundry Wax, heat set it and then I attached the three stripes on my Tag. And with that, my background was done!
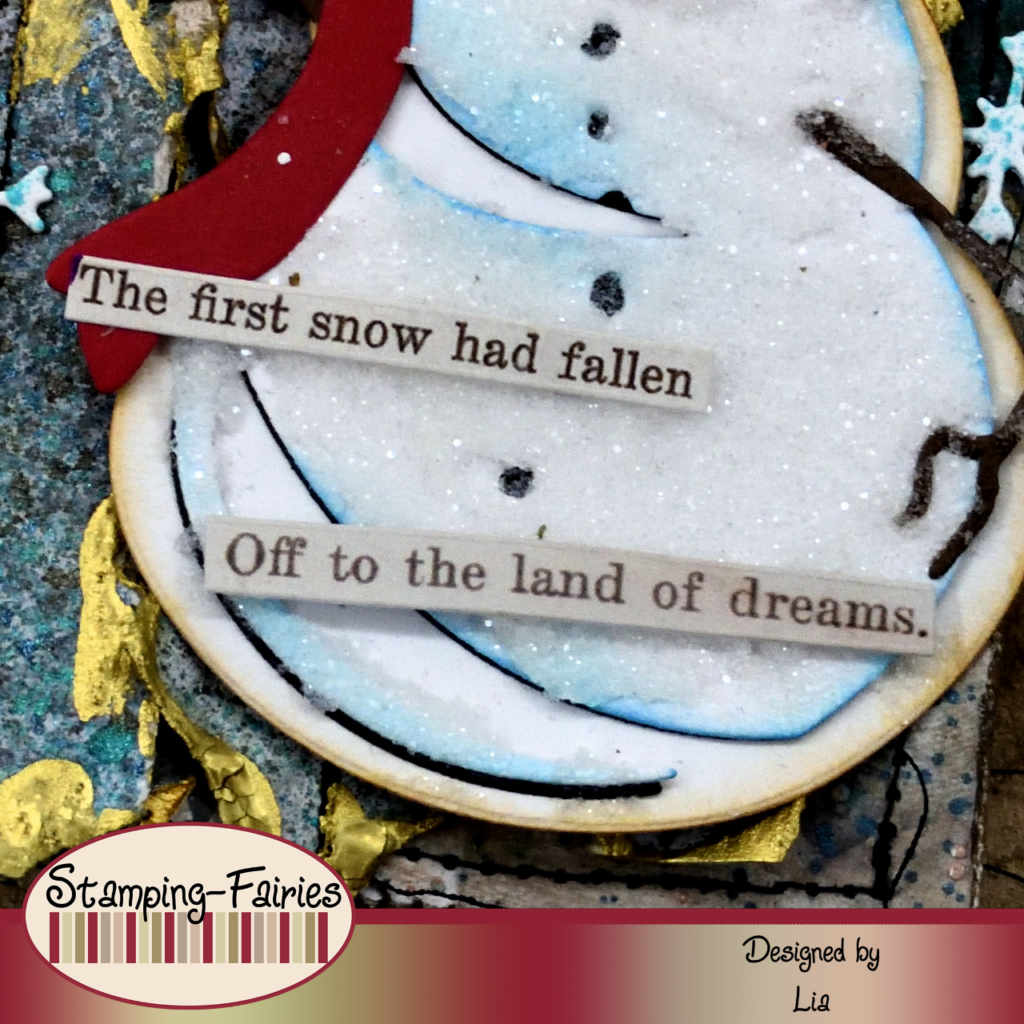
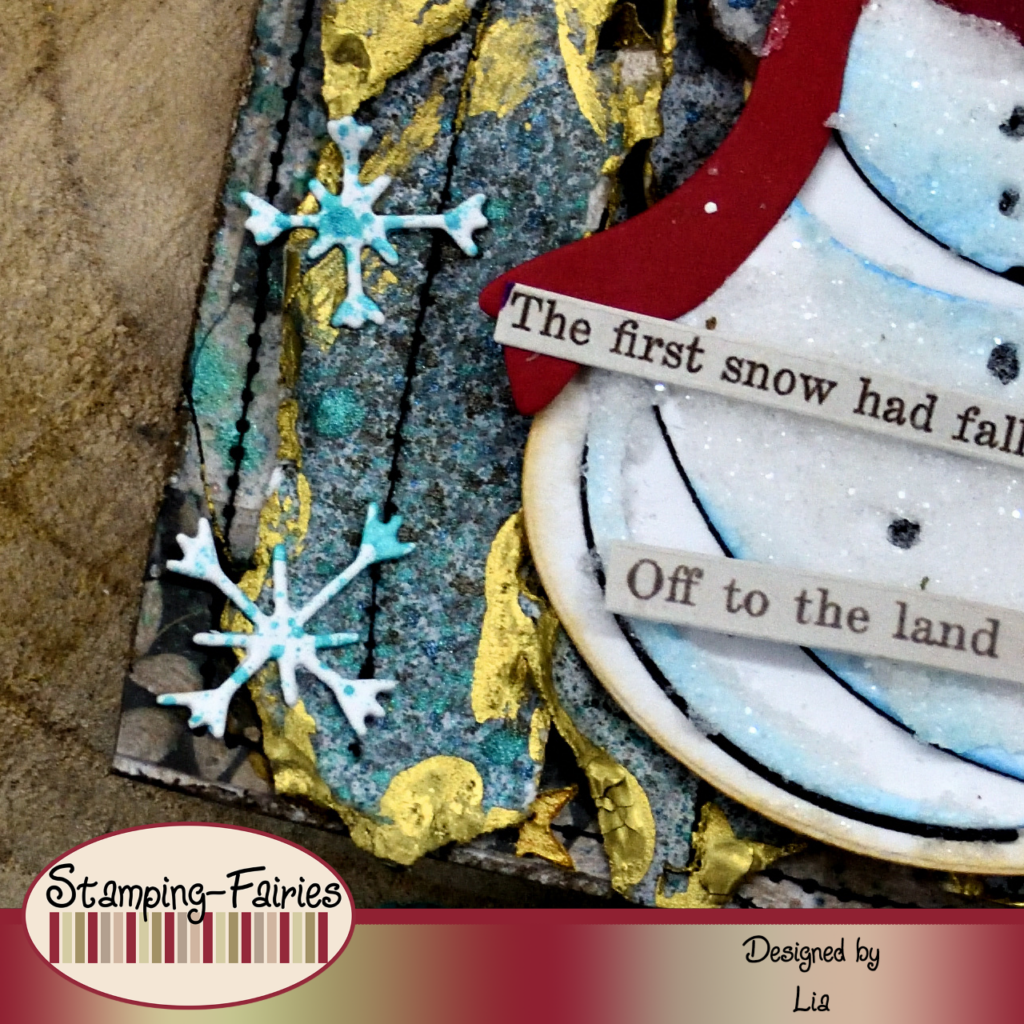
It was time to prepare my images for this project. I built a snowman, using the Sizzix Mr. Frost Thinlits set along with some white and coloured cardstock. I added some colour on the white parts of my snowman, using Vintage Photo Distress Oxide ink, for the base layer, and Salty Ocean Distress Oxide ink, for the upper layer. When my snowman was assembled, I added some Distress Snowfall Grit Paste on the body, the hat and the carrot-nose. Then I added some Distress Rock Candy Glitter on top of the Snowfall Paste. Lastly, I used the snowflake dies from the Sizzix Cozy Winter Thinlits set to cut some snowflakes out of white cardstock. I sprayed the snowflakes with Shiny Bauble Distress Mica Stain Spray and dried them. I attached the snowflakes all around the snowman, all over the Tag.
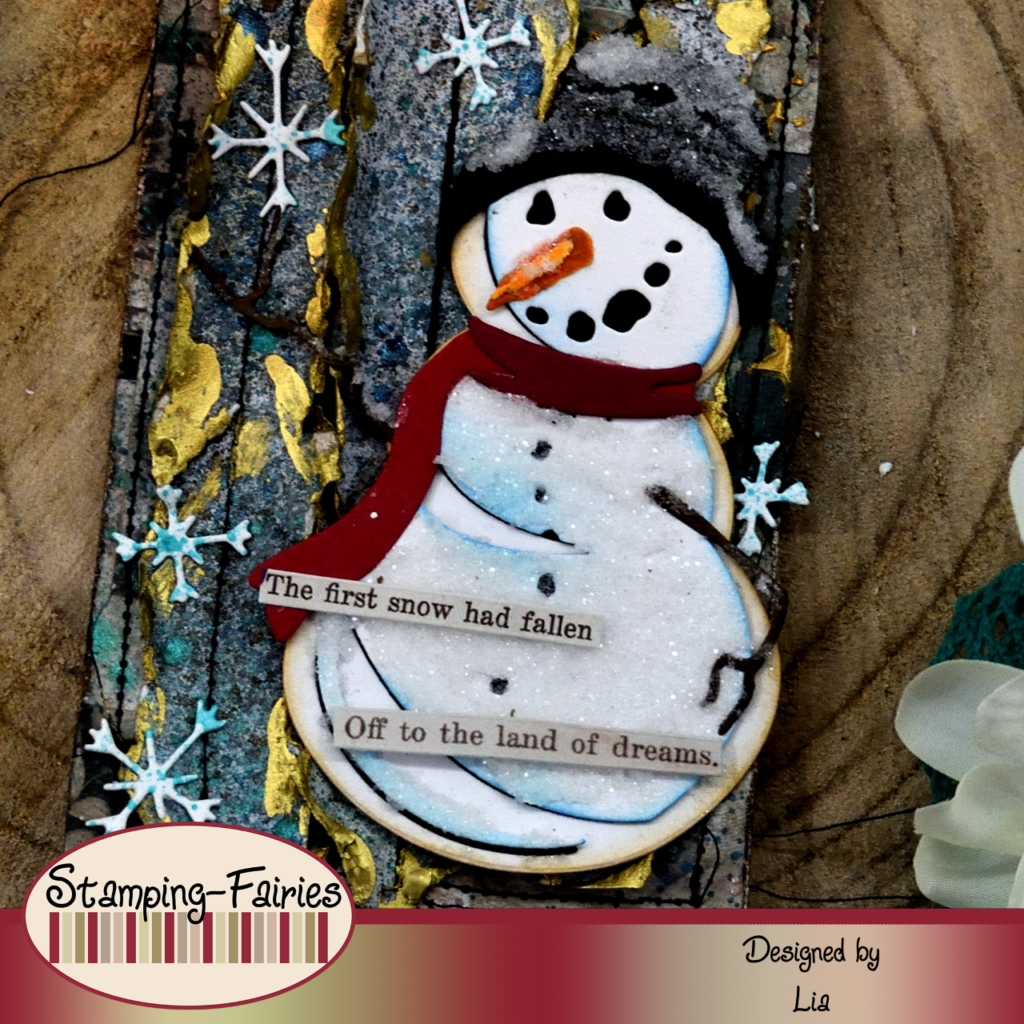
I used several stripes from the Idea-Ology Christmas Sticker Book as sentiments. This book might be intended for Christmas, but it has some really nice winter phrases inside. I attached two sentences on the top left corner of the Tag and another two sentences on the bottom of the Tag, right on the snowman. The phrases say: „In the frosty air of night“, „the winds of winter blow“, „The first snow had fallen“, „Off to the land of dreams“. I think that, mixed all together, they make a nice little winter story! I attached a ring on my Tag. I intend to make more Tags and keep them together like this, like a little Tag Journal.
And that was the project for today! I had a lot of fun making this Tag and using new (to me) products! Now I am full of ideas for new projects! Just a reminder: our Christmas/Winter challenge will be running until tonight. You can find more information about it in the Stamping Fairies profiles on Instagram and Facebook. I really hope you like today’s project! I hope you got inspired! We will see each other again next Monday! Until then, stay creative and have fun!
*Deutsche Version*
Hallo zusammen! Willkommen zurück zu einem weiteren Mixed-Media-Projekt. Unsere Weihnachts-/Winter Challenge endet heute Abend, ihr habt also noch etwas Zeit zum Mitmachen. Für heute habe ich ein Projekt vorbereitet, das unserem Challenge Thema folgt. Beginnen wir mit den Materialien, die ich verwendet habe:
Materialien (wenn etwas nicht auf Lager ist, bitte einfach auf „Produkterinnerung“ klicken)
- Craft Tags Ranger -Kraft Cardstock 8″
- Studio Light – Mixed Paper Pad – Cosy Days
- Ranger Multi Medium – Matte
- Distress Mica Stains
- Distress Paint – Picket Fence
- Ranger – Tim Holtz Distress Oxide Pads
- Tim Holtz Layering Stencil – Falling Stars
- Nuvo Mousse – Indian Gold
- Distress – Foundry Wax – Gilded
- Sizzix Tim Holtz Thinlits – Mr. Frost
- Cardstock
- Tim Holtz Distress Grit Paste – Snowfall
- Distress Stickles Dry Glitter – Clear Rock Candy
- Sizzix Tim Holtz Thinlits – Cozy Winter
- Tim Holtz Sticker Book – Christmas
- Tonic Craft Tacky Glue

Dieses Mal habe ich an einem Ranger Heavyweight Craft Tag gearbeitet. Ich liebe diese Oberfläche, weil sie viele Medien wunderbar aufnehmen kann! Ich habe einige Papierstücke und Ephemera aus dem Studio Light Cozy Days Mixed Paper Pad verwendet und sie mit Multi Medium Matte auf mein Tag geklebt. Ich habe den Kleber getrocknet und dann etwas Farbe auf den Tag aufgetragen, indem ich Distress Mica Stain Sprays in den Farben Fallen Acorn, Winter Frost und Shiny Bauble verwendet habe. Ich habe dan Tag erneut getrocknet und mit Picket Fence Distress Paint bespritzt. Sobald die Farbe getrocknet war, habe ich die Ränder des Tags mit Ground Espresso Distress Oxide Tinte abgedunkelt, dann habe ich den Tag zu meiner Nähmaschine gebracht und rund um die Kanten ein Nahtdetail hinzugefügt. Und weil ich Schablonen und Dimensionen liebe, habe ich mit der Falling Stars Layering Schablone von Tim Holtz und dem Nuvo Indian Gold Embellishment Mousse noch ein paar weitere Details hinzugefügt. Die meisten dieser Schichten wurden am Ende abgedeckt. Ich habe ein weiteres Stück Papier aus meinem Studio Light Papierblock herausgesucht und es mit meinen Mica Stain Sprays besprüht. Ich habe es in Streifen gerissen und die Ränder der Streifen mit Ground Espresso Distress Oxide Tinte abgedunkelt. Dann habe ich in der Mitte jedes Streifens ein Nahtdetail hinzugefügt. Ich wollte etwas Gold auf die Streifen bringen, also habe ich Gilded Distress Foundry Wax verwendet. Wenn ihr noch nie Foundry Wax verwendet habt, kann ich es nur wärmstens empfehlen! Dieses Produkt ist magisch! Es trocknet schnell, ihr müsst also schnell damit arbeiten und es heißfixieren, sonst verblasst es einfach. Aber wenn man es erst einmal heißfixiert, wird es so schön und funkelnd! Wie auch immer, ich habe das Foundry Wax hinzugefügt, es heißgehärtet und dann die drei Streifen auf meinem Tag angebracht. Und damit war mein Hintergrund fertig!
Zeit, meine Bilder für dieses Projekt vorzubereiten. Ich habe aus dem Sizzix Mr. Frost Thinlits Set und etwas weißem und farbigem Karton einen Schneemann gebaut. Ich habe den weißen Teilen meines Schneemanns etwas Farbe hinzugefügt, indem ich Vintage Photo Distress Oxide Tinte für die Basisschicht und Salty Ocean Distress Oxide Tinte für die obere Schicht verwendet habe. Als mein Schneemann zusammengebaut war, habe ich etwas Distress Snowfall Grit Paste auf den Körper, die Mütze und die Karottennase aufgetragen. Dann habe ich etwas Distress Rock Candy Glitter auf die Snowfall Paste aufgetragen. Zum Schluss habe ich die Schneeflocken Stanzformen aus dem Sizzix Cozy Winter Thinlits- Set verwendet, um einige Schneeflocken aus weißem Karton auszuschneiden. Ich habe die Schneeflocken mit Shiny Bauble Distress Mica Stain Spray besprüht und getrocknet. Ich habe die Schneeflocken rund um den Schneemann angebracht, überall auf dem Tag.
Als Sprüche habe ich mehrere Streifen aus dem Christmas Sticker Book von Idea-Ology verwendet. Dieses Buch ist vielleicht für Weihnachten gedacht, aber es enthält einige schöne Winterphrasen. Ich habe zwei Sätze in die obere linke Ecke des Tags eingefügt und zwei weitere Sätze unten auf den Tag, direkt auf den Schneemann. Die Sätze lauten: „In der frostigen Nachtluft“, „die Winde des Winters wehen“, „Der erste Schnee war gefallen“, „Auf ins Land der Träume“. Ich denke, zusammen ergeben sie eine schöne kleine Wintergeschichte! Ich habe einen Ring an meinem Tag befestigt. Ich habe vor, weitere Tags zu erstellen und sie so zusammenzuhalten, wie ein kleines Tag Journal.

Und das war das Projekt für heute! Es hat mir viel Spaß gemacht, dieses Tag zu erstellen und (für mich) neue Produkte zu verwenden! Jetzt bin ich voller Ideen für neue Projekte! Nur zur Erinnerung: Unsere Weihnachts/Winter- Challenge läuft bis heute Abend. Weitere Informationen dazu findet ihr in den Stamping Fairies Profilen auf Instagram und Facebook. Ich hoffe sehr, dass euch das Projekt gefällt! Ich hoffe, ihr habt euch inspirieren lassen! Wir sehen uns nächsten Montag wieder! Bis dahin bleibt kreativ und habt Spaß!