To the moon and back
*German version below | Deutsche Version unten*
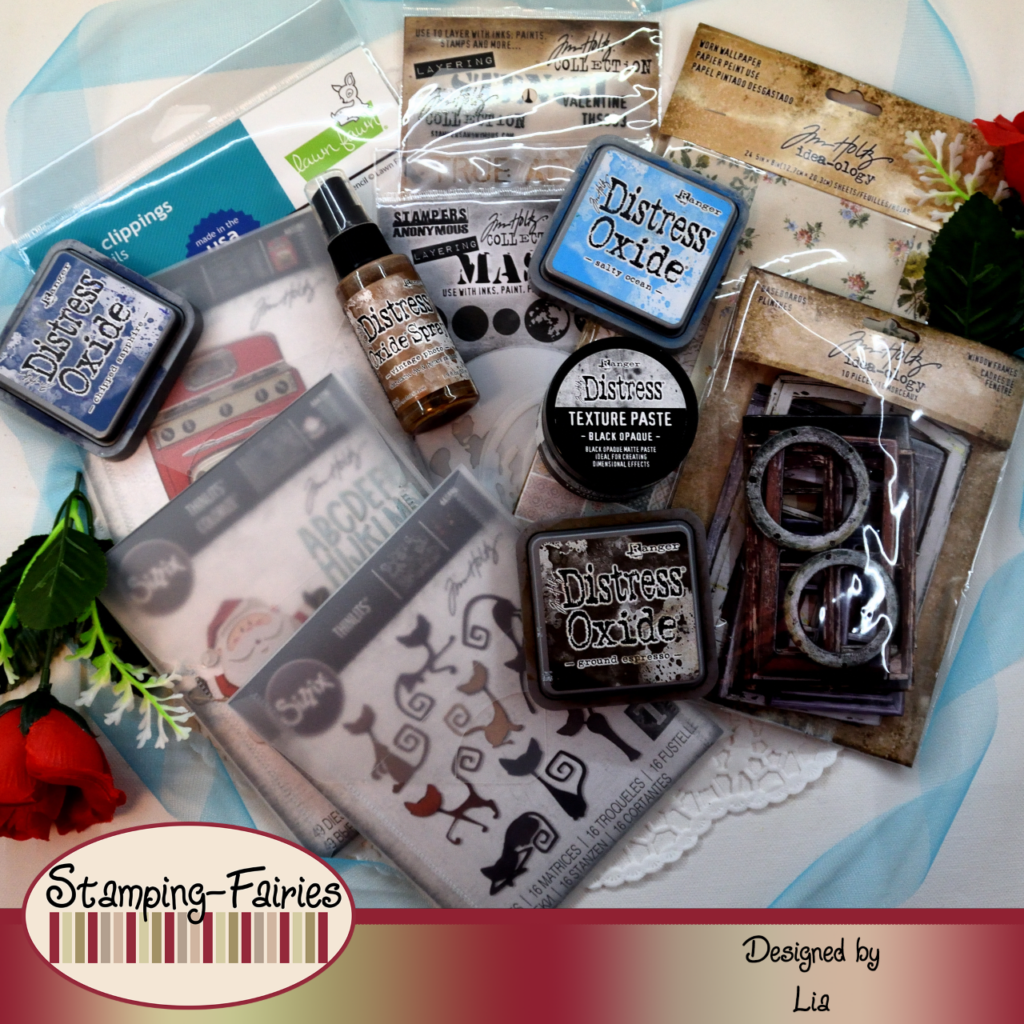
Hello everyone! Welcome back to another mixed media project. Valentine’s day approaches and I have prepared a somewhat romantic project for today. Disclaimer: I know that some of the products I used are no longer available in the shop. This is happening because the inventory is currently being overhauled. Sometimes we use a product and the next day it is no longer listed. I apologize for the inconvenience, but unfortunately there is nothing I can do about it! With that out of the way, let’s start with the materials I used:
Materials (If something is not in stock, please simply click on “Product reminder”/ “Produkterinnerung”)
- Distress Paints
- Lawn Fawn – 6″ x 6″ Stencil – Brick Stencil
- Ranger Distress Texture Paste – Translucent
- Distress Oxide Sprays
- Ranger Multi Medium – Matte
- Tim Holtz Worn Wallpaper
- Ranger – Tim Holtz Distress Oxide Pads
- Tim Holtz Texture Paste – Black Opaque
- Tim Holtz Layering Stencil – Valentine
- Tim Holtz – Baseboards Window Frames
- Sizzix Tim Holtz Thinlits – Mischievous
- Sizzix Tim Holtz Thinlits – Santa Greetings, Colorize
- Sizzix Tim Holtz Thinlits – Retro Oven
- Cardstock
- Glitter Cardstock
- Tonic Craft Tacky Glue
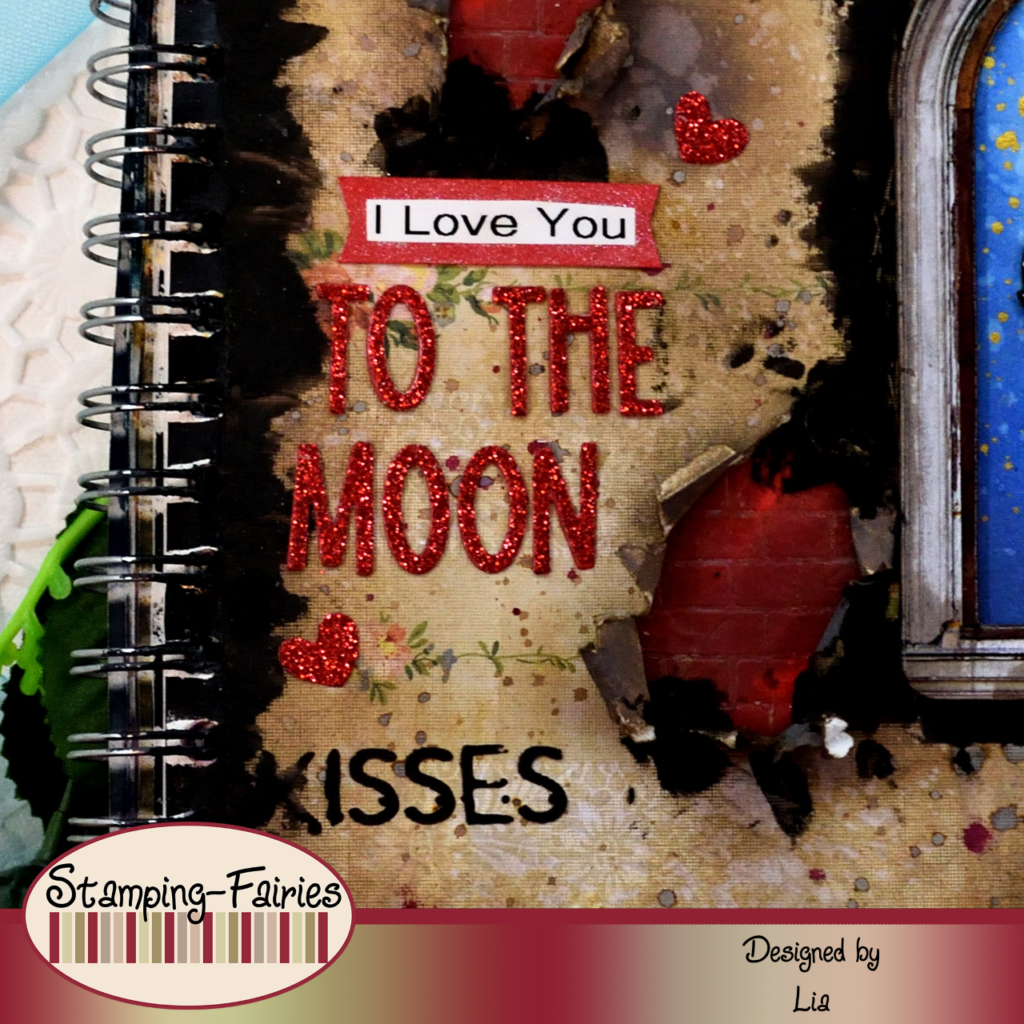
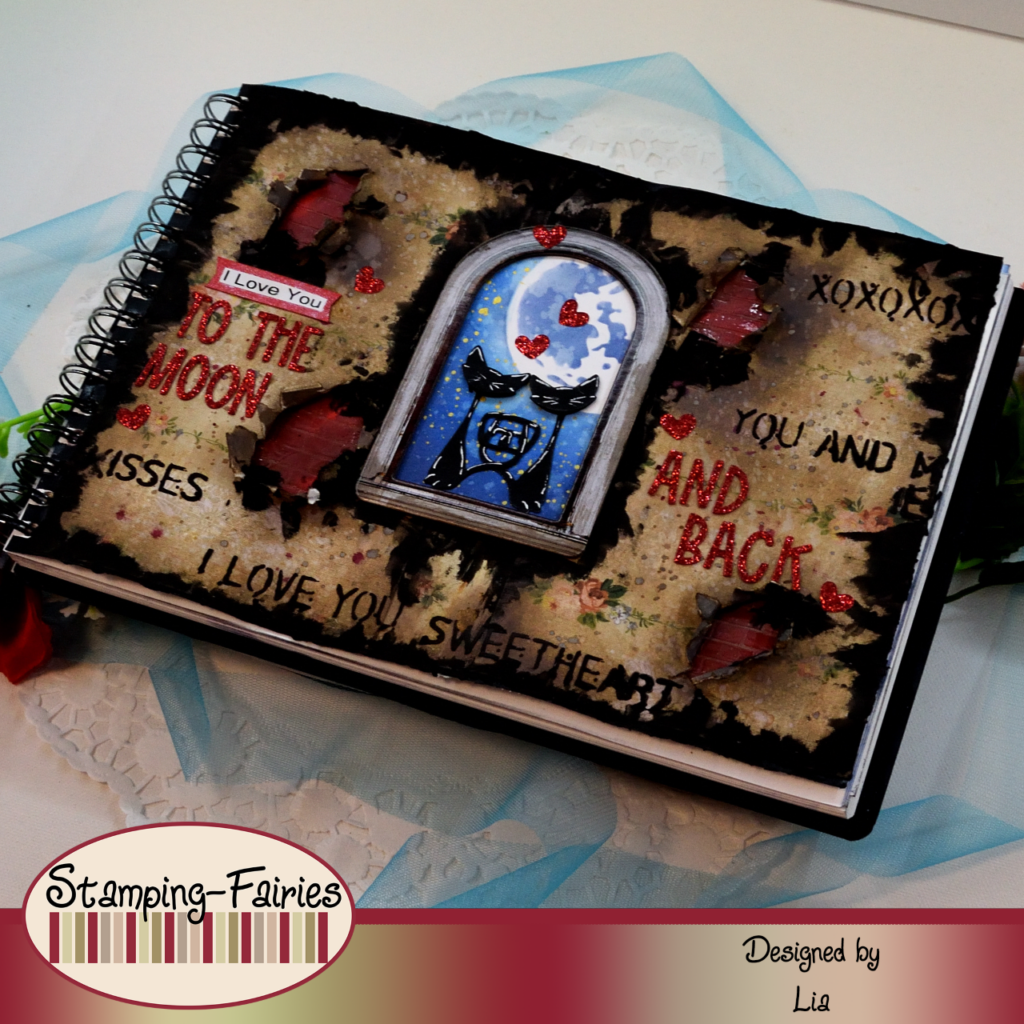
For this project, I worked in one of my bigger art journals and I started with the background. I wanted to create the impression of a torn wallpaper that reveals some of the bricks underneath it. I started by applying some Fired Brick and Walnut Stain Distress Paint and mixing them with my fingers directly on the page. Then I used the Lawn Fawn Brick stencil and Distress Translucent Texture Paste to create the Bricks. Once the Paste was dry, I sprayed the bricks with Vintage Photo Distress Oxide spray and water. I was just trying to make the brown seep into the brick cracks and make them stand out. I picked three pieces of wallpaper from the Idea-Ology Worn Wallpaper pack and I placed them on my page so I could see where to tear them. I tore four openings on the wallpaper and then treated the edges with Ground Espresso Distress Oxide ink. I went on applying the same ink all over the wallpaper, to make it look dirty, and then I used some water and splattered it to create stains and make it look even dirtier. In the end I splattered it with Vintage Photo Distress Oxide spray and some Lumberjack Plaid Distress Stain spray. I glued the wallpaper on my page using Multi Medium Matte, and then I used the Valentine Layering stencil with Ranger Black Opaque Texture Paste on some spots. And with that, my background was mostly done!

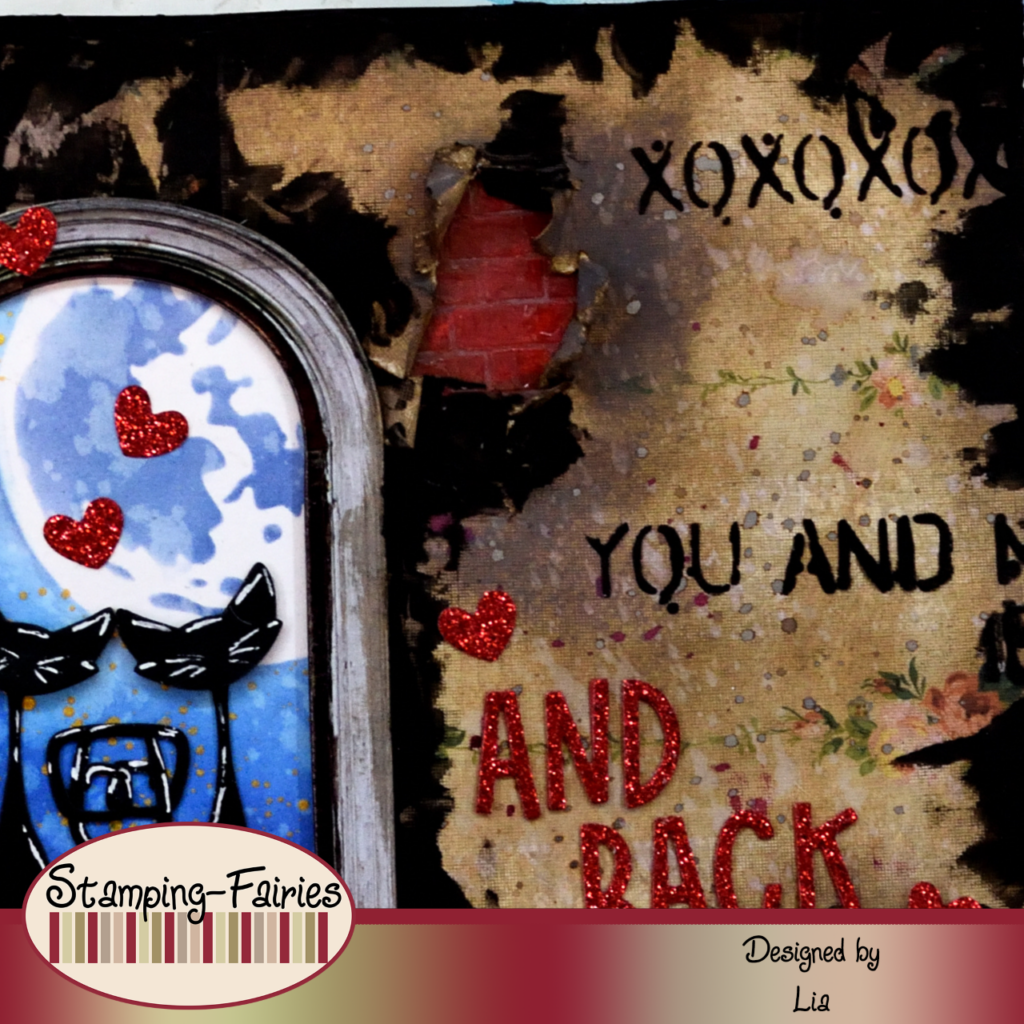
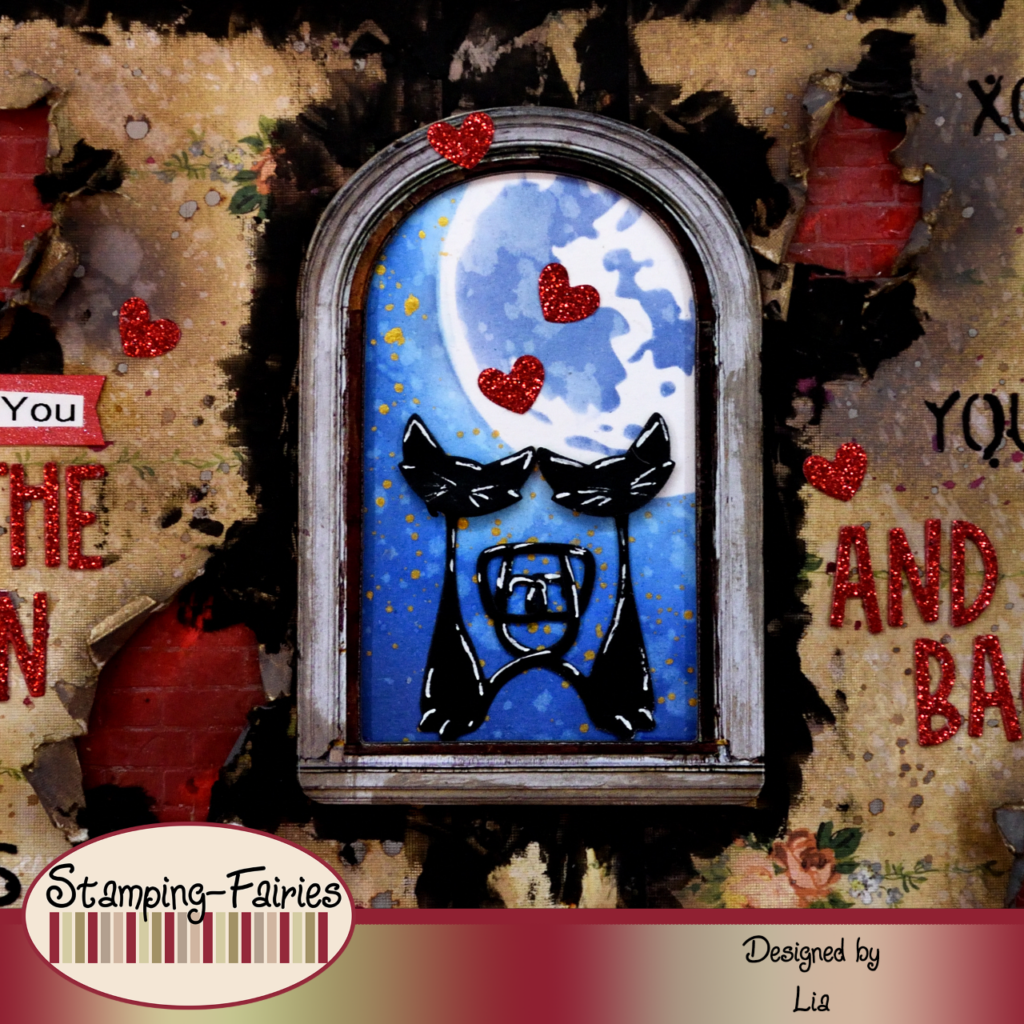
My main image for this project is a window where two cats are sitting, watching the moon. First, I needed to create the moon scenery. I used the middle sized moon from the Layering Moon Mask stencil and Distress Oxide inks in coloures Speckled Egg, Salty Ocean, Prize Ribbon and Chipped Sapphire and I inkblended the moon scene on mixed media paper. I splattered the scene with water, dabbed the excess and then I dried it. I splattered the scene with some gold acrylic paint and dried it again. I chose a big arched window frame from the Idea-Ology Baseboards Window Frames pack and attached it on the scene. Then I carefully cut the excess paper all around the window. My cats are cut out of black cardstock with the Sizzix Mischievous Thinlits set. I also used the cookie die from the Sizzix Rerto Oven Thinlits set to cut some hearts out of red glitter Cardstock. I placed my window on the center of my page and then I added some Ranger Black Opaque Texture Paste all around it. I also added the same Black Paste all over the edges of the page as well as on some spots around the exposed bricks.
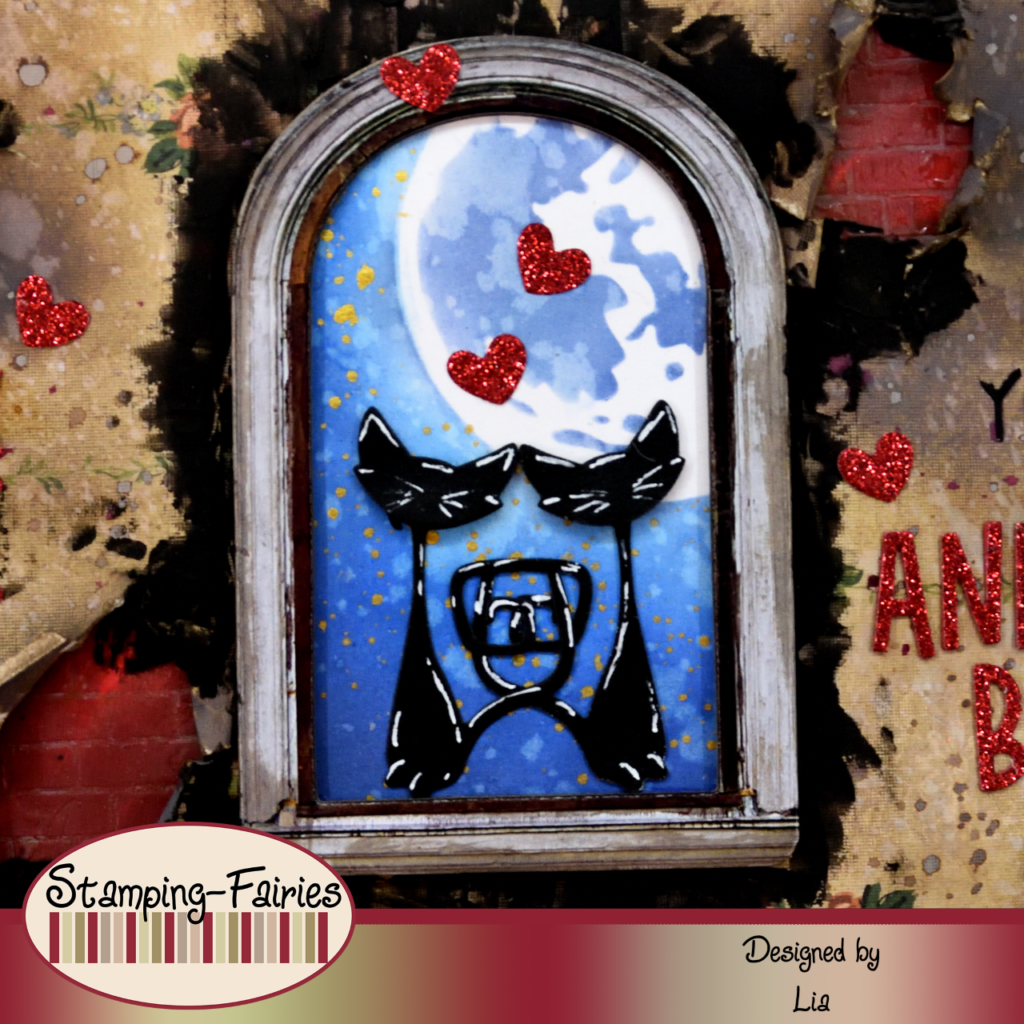
My sentiment consists of two parts. The first part is printed on my Brother label maker. I attached the little label on red cardstock. The second part is cut out of red glitter Cardstock, with the alphabet dies from the Sizzix Santa Greetings Colorize Thinlits set. Altogether, it says „I Love You to the moon and back“. I have been working with song titles lately. I really love music. This time I was thinking of a music group called Savage Garden. It is about Valentine’s day so some love songs are in order, don’t you think?

And that was the project for today! It is not always necessary to use Valentine oriented products and pink colours to make a Valentine’s scene. This project serves to prove that. We can easily make beautiful, romantic scenes using everyday themed products! I hope you like this idea! Just a reminder: our Love Challenge will be running until the 29th of February. You can find more information about it in the Stamping Fairies profiles on Instagram and Facebook. I really hope you like today’s project! I hope you got inspired! We will see each other again next Monday! Until then, stay creative and have fun!
*Deutsche Version*
Hallo zusammen! Willkommen zurück zu einem weiteren Mixed-Media-Projekt. Der Valentinstag naht und ich habe für heute ein etwas romantisches Projekt vorbereitet. Disclaimer: Ich weiß, dass einige der von mir verwendeten Produkte nicht mehr im Shop erhältlich sind. Das geschieht, weil das Inventar gerade überholt wird. Manchmal verwenden wir ein Produkt und am nächsten Tag ist es nicht mehr aufgeführt. Ich entschuldige mich für die Unannehmlichkeiten, aber leider kann ich nichts dagegen tun! Aber jetzt, beginnen wir mit den Materialien, die ich verwendet habe:
Materialien (wenn etwas nicht auf Lager ist, bitte einfach auf „Produkterinnerung“ klicken)
- Distress Paints
- Lawn Fawn – 6″ x 6″ Stencil – Brick Stencil
- Ranger Distress Texture Paste – Translucent
- Distress Oxide Sprays
- Ranger Multi Medium – Matte
- Tim Holtz Worn Wallpaper
- Ranger – Tim Holtz Distress Oxide Pads
- Tim Holtz Texture Paste – Black Opaque
- Tim Holtz Layering Stencil – Valentine
- Tim Holtz – Baseboards Window Frames
- Sizzix Tim Holtz Thinlits – Mischievous
- Sizzix Tim Holtz Thinlits – Santa Greetings, Colorize
- Sizzix Tim Holtz Thinlits – Retro Oven
- Cardstock
- Glitter Cardstock
- Tonic Craft Tacky Glue
Für dieses Projekt habe ich in einem meiner größeren Kunstjournalen gearbeitet und mit dem Hintergrund begonnen. Ich wollte den Eindruck einer zerrissenen Tapete erwecken, die einige der darunter liegenden Ziegelsteine zum Vorschein bringt. Ich habe damit begonnen, etwas Fired Brick und Walnut Stain Distress Paint aufzutragen und sie direkt auf der Seite mit den Fingern zu vermischen. Dann habe ich die Lawn Fawn Brick Schablone und die Distress Translucent Texture Paste verwendet, um die Ziegelsteine zu erstellen. Sobald die Paste trocken war, habe ich die Steine mit Vintage Photo Distress Oxide Spray und Wasser besprüht. Ich habe versucht, das Braun in die Ziegelrisse eindringen zu lassen und sie hervorzuheben. Ich habe drei Tapetenstücke aus dem Idea-Ology Worn Wallpaper Paket ausgewählt und sie auf meiner Seite platziert, damit ich sehen kann, wo ich sie abreißen kann. Ich habe vier Löcher in die Tapete gerissen und die Kanten dann mit Ground Espresso Distress Oxide Tinte behandelt. Ich habe weiterhin die gleiche Tinte auf die ganze Tapete aufgetragen, damit sie schmutziger aussah, und dann habe ich etwas Wasser benutzt und es aufgespritzt, um Flecken zu erzeugen und sie noch schmutziger aussehen zu lassen. Am Ende habe ich es mit Vintage Photo Distress Oxide Spray und etwas Lumberjack Plaid Distress Stain Spray gespritzt. Ich habe die Tapete mit Multi Medium Matte auf meine Seite geklebt und dann an einigen Stellen die Valentine Layering Schablone mit Ranger Black Opaque Texture Paste verwendet. Und damit war mein Hintergrund größtenteils fertig!
Mein Hauptbild für dieses Projekt ist ein Fenster, in dem zwei Katzen sitzen und den Mond beobachten. Zuerst musste ich die Mondlandschaft erstellen. Ich habe den mittelgroßen Mond aus der Layering Moon Mask Schablone und Distress Oxide Tinten in den Farben Speckled Egg, Salty Ocean, Prize Ribbon und Chipped Sapphire verwendet und die Mondszene auf Mixed Media Papier eingefärbt. Ich habe die Szene mit Wasser bespritzt, den Überschuss abgetupft und dann getrocknet. Ich habe die Szene mit etwas goldener Acrylfarbe bespritzt und erneut getrocknet. Ich habe einen großen Bogenfensterrahmen aus dem Idea-Ology Baseboards Window Frames Paket ausgewählt und ihn auf meine Szene angebracht. Dann habe ich das überschüssige Papier rund um das Fenster vorsichtig abgeschnitten. Meine Katzen sind mit dem Sizzix Mischievous Thinlits Set aus schwarzem Karton ausgeschnitten. Ich habe auch die Keksstanze aus dem Sizzix Rerto Oven Thinlits Set verwendet, um ein paar Herzen aus rotem Glitzerkarton auszuschneiden. Ich habe mein Fenster in der Mitte meiner Seite platziert und dann rundherum etwas Ranger Black Opaque Texture Paste aufgetragen. Außerdem habe ich die gleiche schwarze Paste an allen Rändern der Seite sowie an einigen Stellen rund um die freigelegten Ziegelsteine aufgetragen.
Mein Spruch besteht aus zwei Teilen. Der erste Teil wird auf meinem Brother Etikettendrucker gedruckt. Das kleine Etikett habe ich auf rotem Karton befestigt. Der zweite Teil ist aus rotem Glitzerkarton ausgeschnitten, mit den Alphabet Stanzformen aus dem Sizzix Santa Greetings Colorize Thinlits Set. Alles in allem heißt es „Ich liebe dich bis zum Mond und zurück“. Ich habe in letzter Zeit mit Songtiteln gearbeitet. Ich liebe Musik wirklich. Diesmal dachte ich an eine Musikgruppe namens Savage Garden. Es geht um den Valentinstag, also sind ein paar Liebeslieder angebracht, findet ihr nicht?
Und das war das Projekt für heute! Es ist nicht immer notwendig, Valentinsprodukte und rosa Farben zu verwenden, um eine Valentinsszene zu gestalten. Dieses Projekt dient dazu, dies zu beweisen. Mit alltäglichen Themenprodukten können wir ganz einfach wunderschöne, romantische Szenen gestalten! Ich hoffe, diese Idee euch gefällt! Nur zur Erinnerung: Unsere Love Challenge läuft noch bis zum 29. Februar. Weitere Informationen dazu findet ihr in den Stamping Fairies Profilen auf Instagram und Facebook. Ich hoffe sehr, dass euch das Projekt gefällt! Ich hoffe, ihr habt euch inspirieren lassen! Wir sehen uns nächsten Montag wieder! Bis dahin bleibt kreativ und habt Spaß!

Hello Alice