Mr. Rabbit Beetlejuice
*German version below | Deutsche Version unten*
Hello everyone! Welcome back to another mixed media project. For today’s project, I prepared something funny, based on a movie I really like. I have references to Beetlejuice on this project! Let’s start with the materials I used:
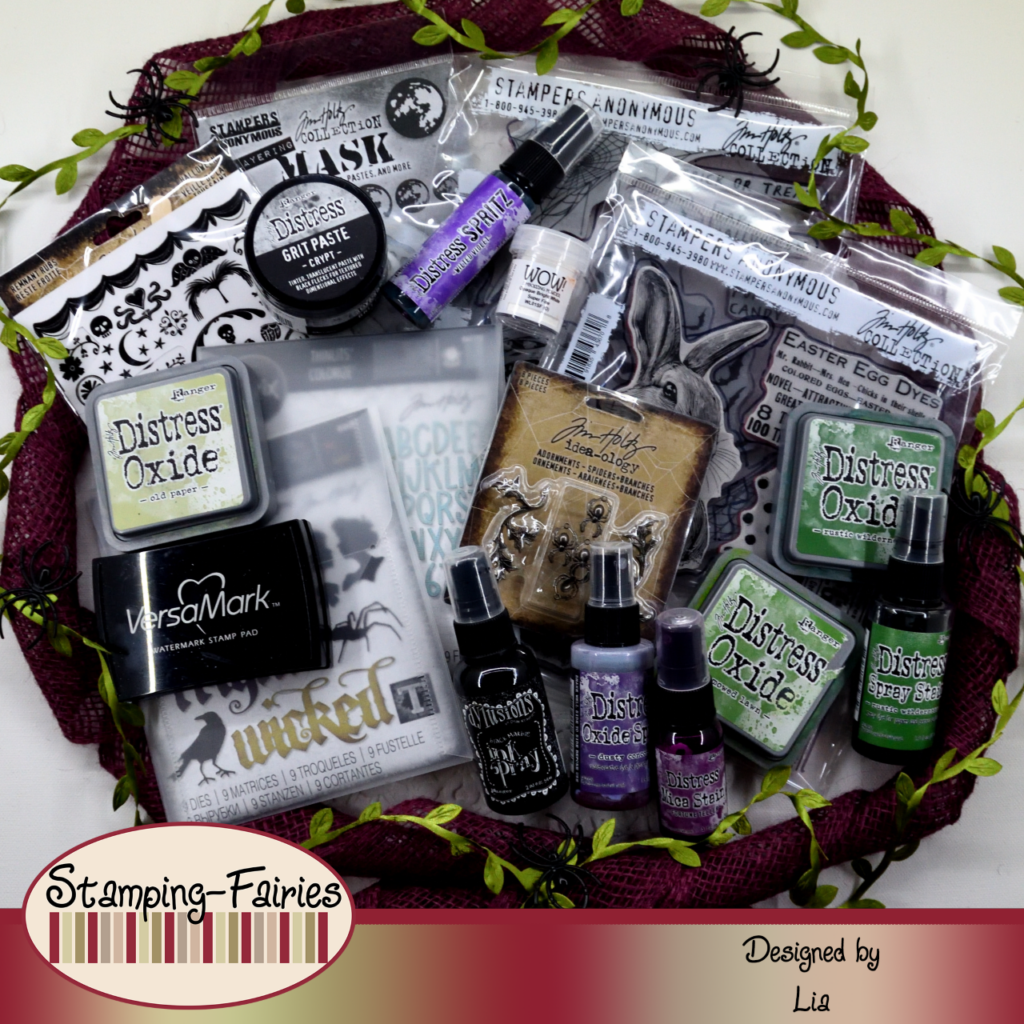
Materials (If something is not in stock, please simply click on “Product reminder”/ “Produkterinnerung”)
- Prima Marketing – Art Basics – Gesso Clear
- Tim Holtz Layering Mask – Moon Mask
- Ranger – Tim Holtz Distress Oxide Pads
- Distress Spray Stain – Rustic Wilderness
- Dylusions Ink Spray – Black Marble
- Distress Oxide Spray – Dusty Concord
- Distress Mica Stain – Fortune Teller
- Tim Holtz Stamp set -MR. Rabbit
- VersaFine Onyx Black
- Distress Spritz – Wilted Violet
- Tim Holtz Stamp set – Unraveled
- VersaMark Ink Pad
- WOW! Embossing powder – Opaque Bright White
- Tim Holtz – Idea-Ology Adornments Spiders + Branches
- Alcohol Markers
- Tim Holtz Distress Grit Paste – Crypt
- Sizzix Tim Holtz Thinlits -Vault Gothic Portraits
- Black Glitter Cardstock
- Sizzix Tim Holtz Thinlits – Santa Greetings, Colorize
- Cardstock
- Tim Holtz Remnant Rubs – Halloween
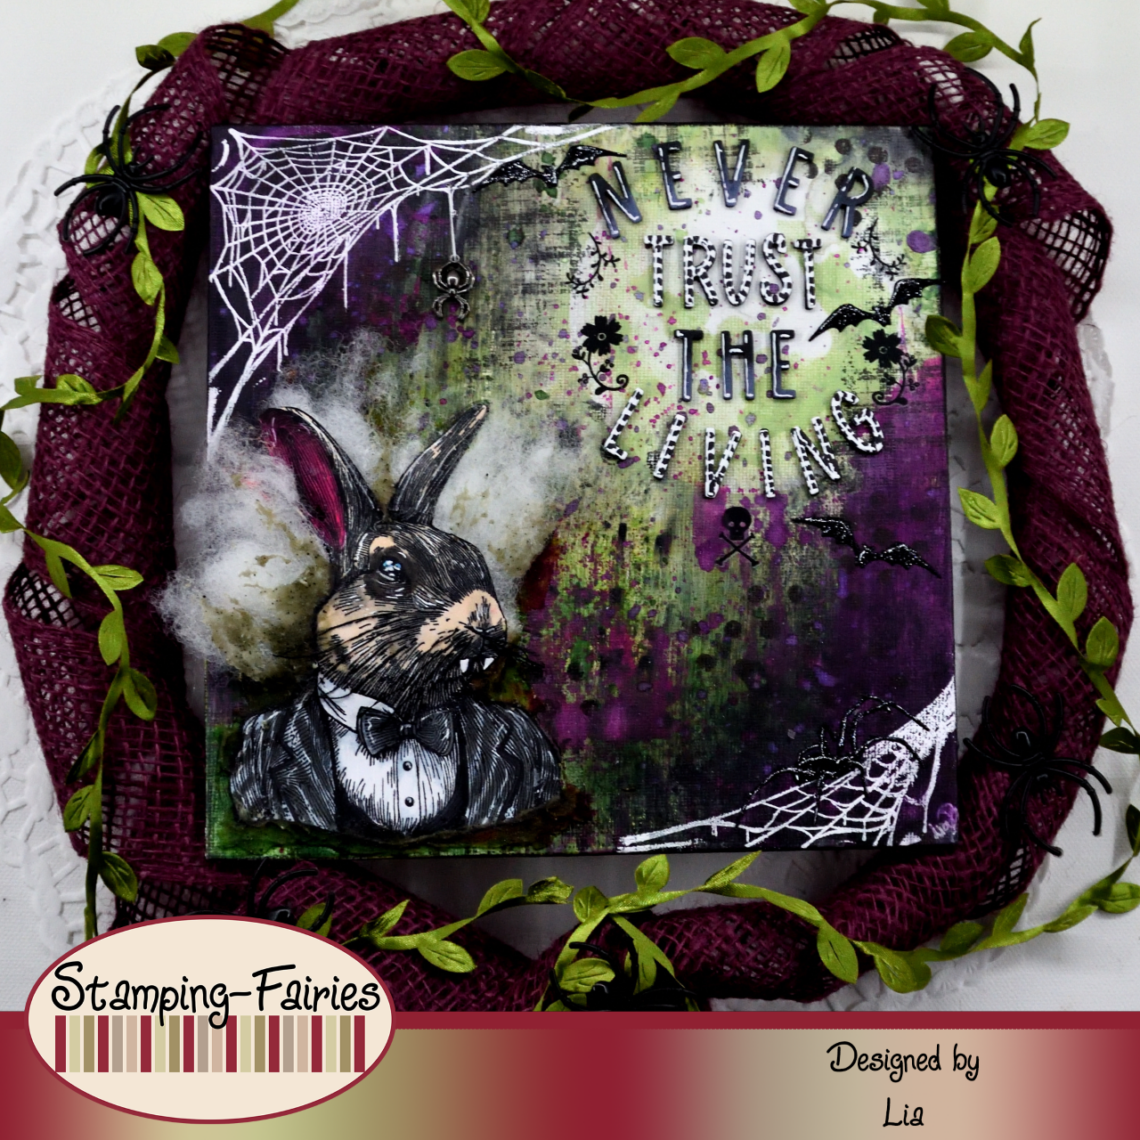
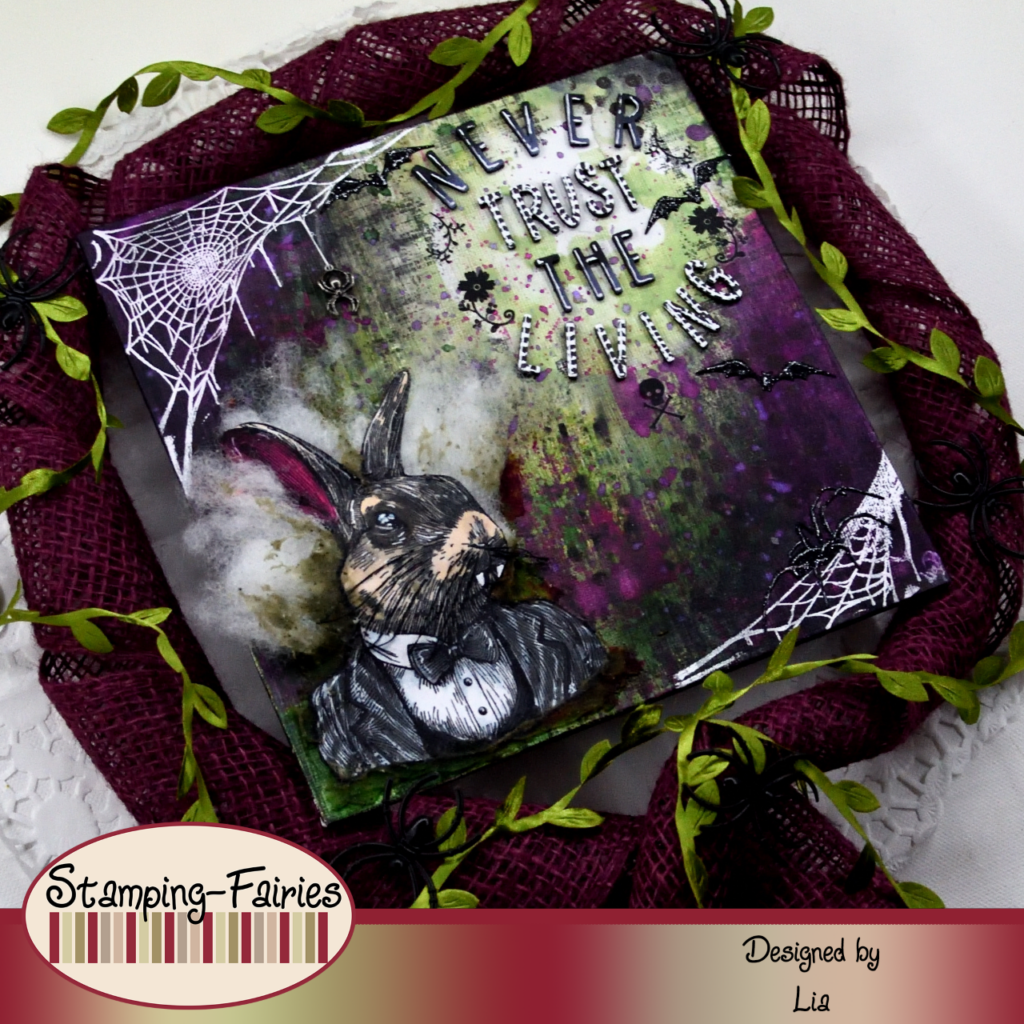
I built this project on a canvas because I wanted to be able to hang it on the wall. I started by covering the canvas with a good layer of Gesso. I wanted to create a big moon and for that, I used the Moon Mask Layering stencil. I chose the bigger moon of the set and I placed the mask part of it on the upper right side of the canvas. Then I added colour to the canvas, using the reverse ink smooshing technique. I applied the ink on an acetate sheet, sprayed it with a little water, picked up the acetate sheet and pressed it on the canvas. I started with Old Paper Distress Oxide ink, for the area around the moon, and then I used Mowed Lawn and Rustic Wilderness Distress Oxide inks, making sure always to dry my project between the layers of colours. In the end, I also used some Rustic Wilderness Distress Spray Stain. The Spray Stain does not oxidize like the Distress Oxide inks and it remains darker. I removed the Moon Mask and used the Moon stencil with Old paper Distress Oxide ink, to add some details to the moon. After I had my green layers ready, I made sure everything was dry, I carefully covered everything with clear Gesso and then I dried the canvas again. Then, I added a little bit of black colour on the top left and bottom right corners of the project. I used the Dylusions Black Marbel spray, just sprayed it directly on the canvas, prayed it with very little water, dubbed of the excess and dried. I wanted to add purple on those dark corners. I used the Dusty Concord Distress Oxide ink and the Fortune Teller Distress Mica Stain Spray, I sprayed them both on my acetate sheet, I mixed them and then I picked them up with my brayer and applied them on the canvas. To add some more visual texture on my project, I did some stamping with some of the stamps from the Tim Holtz „Mr. Rabbit“ stamp set and VersaFine Onyx Black ink. I splattered the canvas with Wilted Violet Distress Spritz, I dried it, and my background was done!
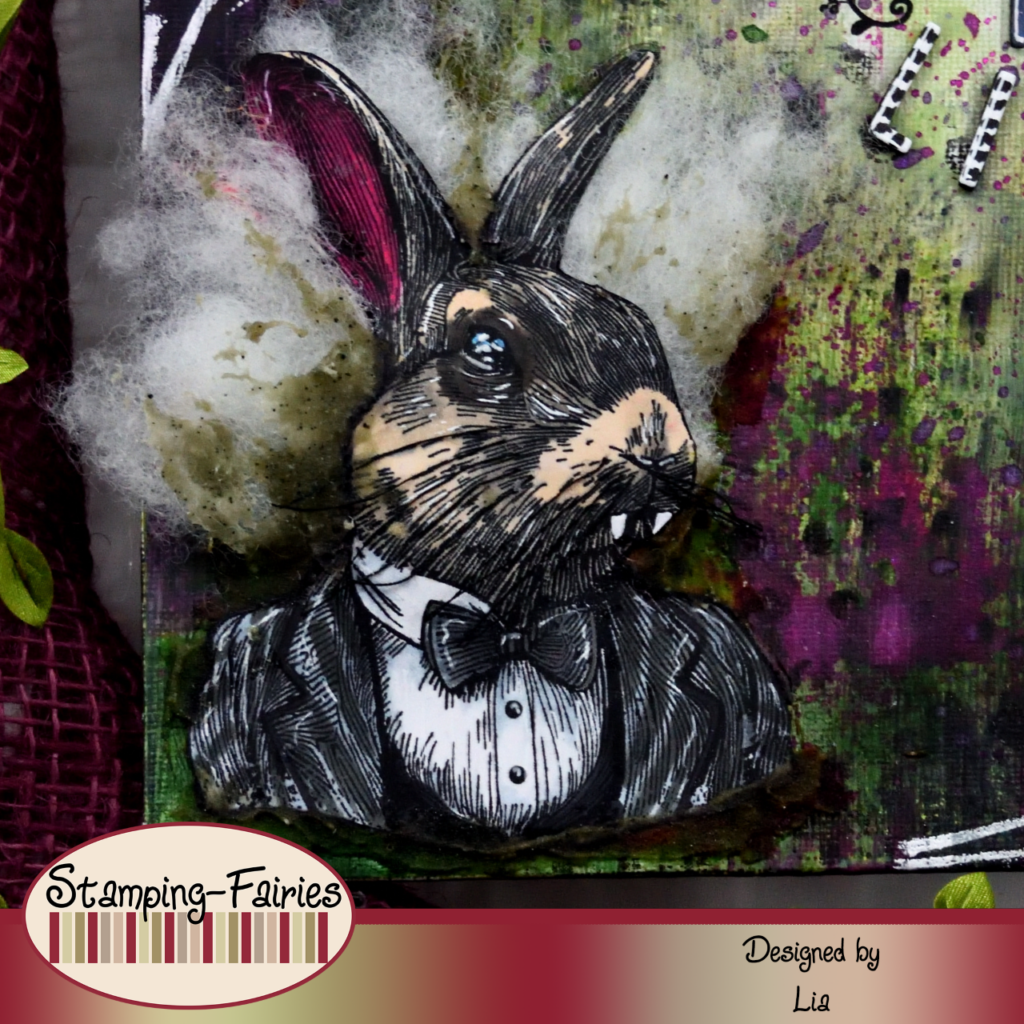
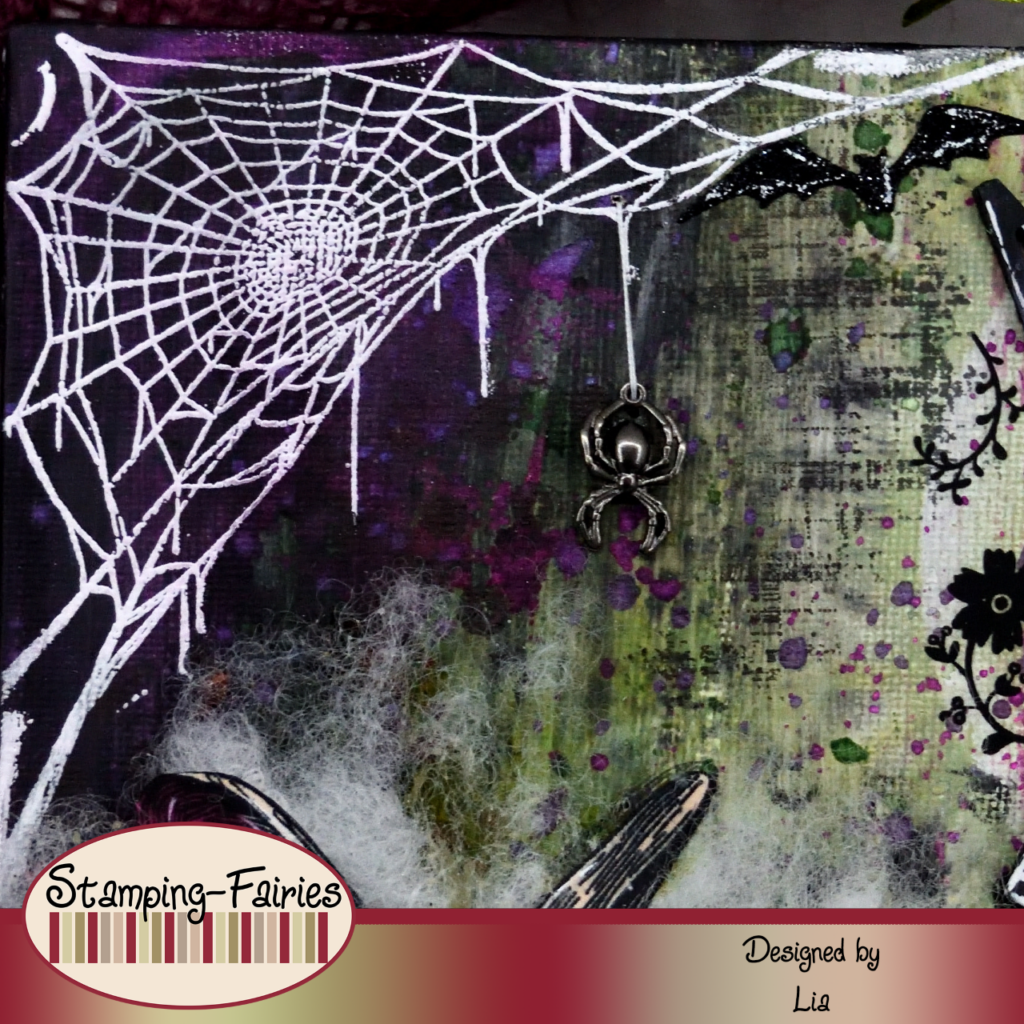
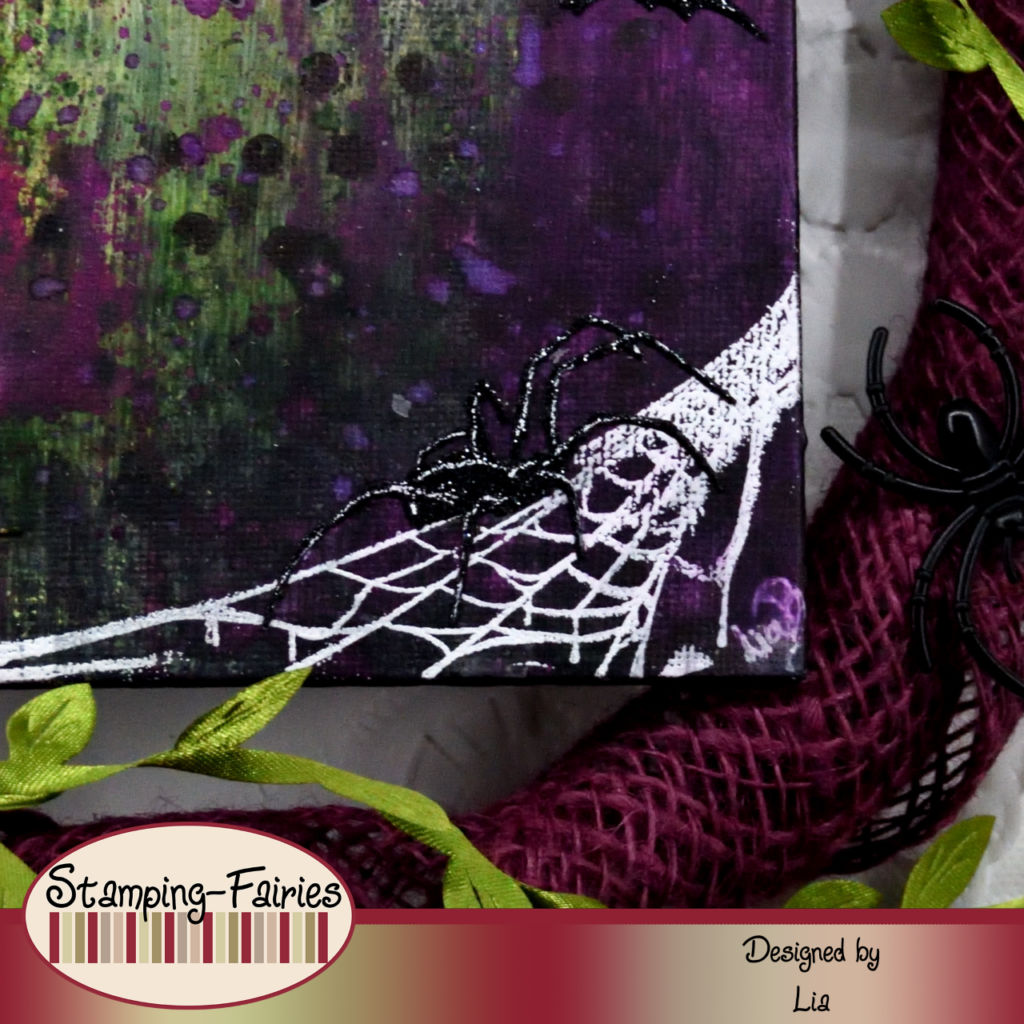
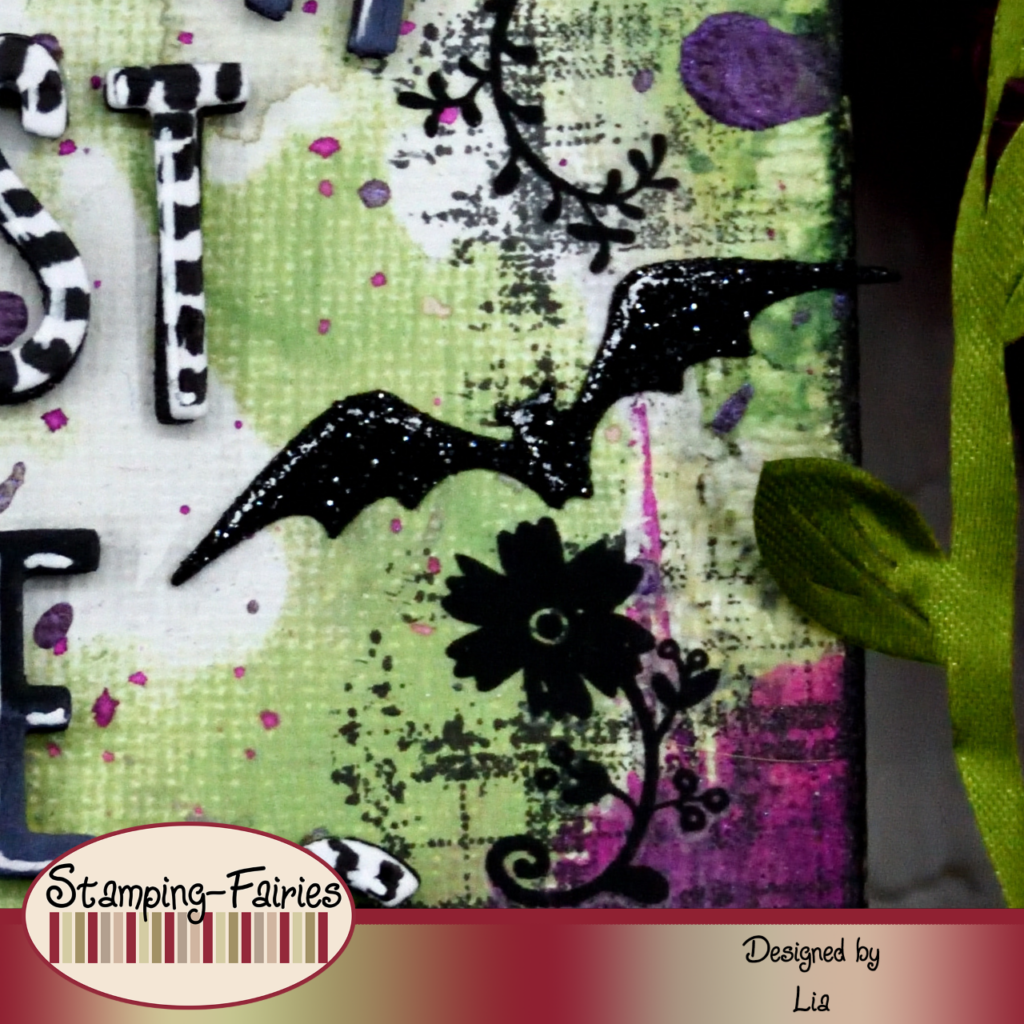
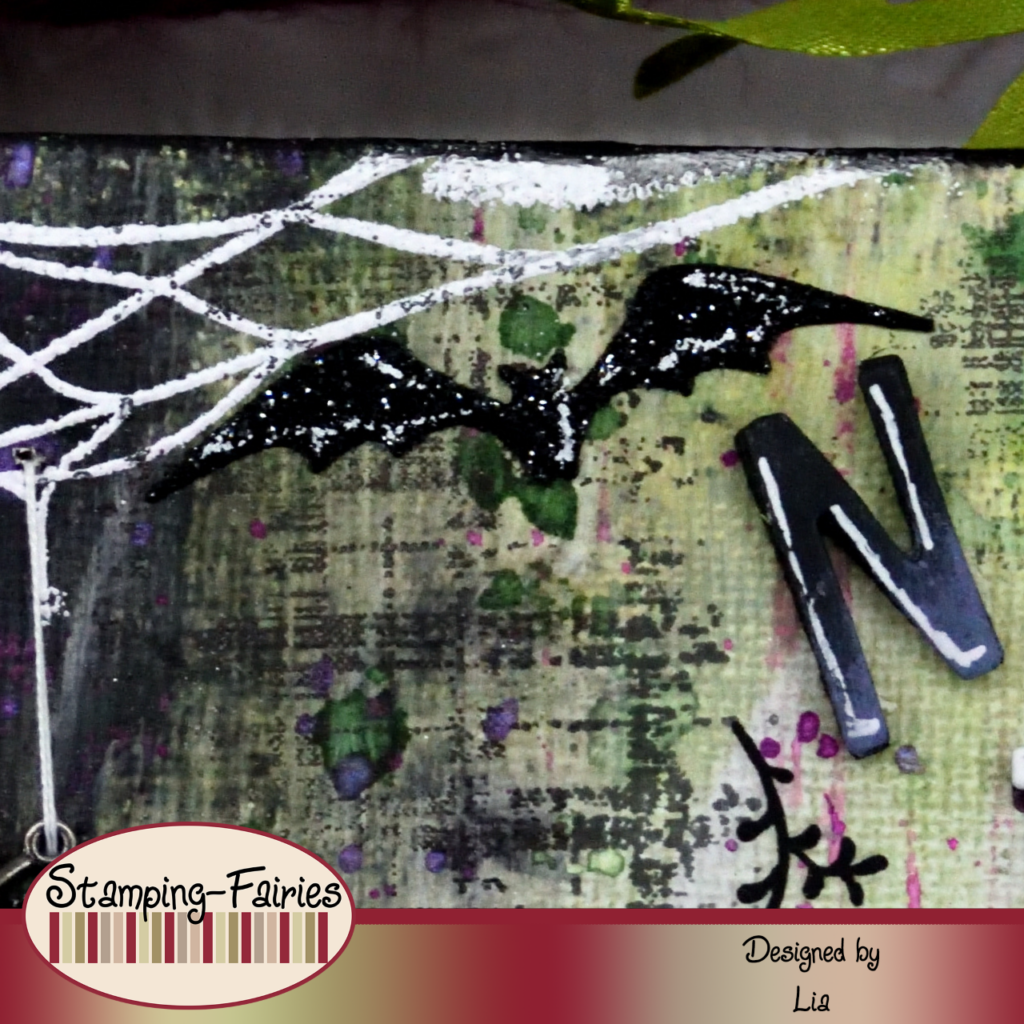
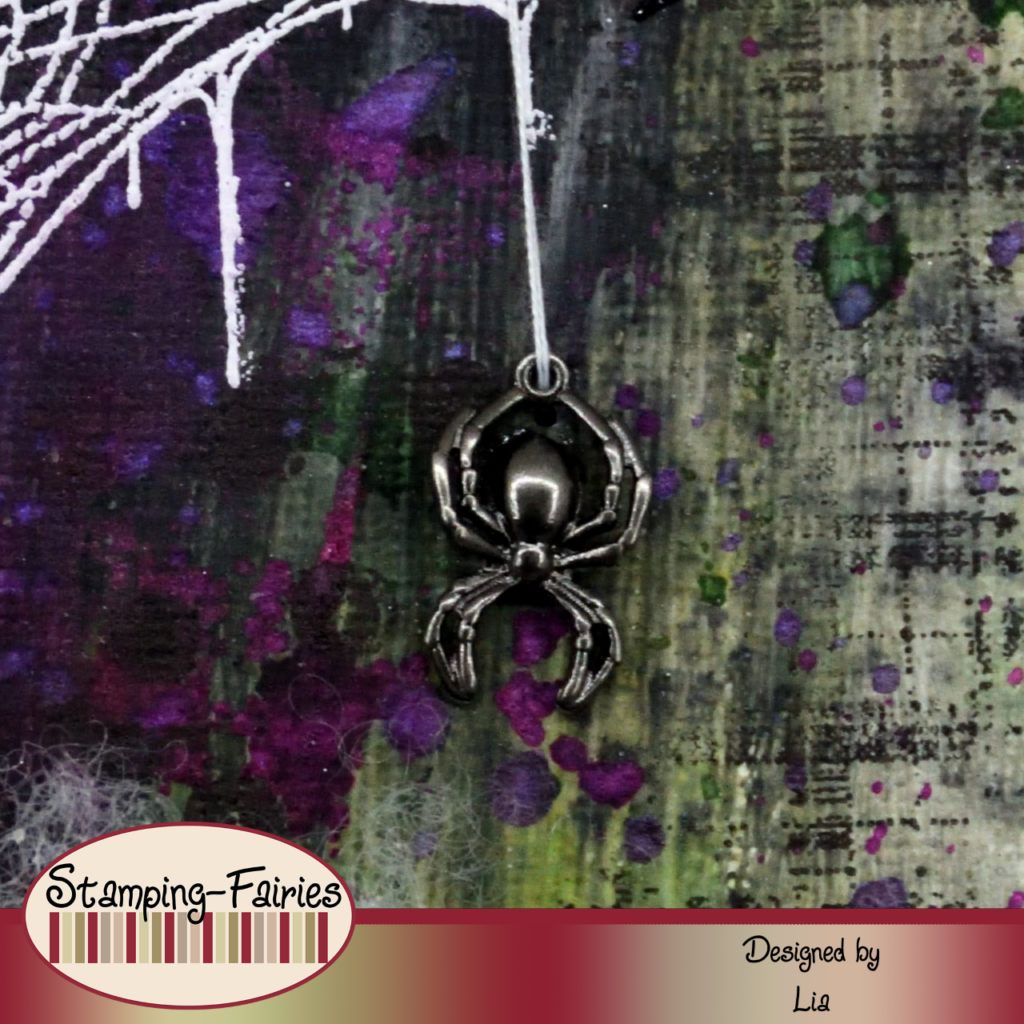
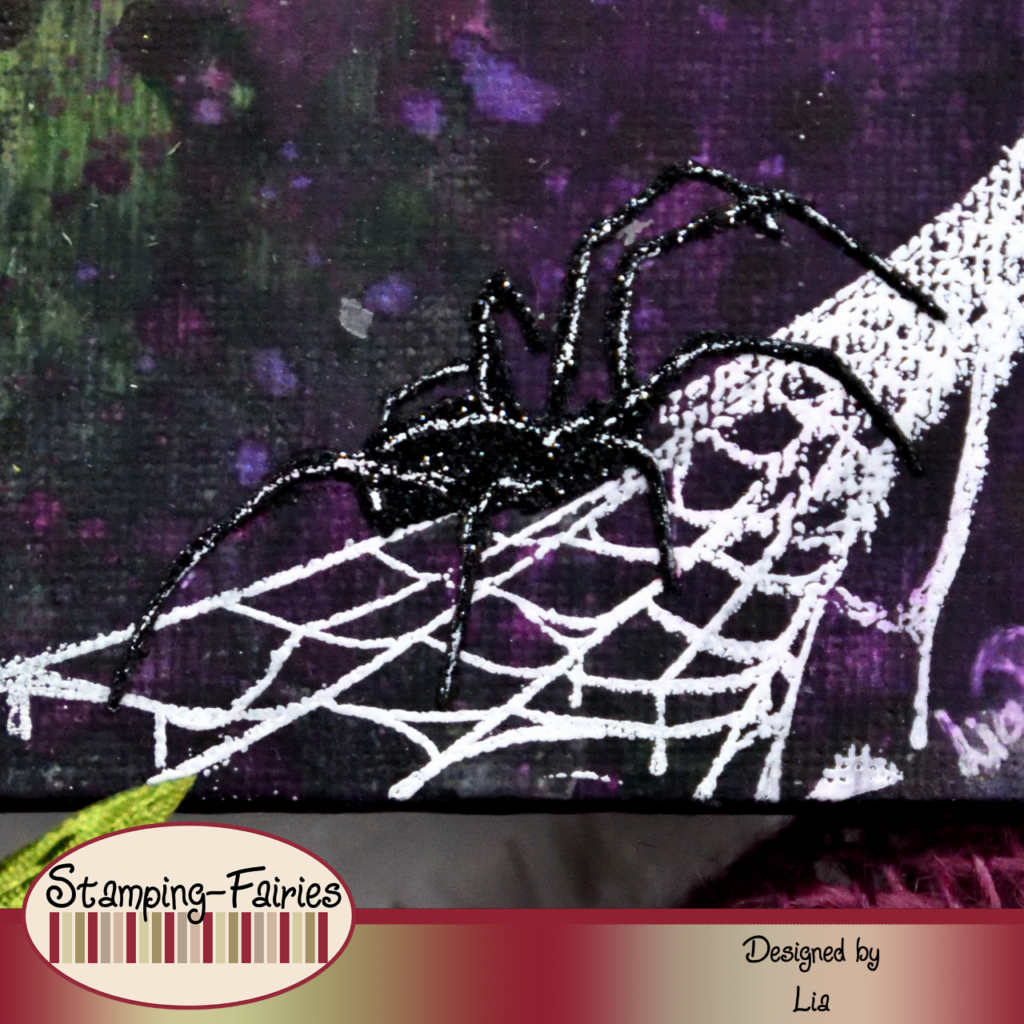
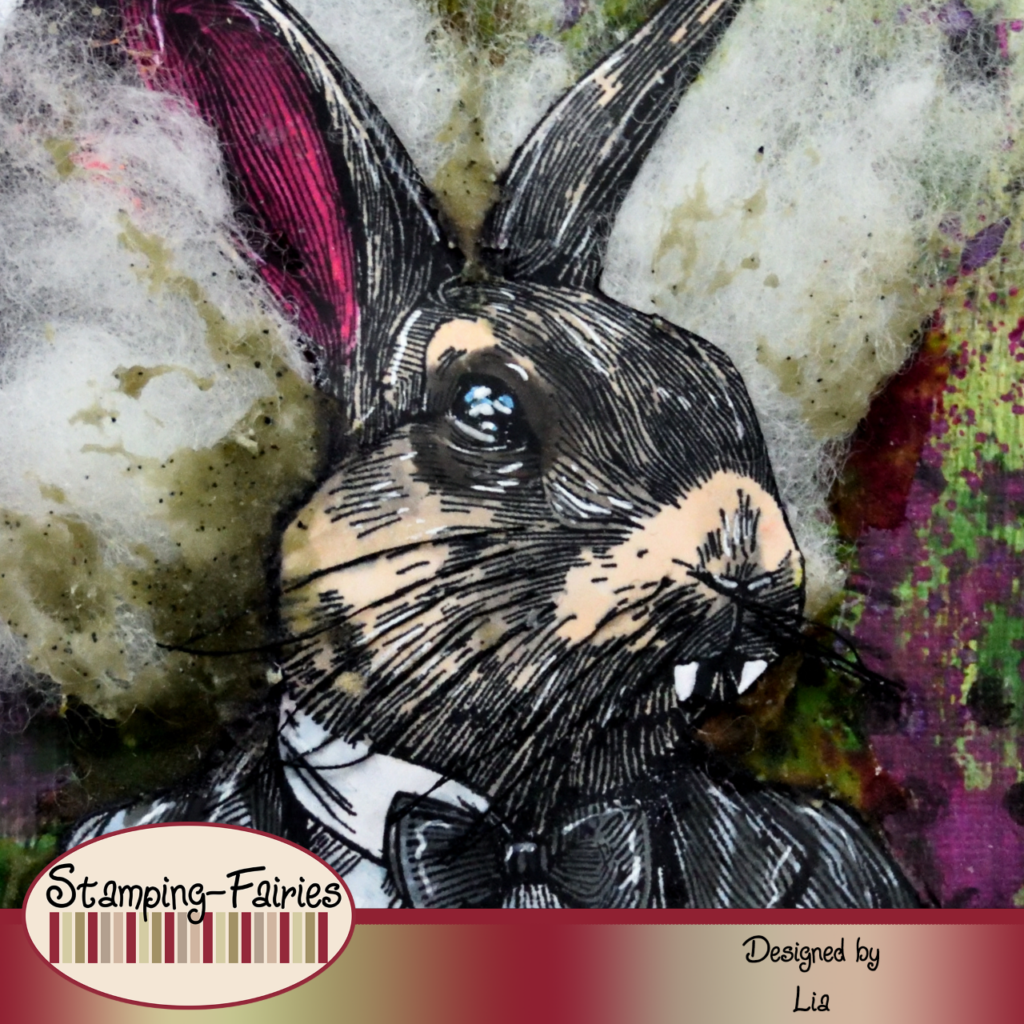
Time to prepare my images. So, first of all I needed some spider webs on the project. I used the spider web stamps from the Tim Holtz „Unraveled“ stamp set with VersaMark ink and WOW! Opaque Bright White embossing powder and I heat embossed the webs on the purple areas of the canvas. I used one little spider from the Idea-Ology Adornments-Spiders+Branches pack and I sewed it on the upper webs with white thread. I used the Sizzix Vault Gothic Portraits Thinlits set to cut a spider out of glitter Cardstock, for the lower webs, and I also cut a few bats with the bat dies from the same set. My focal point is the big Mr. Rabbit Beetlejuice. I used the Rabbit from the Tim Holtz „Mr. Rabbit“ stamp set, I stamped him with Memento Tuxedo Black ink and coloured him with alcohol markers. I tried to colour his suit the way Beetlejuice’s suit is. I cut him out and I glued some pillow stuffing behind his head, to create Beetlejuice’s crazy hair. I placed him on the canvas and then I added some Ranger Distress Crypt Grit Paste around him, just to give that impression of dirtiness. I also added some black thread on his whiskers.
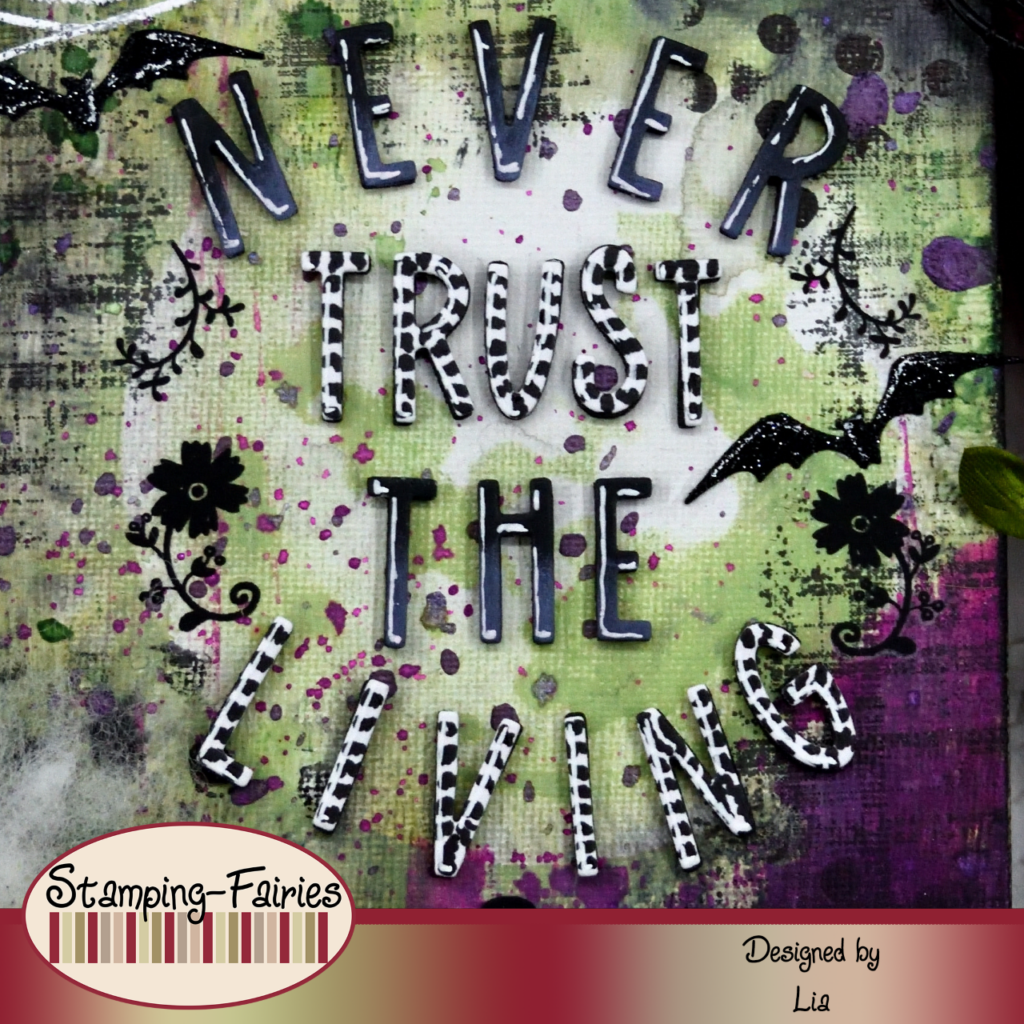
My sentiment is cut with the alphabet dies from the Sizzix Santa Greetings, Colorize Thinlits set. I cut part of it out of black cardstock and part of it out of white cardstock. I also cut the sentiment a second time, out of black fan foam and I stacked the fan foam and the cardstock letters, to add some dimension. I used some Dusty Concord Distress Oxide ink on the lower parts of the black letters and I gave black stripes to the white letters. The sentiment says: „Never trust the Living“ which is a phrase from the Beetlejuice movie. Also, it is a very good advice!!! (LOL) I embellished the sentiment by adding some images from the Idea-Ology Remnant Rubs all around it. Then I attached the little glitter Cardstock bats around the sentiment.
And that was the project for today! I had a lot of fun, trying to turn a rabbit into Beetlejuice! I hope it will not come back to bite me… Halloween projects can be so entertaining. I really hope you like today’s project! I hope you got inspired! We will see each other again next Monday! Until then, stay creative and have fun!
*Deutsche Version*
Hallo zusammen! Willkommen zurück zu einem weiteren Mixed-Media Projekt. Für das heutige Projekt habe ich etwas Lustiges vorbereitet, basierend auf einem Film, den ich wirklich mag. Ich habe bei diesem Projekt Bezüge zu Beetlejuice! Beginnen wir mit den Materialien, die ich verwendet habe:
Materialien (wenn etwas nicht auf Lager ist, bitte einfach auf „Produkterinnerung“ klicken)
- Prima Marketing – Art Basics – Gesso Clear
- Tim Holtz Layering Mask – Moon Mask
- Ranger – Tim Holtz Distress Oxide Pads
- Distress Spray Stain – Rustic Wilderness
- Dylusions Ink Spray – Black Marble
- Distress Oxide Spray – Dusty Concord
- Distress Mica Stain – Fortune Teller
- Tim Holtz Stamp set -MR. Rabbit
- VersaFine Onyx Black
- Distress Spritz – Wilted Violet
- Tim Holtz Stamp set – Unraveled
- VersaMark Ink Pad
- WOW! Embossing powder – Opaque Bright White
- Tim Holtz – Idea-Ology Adornments Spiders + Branches
- Alcohol Markers
- Tim Holtz Distress Grit Paste – Crypt
- Sizzix Tim Holtz Thinlits -Vault Gothic Portraits
- Black Glitter Cardstock
- Sizzix Tim Holtz Thinlits – Santa Greetings, Colorize
- Cardstock
- Tim Holtz Remnant Rubs – Halloween
Ich habe dieses Projekt auf einer Leinwand aufgebaut, weil ich es an die Wand hängen wollte. Ich habe damit begonnen, die Leinwand mit einer dicken Schicht Gesso zu bedecken. Ich wollte einen großen Mond erschaffen und dafür habe ich die Moon Mask Layering Schablone verwendet. Ich habe den größeren Mond des Sets gewählt und den Maskenteil davon auf der oberen rechten Seite der Leinwand platziert. Dann habe ich der Leinwand Farbe hinzugefügt, indem ich die Reverse Ink Smooshing Technik verwendet habe. Ich habe die Tinte auf eine Acetatfolie aufgetragen, sie mit etwas Wasser besprüht, die Acetatfolie genommen und auf die Leinwand gedrückt. Ich habe mit Old Paper Distress Oxide Tinte für den Bereich um den Mond herum begonnen, und dann Mowed Lawn und Rustic Wilderness Distress Oxide Tinte verwendet, wobei ich darauf geachtet habe, mein Projekt zwischen den Farbschichten immer zu trocknen. Zum Schluss habe ich auch etwas Rustic Wilderness Distress Spray Stain verwendet. Der Spray Stain oxidiert nicht wie die Distress Oxide Tinten und bleibt dunkler. Ich habe die Mondmaske entfernt und die Mondschablone mit Old Paper Distress Oxide Tinte verwendet, um dem Mond einige Details hinzuzufügen. Nachdem ich meine grünen Schichten fertig hatte, habe ich sicher gestellt, dass alles trocken war, und alles sorgfältig mit klarem Gesso bedeckt und erneut die Leinwand getrocknet. Dann habe ich ein wenig schwarze Farbe in die obere linke und untere rechte Ecke des Projekts hinzugefugt. Ich habe das Dylusions Black Marbel Spray verwendet, es direkt auf die Leinwand gesprüht, es mit sehr wenig Wasser benebelt, den Überschuss abgetupft und sie trocknen lassen. Ich wollte Lila in diese dunklen Ecken hinzufügen. Ich habe die Dusty Concord Distress Oxide Tinte und das Fortune Teller Distress Mica Stain Spray verwendet, sie beide auf meine Acetatfolie gesprüht, sie gemischt und sie dann mit meiner Farbwalze aufgenommen und sie auf die Leinwand aufgetragen. Um meinem Projekt etwas mehr visuelle Textur zu verleihen, habe ich mit einigen Stempeln aus dem Tim Holtz „Mr. Rabbit“ Set und VersaFine Onyx Black Tinte gestempelt. Ich habe die Leinwand mit Wilted Violet Distress Spritz bespritzt, sie getrocknet und mein Hintergrund war fertig!
Zeit, meine Bilder vorzubereiten. Also, zuerst brauchte ich ein paar Spinnennetze für das Projekt. Ich habe die Spinnennetzstempel aus dem Stempelset „Unraveled“ von Tim Holtz mit VersaMark Tinte und WOW! Opaque Bright White Prägepulver verwendet und die Netze auf den violetten Flächen der Leinwand heißgeprägt. Ich habe eine kleine Spinne aus dem Idea-Ology Adornments-Spiders+Branches Paket verwendet und sie mit weißem Faden auf die oberen Netze genäht. Ich habe das Sizzix Vault Gothic Portraits Thinlits Set verwendet, um eine Spinne aus Glitzer Karton für die unteren Netze auszuschneiden, und ich habe auch ein paar Fledermäuse mit den Fledermaus Stanzen aus demselben Set ausgeschnitten. Mein Schwerpunkt ist der große Mr. Rabbit Beetlejuice. Ich habe den Hasen aus dem Stempelset „Mr. Rabbit“ von Tim Holtz verwendet, ihn mit Memento Tuxedo Black Tinte gestempelt und ihn mit Alkoholmarkern ausgemalt. Ich habe versucht, seinen Anzug so auszumalen, wie Beetlejuices Anzug ist. Ich habe ihn ausgeschnitten und etwas Kissenfüllung hinter seinen Kopf geklebt, um Beetlejuices verrückte Frisur zu kreieren. Ich habe ihn auf die Leinwand gelegt und dann etwas Ranger Distress Crypt Grit Paste um ihn herum aufgetragen, um diesen schmutzigen Eindruck zu erwecken. Ich habe auch etwas schwarzen Faden an seinen Schnurrhaaren angebracht.
Mein Spruch ist mit den Alphabet Stanzen aus dem Sizzix Santa Greetings, Colorize Thinlits Set ausgeschnitten. Einen Teil habe ich aus schwarzem Karton und einen Teil aus weißem Karton ausgeschnitten. Ich habe den Spruch auch ein zweites Mal aus schwarzem Fächerschaumstoff ausgeschnitten und den Fächerschaumstoff und die Kartonbuchstaben aufeinandergestapelt, um etwas mehr Dimension hinzuzufügen. Ich habe etwas Dusty Concord Distress Oxide Tinte auf die unteren Teile der schwarzen Buchstaben aufgetragen und den weißen Buchstaben schwarze Streifen gegeben. Der Spruch lautet: „Vertraue niemals den Lebenden“, ein Satz aus dem Film Beetlejuice. Außerdem ist es ein sehr guter Ratschlag!!! (LOL) Ich habe den Spruch verschönert, indem ich rundherum einige Bilder aus den Idea-Ology Remnant Rubs hinzugefügt habe. Dann habe ich auch die kleinen glitzernden Kartonfledermäuse rund um den Spruch angebracht.
Und das war das Projekt für heute! Ich hatte viel Spaß beim Versuch, ein Kaninchen in Beetlejuice zu verwandeln! Ich hoffe, es kommt nicht zurück, um mich zu beißen … Halloween Projekte können so unterhaltsam sein. Ich hoffe sehr, dass euch das Projekt gefällt! Ich hoffe, ihr habt euch inspirieren lassen! Wir sehen uns nächsten Montag wieder! Bis dahin bleibt kreativ und habt Spaß!


