Holly Jolly Christmas
*German version below | Deutsche Version unten*
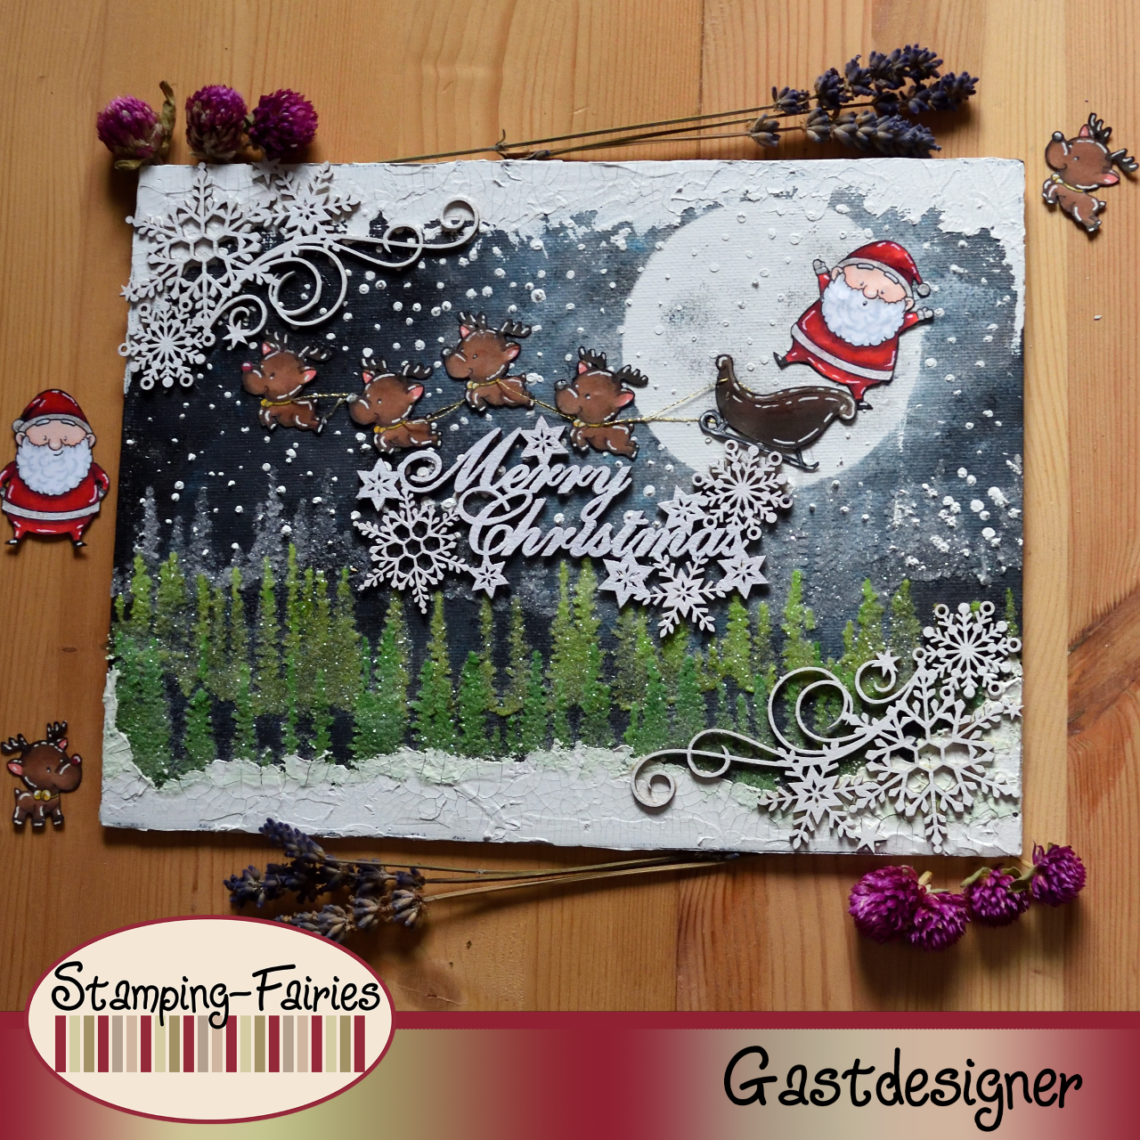
Hello everyone! I am Lia and I have somewhat of a different project to share with you today. I usually make Art Journal pages, but it was a little hard to build this project in a book. So, for today, my work is made on a canvas! Let’s start with the materials I used.
Materials
- Prima Marketing – Art Basics – Heavy Gesso White
- Ranger Dylusions Paint Flip Cap Bottle
- Ranger – Tim Holtz Distress Oxide Ink Pad
- Tim Holtz Distress Grit Paste – Snowfall
- Distress Stickles Dry Glitter – Clear Rock Candy
- Ranger Texture Paste Opaque Crackle
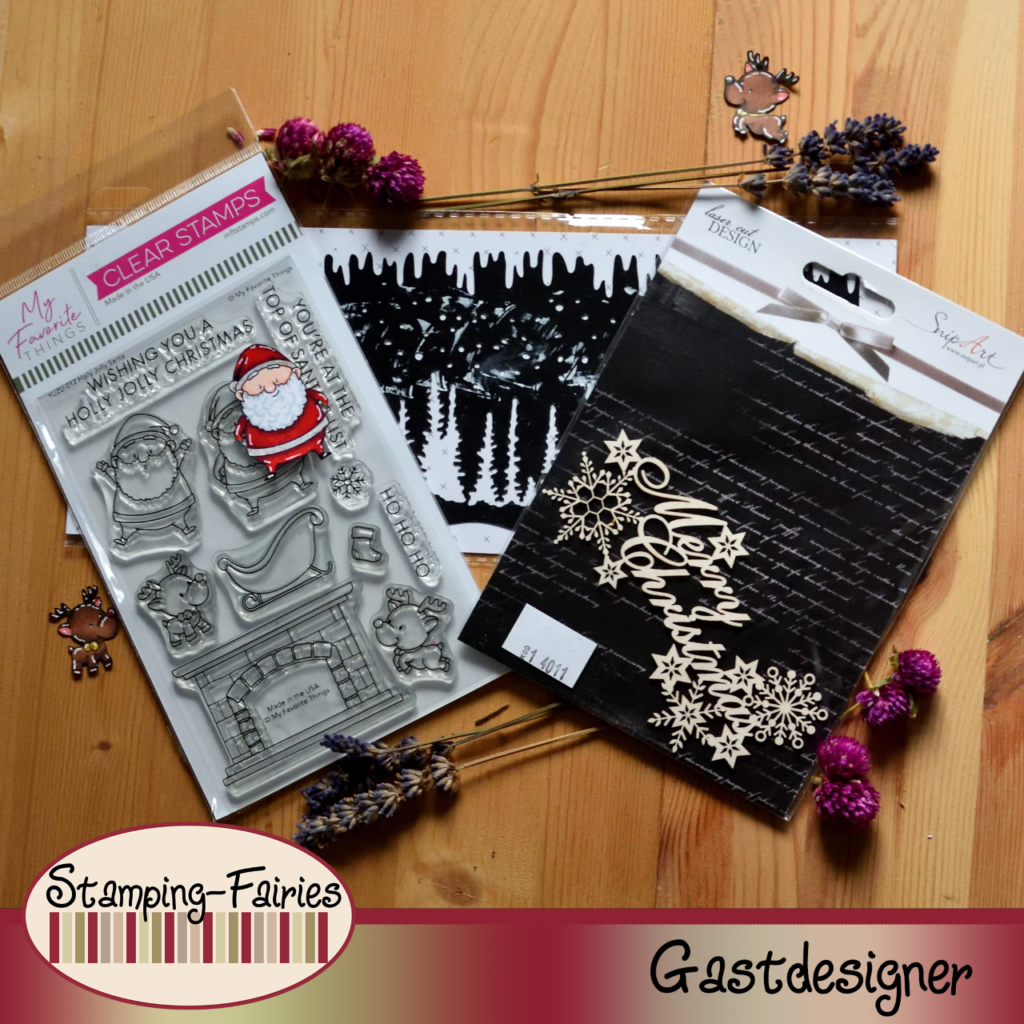
- SnipArt Chipboards Frosty Moments – Merry Christmas
- SnipArt Chipboards Frosty Moments – Decors with snowflakes
- MFT Holly Jolly Santa stamp set
- Memento Inkpad – Tuxedo Black
- Studio Light – Christmas Landscape stencil (this one unfortunately does not exist in the shop any more)
- A canvas or a piece of cardboard. Something to build your scene on.
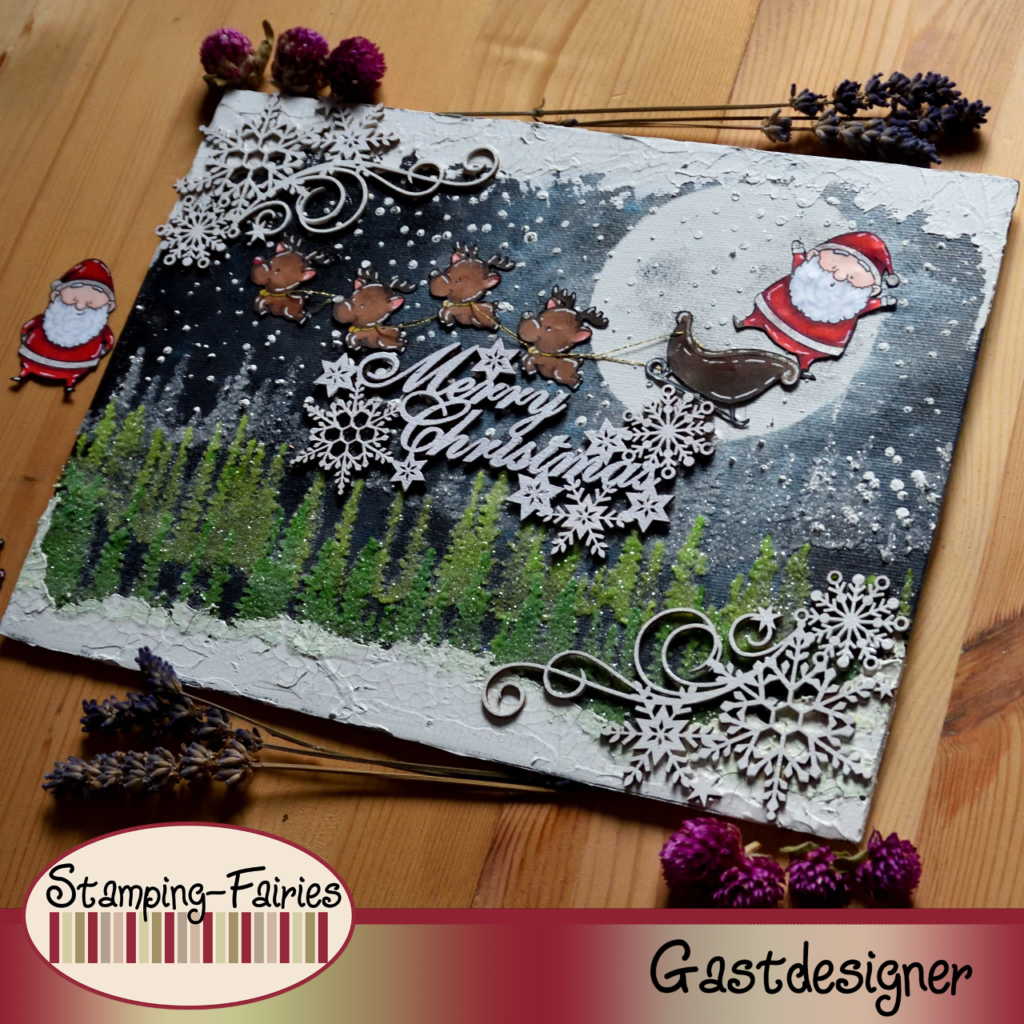
The first thing I had to do was to prepare my canvas. Canvases are usually pretreated but it doesn’t hurt to give them some extra love. I gave my canvas two coats of white gesso and left it to dry very well. For that big moon on my scene, I cut a mask out of sticky paper and applied on my canvas. Then I used Dylusions paint with a sponge to create my night sky. I started with White Linen, mixing it slightly with Black Marble, making it darker as I was moving further from the moon. In the darker areas I also mixed some London Blue in my night sky. The Dylusions paints dry really fast. By the time I was done, I could already continue with my next step!
It was time to create my tree line. This is where I used the Studio Light Christmas Landscape stencil, with the Distress Grit Paste – Snowfall. For the first line of trees I just used the paste as it is and then I dusted some Rock Candy glitter on top of it. Then I dabbed my Mowed Lawn Distress Oxide inkpad on my working surface and I mixed some Grit Paste with it. I used that paste to create my second tree line. I also dusted these trees with Rock Candy glitter. I used the same method to colour the Grit Paste for my third tree line, only this time I also mixed some Rustic Wilderness Distress Oxide ink with my previous colour, just to make it a little darker. I dusted this tree line with Rock Candy glitter as well. Those glittery tree lines made me very happy! I am really sorry this stencil does not exist in the shop any more, but there is a stamp set of the same line. You could use that with embossing powders, for example, in order to build a similar scene.
One thing I like about this stencil is that it contains a whole scene by itself. So, of course, it had the snow too! So, I used the stencil with Crackle Paste to create my falling snow. I also used a good portion of the Crackle Paste around the edges of my canvas.
At this point, my Chipboard pieces needed to be painted white. So, I used my White Linen Dylusions paint and a sponge brush to make them white. I attached my corner pieces on opposite corners and the big “Merry Christmas“ on the center of my canvas.
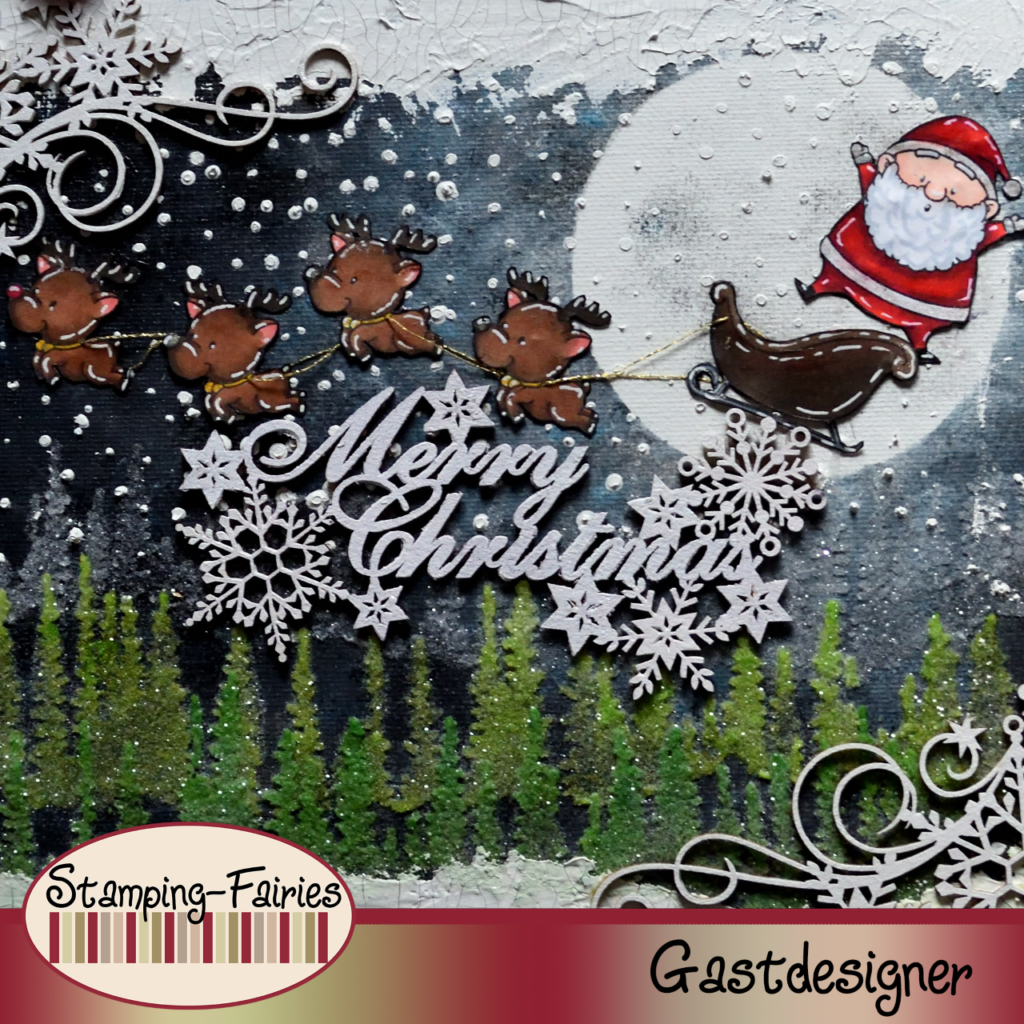
I took a look at my scene and, although it looked good, I had this feeling that there was something missing. So, I thought about creating a Santa sleigh. I used this lovely MFT stamp set to create my images. I would like to mention here that you can use your stamps for everything. Just because you are making an Art Journal page or a scrapbook page or a scene on a canvas, doesn’t mean that you can not use your stamps. You can create your images and use them just like you would use ephemera or stickers or cut out pieces from a paper pad. Your stamps are very versatile! Just use them any way you want! So, I stamp the images from my stamp set with Memento Tuxedo Black ink, which works well with alcohol markers, and I coloured them with an assortment of alcohol markers. I am sure this stamp set has coordinating dies, but I usually cut everything by hand. Sometimes it can be really difficult, but this is me! I used some gold thread to attach my reindeers together and to the sleigh and then I attached all of the images on my canvas.
I had this idea of the reindeers trying to avoid the letters. In the process, they make the sleigh tilt and the Santa falls out of it. I thought it would be a funny scene! I really like the expression of the Santa! He definitely plays his part, don’t you think?

And that was my project for today! Now I have to find a nice spot on the wall to hang it! That is the nice thing with canvases. They can really be fun to make but also they can go on the walls and decorate your room! I really hope you like this project! I hope you got inspired! This is my last project as a guest designer, but we might have something new cooking! Either way, I will see you again! Until then, stay creative and have fun!
*Deutsche Version*
Hallo zusammen! Ich bin Lia und habe heute ein etwas anderes Projekt mit euch zu teilen. Normalerweise erstelle ich Seiten für Kunstjournale, aber es war ein bisschen schwierig, dieses Projekt in einem Buch zusammenzufassen. Also, für heute ist meine Arbeit auf einer Leinwand gemacht! Beginnen wir mit den Materialien, die ich verwendet habe.
Materialien
- Prima Marketing – Art Basics – Heavy Gesso White
- Ranger Dylusions Paint Flip Cap Bottle
- Ranger – Tim Holtz Distress Oxide Ink Pad
- Tim Holtz Distress Grit Paste – Snowfall
- Distress Stickles Dry Glitter – Clear Rock Candy
- Ranger Texture Paste Opaque Crackle
- SnipArt Chipboards Frosty Moments – Merry Christmas
- SnipArt Chipboards Frosty Moments – Decors with snowflakes
- MFT Holly Jolly Santa stamp set
- Memento Inkpad – Tuxedo Black
- Studio Light – Christmas Landscape Schablone (diese gibt es leider nicht mehr im Shop)
- Eine Leinwand oder ein Stück Pappe. Etwas, auf dem ihr eure Szene aufbauen könnt.
Das Erste, was ich tun musste, war, meine Leinwand vorzubereiten. Leinwände sind normalerweise vorbehandelt, aber es schadet nicht, ihnen etwas mehr Liebe zu schenken. Ich habe meiner Leinwand zwei Schichten weißen Gesso gegeben und sie sehr gut trocknen gelassen. Für diesen großen Mond in meiner Szene habe ich eine Maske aus Klebepapier ausgeschnitten und auf meine Leinwand aufgetragen. Dann habe ich Dylusions Farbe mit einem Schwamm verwendet, um meinen Nachthimmel zu erschaffen. Ich habe mit White Linen begonnen, es leicht mit Black Marble gemischt und es dunkler gemacht, je weiter ich mich vom Mond entfernte. In den dunkleren Bereichen habe ich auch etwas London Blue in meinen Nachthimmel gemischt. Die Dylusions-Farben trocknen sehr schnell. Als ich fertig war, konnte ich bereits mit meinem nächsten Schritt fortfahren!
Es war Zeit, meine Baumgrenze zu erstellen. Hier habe ich die Studio Light Christmas Landscape Schablone mit der Distress Grit Paste – Snowfall verwendet. Für die erste Baumreihe habe ich einfach die Paste so wie sie ist verwendet und dann etwas Rock Candy Glitzer darüber gestäubt. Dann habe ich mein Mowed Lawn Distress Oxide Stempelkissen auf meine Arbeitsfläche getupft und etwas Grit Paste damit gemischt. Ich habe diese Paste verwendet, um meine zweite Baumlinie zu erstellen. Ich habe diese Bäume auch mit Rock Candy Glitter bestäubt. Ich habe die gleiche Methode verwendet, um die Grit Paste für meine dritte Baumlinie zu färben, nur habe ich dieses Mal auch etwas Rustic Wilderness Distress Oxide-Tinte mit meiner vorherigen Farbe gemischt, nur um sie ein wenig dunkler zu machen. Ich habe diese Baumgrenze auch mit Rock Candy Glitter bestäubt. Diese glitzernden Baumreihen haben mich sehr glücklich gemacht! Es tut mir wirklich leid, dass es diese Schablone nicht mehr im Shop gibt, aber es gibt ein Stempelset der gleichen Linie. Das könntet ihr zum Beispiel mit Embossing-Pulvern verwenden, um eine ähnliche Szene zu bauen.
Eine Sache, die ich an dieser Schablone mag, ist, dass sie eine ganze Szene in sich enthält. Schnee war natürlich auch dabei! Also habe ich die Schablone mit Crackle Paste verwendet, um fallenden Schnee zu schaffen. Ich habe auch eine gute Portion Crackle Paste entlang den Rändern meiner Leinwand verwendet.
An dieser Stelle mussten meine Spanplattenstücke weiß gestrichen werden. Also habe ich meine White Linen Dylusions-Farbe und einen Schwammpinsel verwendet, um sie weiß zu machen. Ich habe meine Eckstücke an gegenüberliegenden Ecken und das große „Merry Christmas“ in der Mitte meiner Leinwand befestigt.
Ich habe mir meine Szene angesehen und obwohl sie gut aussah, hatte ich das Gefühl, dass etwas fehlte. Also dachte ich darüber nach, einen Weihnachtsschlitten zu bauen. Ich habe dieses schöne MFT-Stempelset verwendet, um meine Bilder zu erstellen. Ich möchte hier erwähnen, dass ihr eure Stempel für alles verwenden könnt. Nur weil ihr eine Seite für ein Kunstjournal oder ein Sammelalbum oder eine Szene auf einer Leinwand erstellt, heißt das nicht, dass ihr eure Stempel nicht verwenden könnt. Ihr könnt eure Bilder erstellen und so verwenden wie Ephemera oder Aufkleber oder ausgeschnittene Stücke aus einem Papierblock. Eure Stempel sind sehr vielseitig! Verwendet sie einfach so wie ihr wollt! Also habe ich die Bilder aus meinem Stempelset mit der Memento Tuxedo Black-Tinte gestempelt, die gut mit Alkoholmarkern funktioniert, und ich habe sie mit einer Auswahl an Alkoholmarkern coloriert. Ich bin mir sicher, dass dieses Stempelset passende Stanzen hat, aber normalerweise stanze ich alles von Hand. Manchmal kann es wirklich schwierig sein, aber so bin ich! Ich habe etwas Goldfaden verwendet, um meine Rentiere aneinander und am Schlitten zu befestigen, und dann habe ich alle Bilder auf meiner Leinwand befestigt.
Ich hatte diese Vorstellung von Rentieren, die versuchen den Buchstaben auszuweichen. Dabei bringen sie den Schlitten zum Kippen und der Weihnachtsmann fällt raus. Ich habe gedacht, dass es eine lustige Szene wäre! Ich mag den Gesichtsausdruck des Weihnachtsmanns! Er spielt definitiv seine Rolle, findet ihr nicht?
Und das war mein Projekt für heute! Jetzt muss ich einen schönen Platz an der Wand finden, um es aufzuhängen! Das ist das Schöne an Leinwänden. Es kann wirklich Spaß machen, sie zu gestalten, und sie können auch an die Wände gehen und euer Zimmer dekorieren! Ich hoffe sehr, dass euch dieses Projekt gefällt! Ich hoffe, ihr habt euch inspirieren lassen! Dies ist mein letztes Projekt als Gastdesignerin, aber vielleicht haben wir etwas Neues am Kochen! So oder so, wir sehen uns wieder! Bis dahin bleibt kreativ und habt Spaß!


Das könnte dich auch interessieren
Ein kleines gewachstes Dankeschön

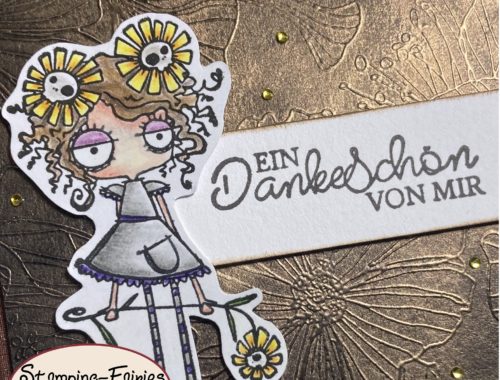
Tulip Girl